Installation, Desk-top installation – PYLE Audio View Series PLVWR5600 User Manual
Page 2
2
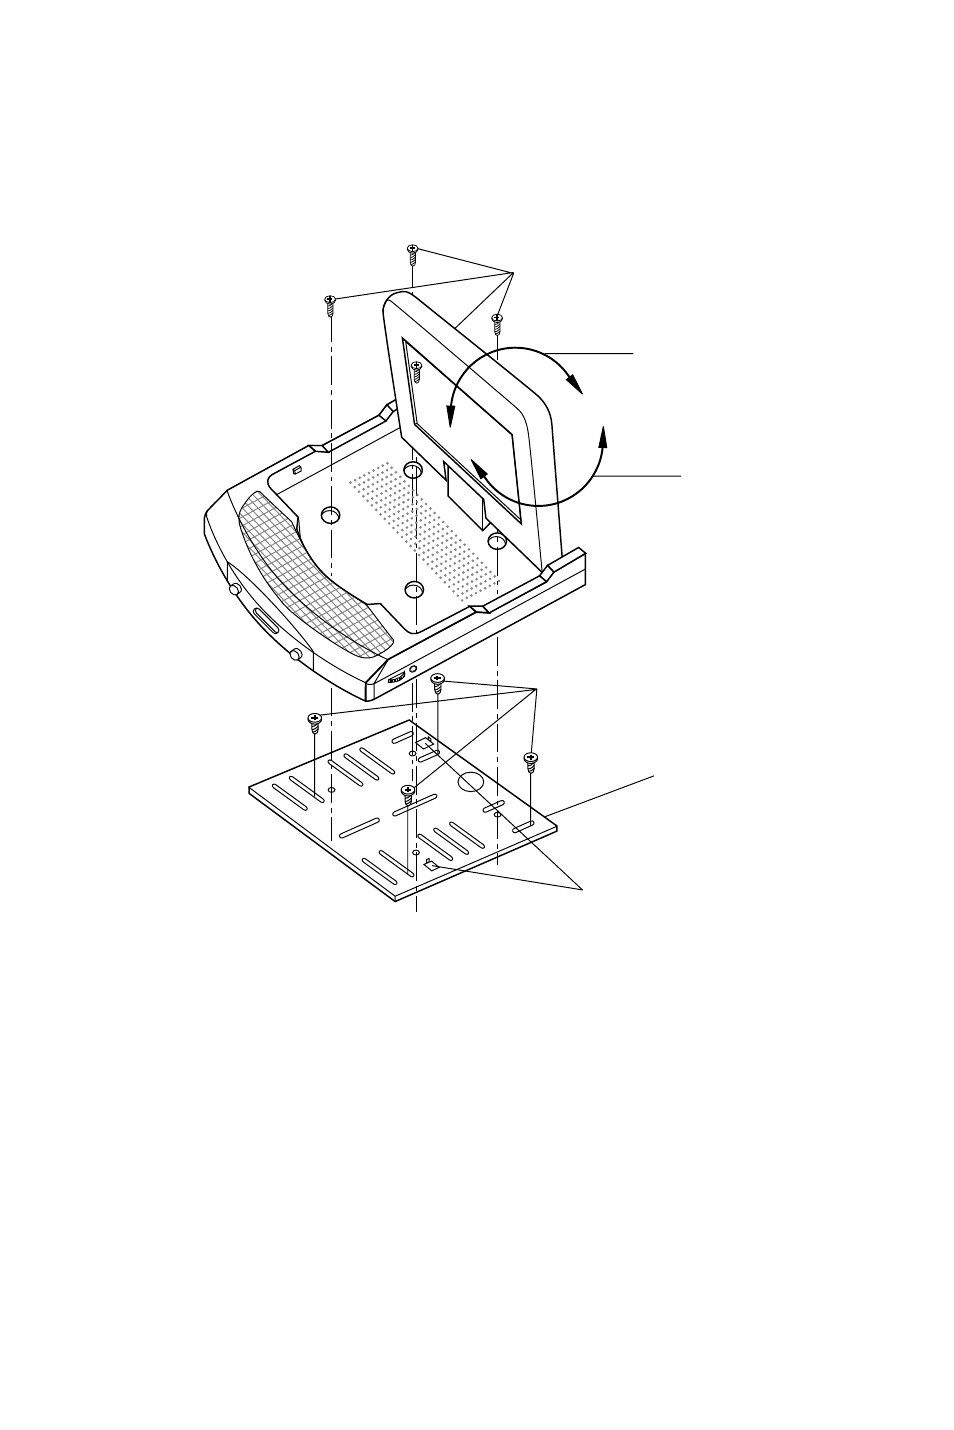
INSTALLATION
Desk-top Installation
1. Determine the mounting location and drill four mounting holes.
2. Attach the bracket to the holes with the tapping screws (M4x10).
3. Let the two levers aim at the fixing holes on the bottom of the base to fix the display
unit.
4. Attach the TV unit to the preferred location with the mounting bolts (M3x6).
5. For the convenience of fixing the unit, you can turn the display left or right to show
the holes on the base.
(See the arrowhead symbol named 1).
6. When the installation has completed, you can turn the display upward or downward,
left or right to adjust the viewing angle.
(See the arrowhead symbol named 2 and 1).
Fig. 1
Mounting Bolts (M3x6)
2
Tapping Screw (M4x10)
Bracket
Levers
1
See also other documents in the category PYLE Audio Car speakers:
- Mobile Audio System PLMR18 (14 pages)
- PIFMDK6 (2 pages)
- PLCD12MRKT (16 pages)
- PLD182 (21 pages)
- PLCD94M (12 pages)
- PLHR58 (2 pages)
- PYLE Chopper Series PLA1200 (26 pages)
- Mobile Video System PLD41MUT (26 pages)
- PiFM5 (1 page)
- PLCD42 (4 pages)
- View Series PLVSR7IR (5 pages)
- PLCD24 (12 pages)
- PLCD21 (11 pages)
- PLD144 (19 pages)
- PLD184V (21 pages)
- PLFMTR9BT (8 pages)
- View Series PLVSMN6 (3 pages)
- PLDVD140 (28 pages)
- PLCD44 (4 pages)
- PLCDCS330MP (16 pages)
- View Series PLVW1345R (7 pages)
- PLDVD65IN (33 pages)
- PLCD15MR (14 pages)
- PLCD46 (6 pages)
- AT-3040 (2 pages)
- Mobile Audio System PLDTF5M (16 pages)
- PLMRKT12 (14 pages)
- PiFM7 (2 pages)
- View Series PLVRL6400 (8 pages)
- PLCDUSMP74 (16 pages)
- PLD193T (24 pages)
- PLD53MUT (24 pages)
- PYLE Hydra Series PLCD11MRKT (16 pages)
- PLCD80M (12 pages)
- PLCD38 (4 pages)
- PLCDCS100 (6 pages)
- PLUS PLCD25 (4 pages)
- View Series PLVSMN56 (4 pages)
- PLVW1682 (4 pages)
- PIFMPK9 (1 page)
- View Series PLVSMN7 (3 pages)
- PYLE Hydra Series PLMR19W (14 pages)