Installa tion – Legacy Car Audio LCD17A User Manual
Page 2
Page 1
Page 10
Thank
you for purchasing
this car audio product.
Please read this manual carefully before operating this car audio product.
Please keep
this manual for future use. It will be helpful
to you
if you
are encounter any
operational problem.
W
A
RNING!
T
o
reduce the risk
of fire
or electric shock, do not use the unit
in the
rain or moisture
environment.
T
o
prevent direct exposure to laser beam, do not try open
the enclosure.
Vi
sible and
invisible laser radiation when
open and
interlocks
defeated.
T
o
protect our environment,
do
not dispose of electrical equipment in the domestic waste.
Please return any electrical equipment that you will no longer use to the collection points
provided
for
their disposal.
Th
is helps avoid the potential ef
fects of incorrect disposal on the environment and human
health. T
his will contribute to the recycling and other forms of reutilization of electrical and
electronic equipment.
Information concerning where the equipment can be disposed of can
be obtained
from your local authority
.
Selecting fine audio equipment is only the start of your musical enjoyment.
Now it is time to consider how to maximize the enjoyment you will get from
knowing how to work your new car stereo receiver
.
We
hope
you enjoy using this product and encourage
you to always listen at
a moderate, safe sound level to avoid any
possible hearing damage
or loss.
If you
listen to excessively loud
sound
over time, your hearing can
adapt to
higher volumes
and what sounds
"normal" to you may
be
quite harmful
and
can cause you to have
permanent hearing loss. So please practice "safe sound"
and always listen at moderate sound levels only
.
Start with
your volume control
at the
lowest setting, and
slowly increase
the level
until you can
hear it comfortably and
clearly
, free from distortion.
Once
you have
established
this comfortable sound level, leave it there.
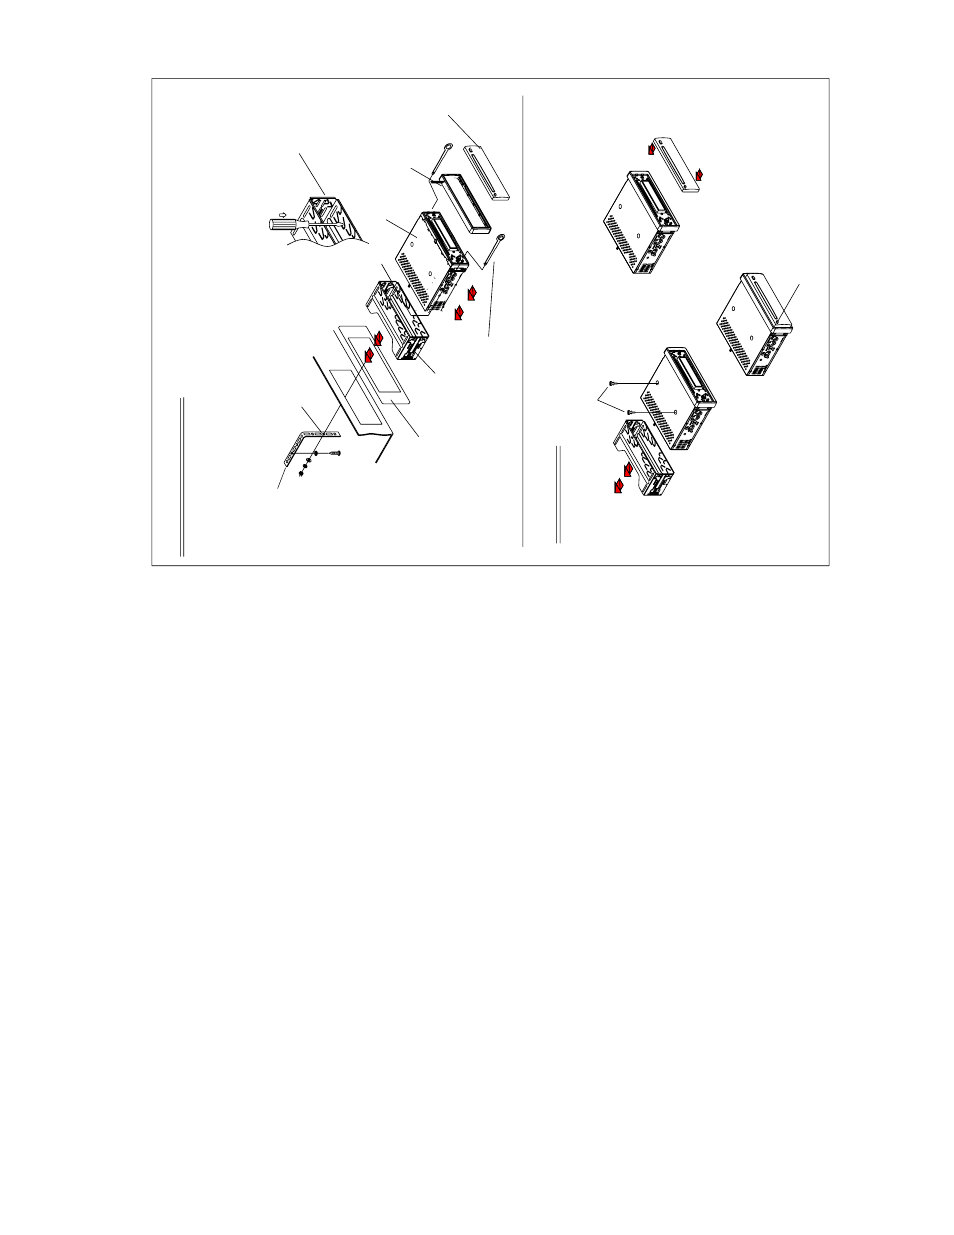
Preface
INSTALLA
TION METHOD
T
his is an
anti-theft
installation method.
T
h
e
m
ain unit
wears a META
L M
O
UNTING SLEEVE.
Please
connect the wiring, eg, the
P
ower supply, th
e Speakers and
the Ant
enna
according to the requirements of this Instruction Manual, then
install the
metal mounting sleeve into the car as per
the diagram illustrated
below.
METAL SUPPOR
T STRAP
To rais
e the anti-skip capability of the unit,
please ensure the metal support strap is
connected firmly to the car chassis.
Bend the tabs on the mounting
sleeve against the dashboard
with a screwdriver.
To rem
ove
the CD player out of the mounting sleeve,
insert the two supplied keys into the left and right side
slots of the chassis at the same time.
Then pull the chassis out of the mounting sleeve
as
shown in the illustration.
META
L MO
UNTING SLEEVE
DASHBOARD
FRONT PANEL
PLASTIC TRIM RING
UNIT CHASSIS
Before installing and
operating
the CD player,
remove the metal
mounting sleeve illustrated
by the
arrows.
Remove the two screws
that protect
the CD player during
transportation
before operating the player
.
To remove
the front control panel
from
the unit chassis, press
the REL button.
NOTE
INSTALLA
TION
To attach the removable faceplate, insert the right
side of the faceplate into the right of the CD player
chassis first. Then push the left side of the face-
plate into the chassis until you hear it
click
.