Installation, Start using, Software installation guide – Lumens Technology DC-A11 User Manual
Page 2: Start wireless network connection, 1 auto connection, 2 change the ssid
SContinued from the previous page
Charge the unit for 3 hours before the first use.
Switch power to [ON]. (Note: When the unit is fully charged,
indicator lights blue.)
To start connection, please follow the steps of
Section 5.1 Auto connection
.
Modify SSID before the first use. Please follow the steps of
5.2 Change the SSID
for
modification.
Double click on [Ladibug]
icon to activate Ladibug™ Software.
Move the mouse to [Ladibug]
icon, and the main function menu will be displayed.
Place an object to be displayed under the camera.
Press [Preview]
to display the setting screen of POWER Frequency, and
follow the screen instructions. A live image is displayed when the setting is
finished.
(
This setting is required for the first use only.)
Press [AUTO TUNE]
button to optimize the image.
For more information on the operation of DC120, please refer to
DC120 User Manual
.
For more information on the setting of DC-A11, please refer to
DC-A11 User Manual
.
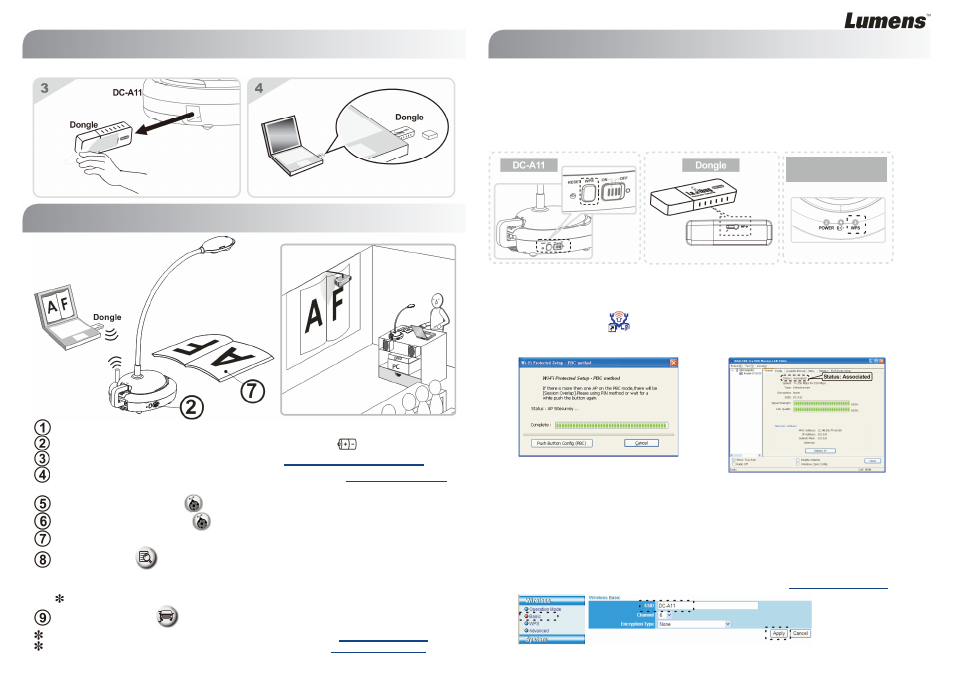
5.1 Auto connection
1. Press the WPS button of DC-A11, as shown in Fig. 1.
2. Within 30 seconds, press and hold the WPS button of Dongle for about 5 seconds, as
shown in Fig. 2.
[Note] The WPS indicator of DC-A11 will now flash red, and then light blue after the
connection is made. (Refer to Fig. 3)
SFig. 1
SFig. 2
SFig. 3
3. The connection is started when the screen like Fig. 4 displays. The connection will
complete when the window closes.
4. Double click the icon
of Wireless LAN Utility. (A screen indicating successful
connection is as shown in Fig. 5)
XFig. 4
XFig. 5
5.2 Change the SSID
1. Open the Internet Explorer webpage browser, and enter [192.168.2.1] (default) in the
address bar.
2. Enter the Login Name [Admin].
3. Enter the default password [Admin] and click [Login].
4. Enter the [Basic] page (Please refer to Fig. 6).
5. Enter new [SSID], and click [Apply] to apply the changes.
6. Please make a connection again according to the steps of
5.1 Auto connection
.
XFig. 6
3. Installation
Computer
Computer
5. Start Wireless Network Connection
WPS indicator on the
DC-A11
4. Start Using
Computer
Projector
2. Software Installation Guide