Kawasaki 840457 User Manual
Page 8
4. After approximately one hour of charging, the red indicator light should go
“
“O
OF
FF
F”
” and the green light should come “
“O
ON
N”
”. The green light indicates that the
battery is fully charged.
5. When fully charged, reattach battery pack onto Cordless Waxer/Polisher, making
certain latches fasten securely. Cordless Waxer/Polisher will not operate properly
if the battery pack is not seated properly.
O
OP
PE
ER
RA
AT
TIIN
NG
G T
TH
HE
E W
WA
AX
XE
ER
R//P
PO
OL
LIIS
SH
HE
ER
R
Be aware that this tool is always in an operating condition
because it does not have to be plugged into an electrical outlet. Always turn the
switch “
“O
OF
FF
F”
” and remove the battery pack before changing bonnets or
servicing.
B
BE
EF
FO
OR
RE
E U
US
SE
E::
• Make sure the car is
clean. Wash thoroughly
to remove all dirt and
road film. Waxing a dirty
car will scratch the car’s
finish.
• Remove the battery
pack to prevent acciden-
tal starting.
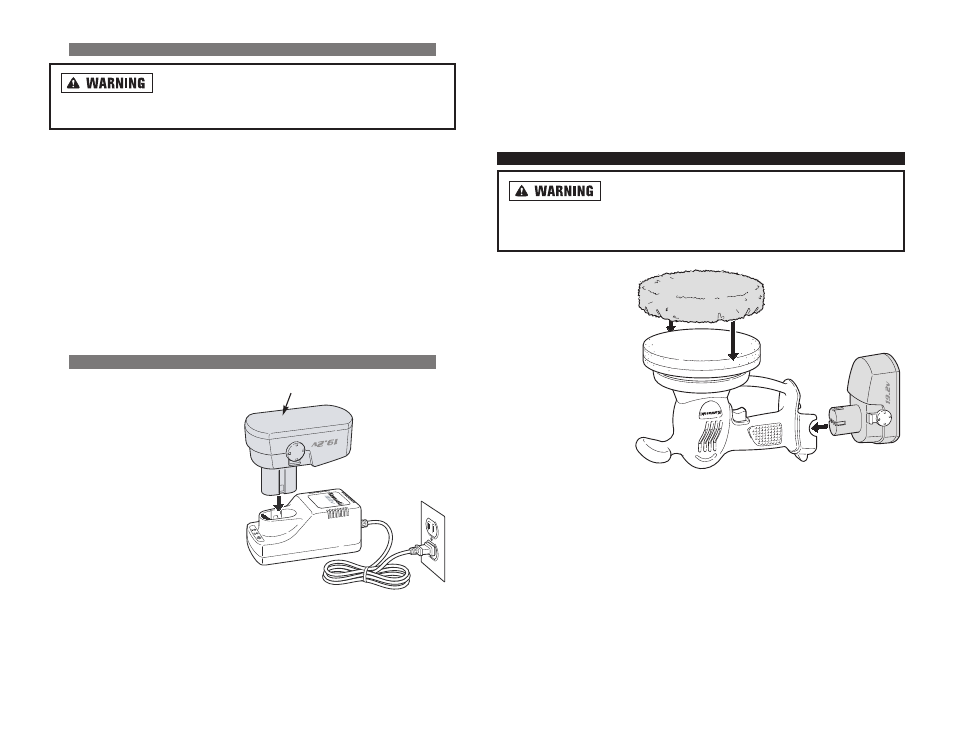
• Turn the waxer upside-
down with the foam pad
facing up.
• Slip the synthetic wool bonnet over the foam pad. Tuck the elastic down evenly
around the pad so the bonnet will not come off while in use.
14
O
ON
NE
E H
HO
OU
UR
R C
CH
HA
AR
RG
GE
ER
R #
#6
69
90
05
50
07
7
B
Be
effo
orre
e u
ussiin
ng
g b
ba
atttte
erryy cch
ha
arrg
ge
err,, p
plle
ea
asse
e rre
ea
ad
d cca
arre
effu
ullllyy a
allll
iin
nssttrru
uccttiio
on
nss a
an
nd
d cca
au
uttiio
on
na
arryy m
ma
arrkkiin
ng
gss o
on
n b
ba
atttte
erryy cch
ha
arrg
ge
err,, b
ba
atttte
erryy p
pa
acckk a
an
nd
d
p
prro
od
du
ucctt u
ussiin
ng
g b
ba
atttte
erryy..
U
Usse
e o
on
nllyy tth
he
e cch
ha
arrg
ge
err w
wh
hiicch
h a
acccco
om
mp
pa
an
niie
ed
d yyo
ou
urr p
prro
od
du
ucctt o
orr d
diirre
ecctt rre
ep
plla
acce
em
me
en
ntt a
ass
lliisstte
ed
d iin
n tth
hiiss m
ma
an
nu
ua
all.. Do not substitute any other charger. Use only Alltrade
approved chargers with your product.
D
Do
o n
no
ott d
diissa
asssse
em
mb
blle
e cch
ha
arrg
ge
err..
D
Do
o n
no
ott u
usse
e cch
ha
arrg
ge
err iiff iitt h
ha
ass b
be
ee
en
n d
da
am
ma
ag
ge
ed
d,, lle
efftt o
ou
uttd
do
oo
orrss iin
n tth
he
e rra
aiin
n,, ssn
no
ow
w,, w
we
ett
o
orr d
da
am
mp
p e
en
nvviirro
on
nm
me
en
nttss,, o
orr iim
mm
me
errsse
ed
d iin
n lliiq
qu
uiid
d..
T
Th
he
e b
ba
atttte
erryy p
pa
acckk a
an
nd
d cch
ha
arrg
ge
err h
he
ea
att d
du
urriin
ng
g cch
ha
arrg
giin
ng
g.. Place the charger on a flat,
non-flammable surface away from flammable materials with at least four inches of
clearance to allow proper air circulation around the charger and battery pack.
W
Wh
he
en
n tth
he
e b
ba
atttte
erryy p
pa
acckk rre
eq
qu
uiirre
ess rre
ecch
ha
arrg
giin
ng
g,, a
a 1
1 h
ho
ou
urr cch
ha
arrg
ge
e a
allllo
ow
wss tth
he
e tto
oo
oll tto
o
o
op
pe
erra
atte
e a
att ffu
ullll p
po
ow
we
err.. A charging indicator light on the charger will illuminate to
show that charging is taking place.
C
CH
HA
AR
RG
GIIN
NG
G B
BA
AT
TT
TE
ER
RY
Y P
PA
AC
CK
K U
US
SIIN
NG
G O
ON
NE
E H
HO
OU
UR
R C
CH
HA
AR
RG
GE
ER
R #
#6
69
90
05
50
07
7
C
CH
HA
AR
RG
GE
E B
BA
AT
TT
TE
ER
RY
Y P
PA
AC
CK
K::
1. Plug the charger into the nearest
120 volt electrical outlet. The
step of the battery has positive
and negative terminal markings
on it. Align the markings with
the identical markings on the top
of the charger base. Insert the
battery pack into base. Pack will
not insert properly if reversed.
2. Make sure the trigger on the
Cordless Waxer/Polisher is in the
“
“O
OF
FF
F”
” position and remove the
battery pack from the Cordless
Waxer/Polisher.
3. If, when first inserting the battery pack, the red “
“O
ON
N”
” button does not light up,
press the “SET” button on the charger. When the battery is charging, the red
light is “
“O
ON
N”
”.
13
BATTERY PACK
BATTERY
CHARGER