Kawasaki 840131-1HR User Manual
Page 20
O
OP
PE
ER
RA
AT
TIIN
NG
G T
TH
HE
E R
RE
EC
CIIP
PR
RO
OC
CA
AT
TIIN
NG
G S
SA
AW
W
B
Bee aaw
waarree tth
haatt tth
hiiss tto
oo
oll iiss aallw
waayyss iin
n aan
n o
op
peerraattiin
ng
g cco
on
nd
diittiio
on
n
b
beeccaau
ussee iitt d
do
oeess n
no
ott h
haavvee tto
o b
bee p
pllu
ug
gg
geed
d iin
ntto
o aan
n eelleeccttrriiccaall o
ou
uttlleett.. Always turn
the switch ““O
OFFFF”” and remove the battery pack before changing blades.
V
VA
AR
RIIA
AB
BL
LE
E S
SP
PE
EE
ED
D T
TR
RIIG
GG
GE
ER
R S
SW
WIIT
TC
CH
H
N
Neevveerr ttaap
pee tth
hee ttrriig
gg
geerr ssw
wiittcch
h d
do
ow
wn
n tto
o p
prro
ovviid
dee cco
on
nttiin
nu
uo
ou
uss
h
hiig
gh
h ssp
peeeed
d.. The tool may fail under such conditions causing fire or personal
injury.
T
Th
hee llo
occkk--o
offff b
bu
utttto
on
n h
heellp
pss p
prreevveen
ntt aacccciid
deen
nttaall ssttaarrttiin
ng
g..
This button can be pressed from either side.
T
TH
HIIS
S T
TO
OO
OL
L IIS
S C
CO
ON
NT
TR
RO
OL
LL
LE
ED
D B
BY
Y A
A T
TR
RIIG
GG
GE
ER
R S
SW
WIIT
TC
CH
H::
• The speed of the Cordless Reciprocating Saw depends on the amount of
pressure applied on the trigger. The further the trigger is pressed, the faster
the tool will go.
• Press the lock-off button, then pull the ““O
ON
N//O
OFFFF”” trigger to turn the Cordless
Reciprocating Saw ““O
ON
N””. To turn the Cordless Reciprocating Saw ““O
OFFFF””,
release the trigger switch.
14
A
AS
SS
SE
EM
MB
BL
LY
Y
FFaaiillu
urree tto
o rreem
mo
ovvee tth
hee b
baatttteerryy p
paacckk ffrro
om
m tth
hee ssaaw
w b
beeffo
orree
rreem
mo
ovviin
ng
g tth
hee b
bllaad
dee cco
ou
ulld
d rreessu
ulltt iin
n aacccciid
deen
nttaall ssttaarrttiin
ng
g aan
nd
d sseerriio
ou
uss p
peerrsso
on
naall
iin
njju
urryy..
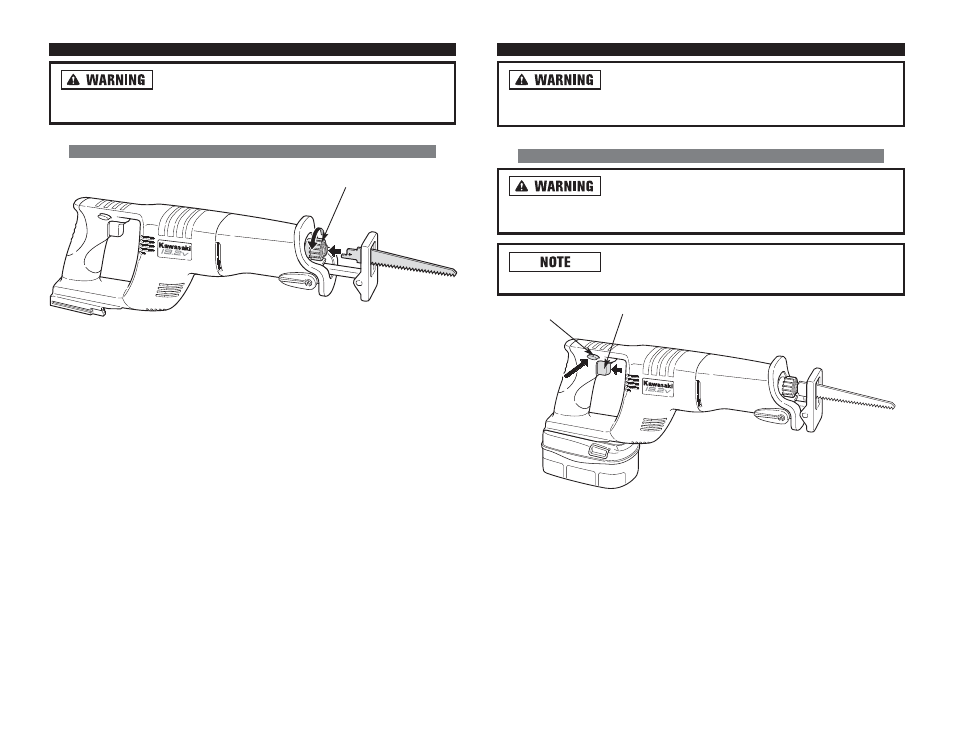
A
AT
TT
TA
AC
CH
HIIN
NG
G // R
RE
EM
MO
OV
VIIN
NG
G B
BL
LA
AD
DE
E
• Remove the battery pack.
T
TO
O A
AT
TT
TA
AC
CH
H B
BL
LA
AD
DE
E::
• Rotate the clamp knob clockwise and hold to retract the clamping jaws inside
the clamp.
• Insert the shank of the blade into the clamp until the hole in the shank engages
the dent ball in the clamp.
• Release the clamp knob to tighten and secure the blade in place.
• Replace the battery pack.
T
TO
O R
RE
EM
MO
OV
VE
E B
BL
LA
AD
DE
E::
• Rotate the clamp knob clockwise and hold to retract the clamping jaws inside
the clamp.
• Pull the blade off the clamp.
• Replace the battery pack.
13
TRIGGER
LOCK-ON
BUTTON
BLADE CLAMP