Konica Minolta NS-DPF8IP User Manual
Package contents, Sides, Setting up the remote control
Quick Setup Guide l
NS-DPF8IP 8" Digital Picture Frame with iPod/iPhone Dock
Congratulations on your purchase of a high-
quality Insignia product. Your new digital picture
frame is designed for reliable and trouble-free
performance.
Package contents
• Digital picture frame
• AC power adapter
• Memory Stick PRO Duo adapter
• Remote control with battery (CR2025)
• Cleaning
cloth
• User
Guide
• Quick Setup Guide
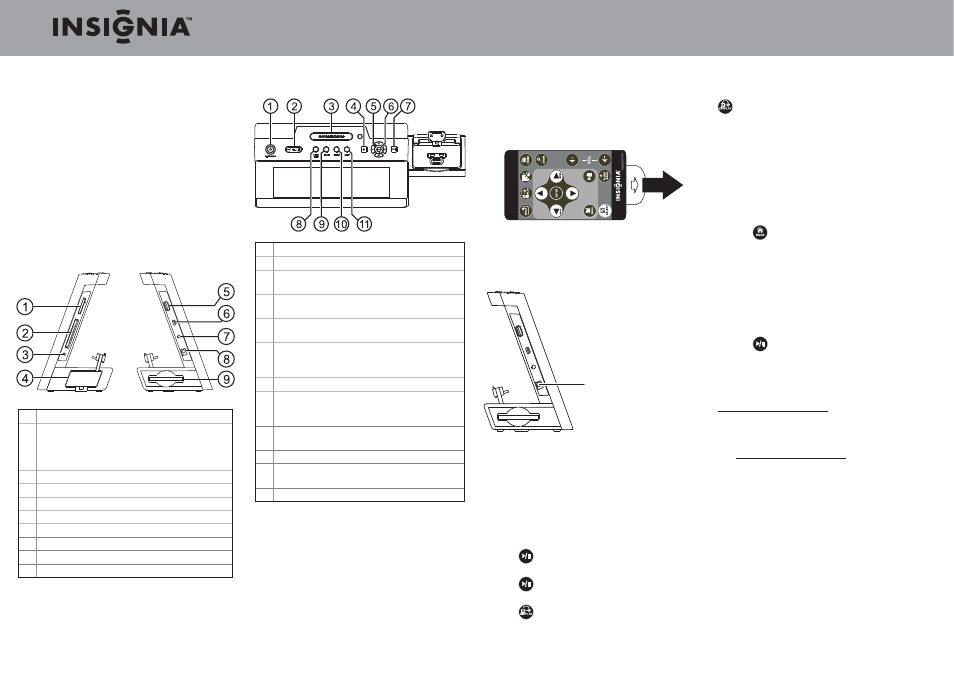
Sides
# Description
1 Memory card slot (SD/SDHC/MMC/Memory
Stick/Memory Stick Pro Duo/xD/microSD)
Note: MicroSD and MS PRO Duo require an
adapter.
2 Memory card slot CompactFlash (CF)
3 Headphone jack
4 iPod
TM
/iPhone
TM
dock
5 USB port
6 Mini USB port
7 Line in connector
8 DC power connector
9 Remote control slot
Top
# Description
1 Standby—press to enter Standby mode.
2 Volume up and down—press to increase or
decrease volume during playback.
3 Snooze/Alarm Set—press to enter the alarm
clock setup or to activate the snooze function.
4 Back—press to move backward through
menus.
5 Up, Down, Left, Right—press to move the
menu selection or to select the next or
previous picture/song/video.
6 Enter—press to select a menu option.
7 Play/Pause—press to pause or resume a
slideshow (Photo mode) or music or video
playback.
8 Sleep Timer—enable Timer to turn off device
automatically.
9 Home—press to return to the main menu.
10 Display—press to choose the display mode
(normal, multi-image, clock, etc.).
11 Menu—press to bring up the menu.
Setting up the remote control
Remove the plastic tab that extends past the
bottom edge of the remote control. This tab
protects the battery. The remote control will not
work until it is removed.
Setting up the frame
Plug the AC power adapter into the frame’s
power connector and into an AC power outlet.
Viewing pictures on a memory card or
USB device
1 Insert a memory card or USB device into one of
the available memory slots or the USB port.
2 Slideshow begins automatically and displays
pictures contained in the memory device you
inserted.
3 Press
(Play/Pause) to pause the slideshow
on a specifi c picture.
4 Press
(Play/Pause) again to resume the
slideshow.
5 Press
(DISPLAY) to select the slideshow
mode you want to view. Options include
Normal, Multi-Image, or Clock display.
To toggle between single- and multi-image
slideshow modes or to display the clock, press
(DISPLAY) during slideshow playback.
Caution: Memory cards fi t into the card slots in one
direction only. Do not force a memory card into a slot.
The card should fi t snugly when inserted correctly.
Some cards require an adapter to fi t correctly.
Playing media from your iPod or iPhone
1 Plug your iPod or iPhone into the docking
connector.
2 Press
(HOME) to return to the Home screen.
3 Press
◄ or ► to select the iPod icon, then press
ENTER.
4 Press
◄ or ► to select the type of media
you want to play (music or video), then press
ENTER.
5 Press
▲ or ▼ to move through the menu and
press ENTER to open a sub-menu.
6 Press
(PLAY/PAUSE) and ENTER to play
selected media fi le or category.
For more information about using your digital picture
frame, see your User Guide online at
www.insigniaproducts.com.
6-month limited warranty
Visit www.insigniaproducts.com for details.
ENGLISH 10-0601
© 2010 BBY Solutions, Inc., All Rights Reserved.
Power connector