Kawasaki 691241 User Manual
Page 6
O
OP
PE
ER
RA
AT
TIIN
NG
G T
TH
HE
E D
DR
RIIL
LL
L
N
Neevveerr ttaap
pee tth
hee ttrriig
gg
geerr ssw
wiittcch
h d
do
ow
wn
n tto
o p
prro
ovviid
dee cco
on
nttiin
nu
u--
o
ou
uss h
hiig
gh
h ssp
peeeed
d.. The tool may fail under such conditions causing fire or
personal injury.
O
OP
PE
ER
RA
AT
TIIN
NG
G T
TH
HE
E O
ON
N//O
OFFFF S
SW
WIIT
TC
CH
H
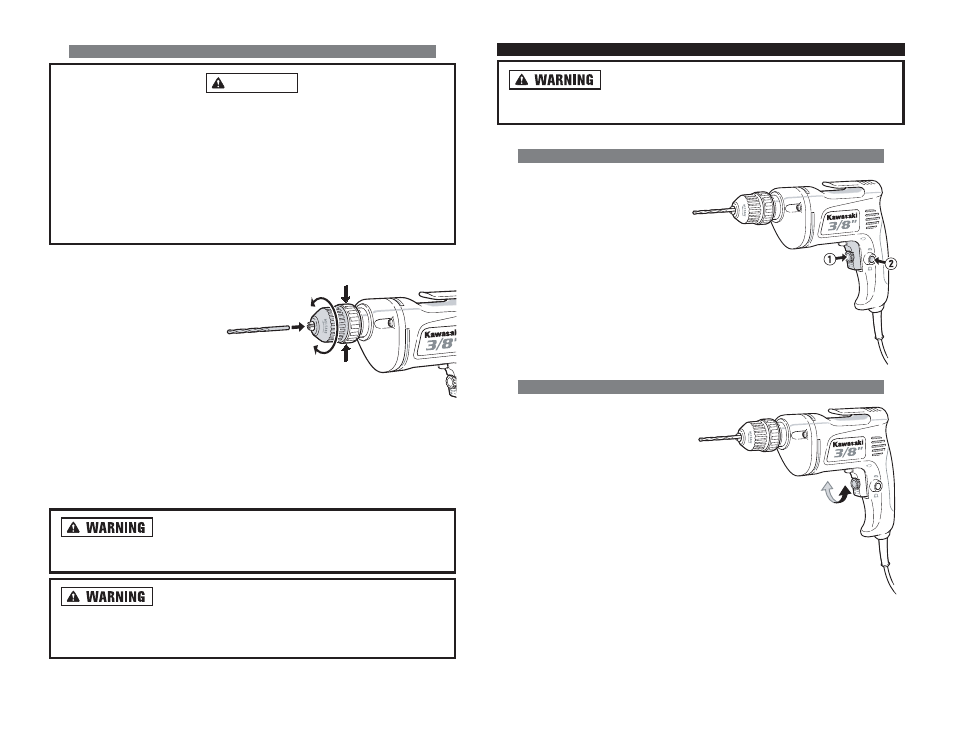
Squeeze the trigger switch to turn
the tool “ON”. Release the trigger
switch to turn the tool “OFF”.
When drilling for extended periods,
the “Lock-On” switch may be used,
but do not use this switch in situa-
tions where the drill is likely to bind
or kickback. If kickback does occur,
the sudden motion of the tool may
make it difficult to release the “Lock-
On” switch and turn the drill off.
S
SP
PE
EE
ED
D C
CO
ON
NT
TR
RO
OL
L A
AD
DJJU
US
ST
TIIN
NG
G S
SW
WIIT
TC
CH
H
To increase the operating speed of
the drill, turn the variable speed con-
trol clockwise. To decrease the
speed, turn the variable speed
control counterclockwise.
IIN
NS
ST
TA
AL
LL
LIIN
NG
G D
DR
RIIL
LL
L B
BIIT
T IIN
NT
TO
O K
KE
EY
YL
LE
ES
SS
S C
CH
HU
UC
CK
K
B
Beeffo
orree iin
nsseerrttiin
ng
g aa d
drriillll b
biitt o
orr o
otth
heerr aacccceesssso
orryy,, make sure the drill power cord
is disconnected from the AC power source to prevent accidental starts that may
result in injury.
D
Do
o n
no
ott aatttteem
mp
ptt tto
o ttiig
gh
htteen
n d
drriillll b
biittss ((o
orr aan
nyy o
otth
heerr aacccceesssso
orryy)) b
byy g
grriip
pp
piin
ng
g tth
hee
ffrro
on
ntt o
off tth
hee cch
hu
ucckk aan
nd
d ttu
urrn
niin
ng
g tth
hee tto
oo
oll o
on
n.. This may cause personal injury
and/or damage to the chuck.
W
Wh
heen
n rreem
mo
ovviin
ng
g tth
hee b
biitt ffrro
om
m tth
hee tto
oo
oll,, aavvo
oiid
d cco
on
nttaacctt w
wiitth
h sskkiin
n aan
nd
d u
ussee p
prro
op
peerr
p
prro
otteeccttiivvee g
gllo
ovveess w
wh
heen
n g
grraassp
piin
ng
g tth
hee b
biitt o
orr aacccceesssso
orryy.. Accessories may be hot
after prolonged use.
1. Unplug the drill. Never change
bits on a live drill.
2. Make sure the bit is undam-
aged, sharp and free from
wood or metal shavings.
3. Hold the rear end of the chuck
in one hand and use the other
hand to rotate the front end in
a counterclockwise direction to
open the jaws of the chuck.
4. Insert the shank of the bit (or other accessory) fully into the keyless chuck,
taking care to keep the bit in the center of the jaws of the chuck.
5. Turn the front end of the chuck clockwise to hold the bit in place.
6. Tighten securely by turning the front end of the chuck clockwise while holding
the rear end.
Always run the drill for one minute before drilling to make
sure the bit is properly seated. If the bit needs to be adjusted, unplug the drill
before touching the bit.
In certain situations, the bit may bind and the drill will kick-
back in the opposite direction. This sudden reaction could lead to loss of con-
trol and possible serious injury. Always be prepared for the possibility of kick-
back, especially when breaking through material to complete a hole.
WARNING
10
9
TIGHTEN
LOOSEN
HOLD HERE