Kawasaki 840844 User Manual
Page 6
FFU
UN
NC
CT
TIIO
ON
NA
AL
L D
DE
ES
SC
CR
RIIP
PT
TIIO
ON
N
C
CO
ON
NT
TR
RO
OL
LS
S A
AN
ND
D C
CO
OM
MP
PO
ON
NE
EN
NT
TS
S::
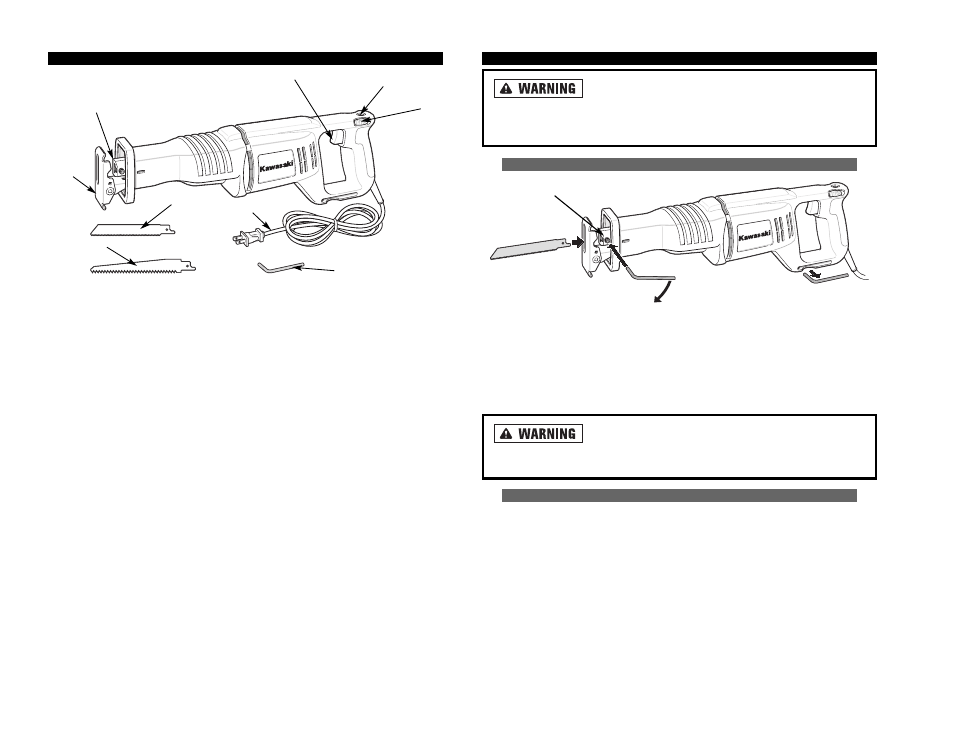
1. Adjustable Pivoting Shoe
2. Blade Clamp
3. Trigger Switch
4. Speed Setting Display
5. Variable Speed Control Wheel
6. Metal Cutting Blade
7. Wood Cutting Blade
8. Power Cord
A
AC
CC
CE
ES
SS
SO
OR
RIIE
ES
S::
9. Allen Wrench (4mm)
A
AS
SS
SE
EM
MB
BL
LY
Y
D
Diisscco
on
nn
neecctt tth
hee p
po
ow
weerr p
pllu
ug
g ffrro
om
m tth
hee A
AC
C p
po
ow
weerr sso
ou
urrccee
b
beeffo
orree aan
nyy aasssseem
mb
bllyy,, aad
djju
ussttm
meen
nttss,, o
orr aad
dd
diin
ng
g//rreem
mo
ovviin
ng
g aacccceesssso
orriieess..
Following this preventative step reduces the risk of the drill coming on acciden-
tally and the risk of damage to the workpiece and injury to the operator.
A
AT
TT
TA
AC
CH
HIIN
NG
G // R
RE
EM
MO
OV
VIIN
NG
G B
BL
LA
AD
DE
E
A
AT
TT
TA
AC
CH
HIIN
NG
G // R
RE
EM
MO
OV
VIIN
NG
G B
BL
LA
AD
DE
E
• Loosen the allen screw (1) and insert or remove blade.
• Tighten the screw with the allen wrench.
N
NO
OT
TE
E: Pull on the blade to make sure it is securely fastened.
• Plug in the power cord to operate the tool.
B
Beeffo
orree p
pllu
ug
gg
giin
ng
g iin
n tth
hee p
po
ow
weerr cco
orrd
d aallw
waayyss p
pu
ullll o
on
n tth
hee
b
bllaad
dee tto
o m
maakkee ssu
urree iitt iiss sseeccu
urreellyy llo
occkkeed
d iin
n tth
hee ccllaam
mp
p.. FFaaiillu
urree tto
o d
do
o sso
o m
maayy
rreessu
ulltt iin
n sseerriio
ou
uss iin
njju
urryy..
A
AD
DJJU
US
ST
TIIN
NG
G T
TH
HE
E P
PIIV
VO
OT
TIIN
NG
G S
SH
HO
OE
E
The pivoting shoe will pivot to follow the angle of the blade to the workpiece. This
action ensures the flat surface of the shoe is against the workpiece for better cut-
ting action and easier control of the saw.
The shoe can be adjusted in or out, allowing the use of the blade teeth at different
points of the blade. This will provide longer blade life as one section of the blade
becomes dull.
• To adjust the pivoting shoe, loosen the two pivoting shoe hex screws on the
lower side of the saw using the 4mm hex key supplied.
• Slide the pivoting shoe in or out until it is in the appropriate position.
9
10
4
5
9
6
1
3
2
8
7
ALLEN SCREW