Kawasaki 840097 User Manual
Page 8
V
VA
AR
RIIA
AB
BL
LE
E S
SP
PE
EE
ED
D T
TR
RIIG
GG
GE
ER
R S
SW
WIIT
TC
CH
H
T
TH
HIIS
S T
TO
OO
OL
L IIS
S C
CO
ON
NT
TR
RO
OL
LL
LE
ED
D
B
BY
Y A
A T
TR
RIIG
GG
GE
ER
R S
SW
WIIT
TC
CH
H::
• The speed of the Cordless Drill depends
on the amount of pressure you put on the
trigger.
• The more pressure you apply, the faster
the Cordless Drill will go.
• Release the pressure and the Cordless
Drill will slow down.
B
BU
UIIL
LT
T IIN
N L
LE
ED
D L
LA
AM
MP
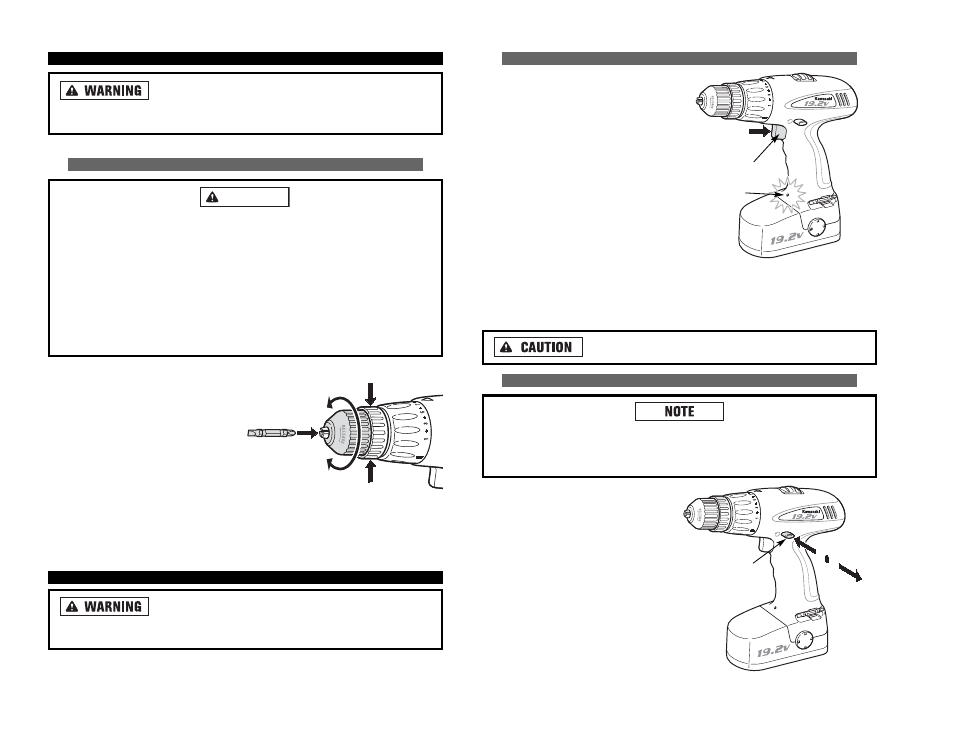
P
• Press the trigger switch to light up the lamp. The lamp remains on while the
trigger switch is being pressed. The lamp goes out after releasing the trigger.
NOTE: Use a dry cloth to wipe the dirt off the lens of lamp. Be careful not to scratch
the lens of lamp, or it may lower the illumination.
Do not look into light or see the source of light directly.
FFO
OR
RW
WA
AR
RD
D // R
RE
EV
VE
ER
RS
SE
E A
AN
ND
D T
TR
RIIG
GG
GE
ER
R L
LO
OC
CK
K L
LE
EV
VE
ER
R
B
Bee ssu
urree tth
hee ttrriig
gg
geerr iiss rreelleeaasseed
d w
wh
heen
n cch
haan
ng
giin
ng
g tth
hee p
po
ossiittiio
on
n o
off tth
hee lleevveerr..
Always store the tool in the ““L
LO
OC
CK
KE
ED
D//O
OFFFF”” position.
A
Allw
waayyss cch
heecckk tth
hee d
diirreeccttiio
on
n o
off tth
hee C
Co
orrd
dlleessss D
Drriillll''ss rro
ottaattiio
on
n b
beeffo
orree u
ussee..
T
TO
O S
SE
EL
LE
EC
CT
T T
TH
HE
E D
DIIR
RE
EC
CT
TIIO
ON
NS
S
O
OFF R
RO
OT
TA
AT
TIIO
ON
N::
• To select forward Cordless Drill
rotation, press the trigger lock from
left to right flat against the Cordless
Drill body.
• To select reverse, press the trigger
lock lever in the opposite direction.
• The center position locks the tool.
A
AS
SS
SE
EM
MB
BL
LY
Y
B
Bee aaw
waarree tth
haatt tth
hiiss tto
oo
oll iiss aallw
waayyss iin
n aan
n o
op
peerraattiin
ng
g cco
on
nd
diittiio
on
n
b
beeccaau
ussee iitt d
do
oeess n
no
ott h
haavvee tto
o b
bee p
pllu
ug
gg
geed
d iin
ntto
o aan
n eelleeccttrriiccaall o
ou
uttlleett.. Always turn
the switch ““O
OFFFF”” and remove the battery pack before changing bits.
IIN
NS
ST
TA
AL
LL
LIIN
NG
G D
DR
RIIL
LL
L B
BIIT
T IIN
NT
TO
O K
KE
EY
YL
LE
ES
SS
S C
CH
HU
UC
CK
K
B
Beeffo
orree iin
nsseerrttiin
ng
g aa d
drriillll b
biitt o
orr o
otth
heerr aacccceesssso
orryy,, make sure the forward/reverse
and trigger lock lever is in the center ““O
OFFFF”” position to prevent accidental starts
that may result in injury.
D
Do
o n
no
ott aatttteem
mp
ptt tto
o ttiig
gh
htteen
n d
drriillll b
biittss ((o
orr aan
nyy o
otth
heerr aacccceesssso
orryy)) b
byy g
grriip
pp
piin
ng
g tth
hee
ffrro
on
ntt o
off tth
hee cch
hu
ucckk aan
nd
d ttu
urrn
niin
ng
g tth
hee tto
oo
oll o
on
n.. This may cause personal injury
and/or damage to the chuck.
W
Wh
heen
n rreem
mo
ovviin
ng
g tth
hee b
biitt ffrro
om
m tth
hee tto
oo
oll,, aavvo
oiid
d cco
on
nttaacctt w
wiitth
h sskkiin
n aan
nd
d u
ussee p
prro
op
peerr
p
prro
otteeccttiivvee g
gllo
ovveess w
wh
heen
n g
grraassp
piin
ng
g tth
hee b
biitt o
orr aacccceesssso
orryy.. Accessories may be hot
after prolonged use.
1. Hold the rear end of the chuck in
one hand and use the other hand to
rotate the front end in a counter-
clockwise direction to open the jaws
of the chuck.
2. Insert the shank of the bit (or other
accessory) fully into the keyless
chuck, taking care to keep the bit in
the center of the jaws of the chuck.
3. Turn the front end of the chuck clockwise to hold the bit in place.
4. Tighten securely by turning the front end of the chuck clockwise while holding
the rear end.
O
OP
PE
ER
RA
AT
TIIN
NG
G T
TH
HE
E D
DR
RIIL
LL
L
N
Neevveerr ttaap
pee tth
hee ttrriig
gg
geerr ssw
wiittcch
h d
do
ow
wn
n tto
o p
prro
ovviid
dee cco
on
nttiin
nu
u--
o
ou
uss h
hiig
gh
h ssp
peeeed
d.. The tool may fail under such conditions causing fire or
personal injury.
WARNING
13
TRIGGER
LOCK
TRIGGER
SWITCH
LED LIGHT
HOLD HERE
HOLD HERE
RELEASE
GRIP
FORWARD
LOCK
REVERSE