Sanyo HV-DX1E User Manual
Page 10
10
Connections
Tips
Depending on your TV and other equipment you wish
to connect, there are various ways you could connect
the DVD+VCR.
Please refer to the manuals of your TV, Stereo
System or other devices as necessary to make the
best connections.
For better sound reproduction, connect this
DVD+VCR’s AUDIO OUT jacks to the audio in jacks
of your amplifier, receiver, stereo or audio/video
equipment. See “Connecting to Optional Equipment”
on page 11.
Caution
– Make sure the DVD+VCR is connected directly to the
TV. Set the TV to the correct video input channel.
– Do not connect the DVD+VCR’s AUDIO OUT jack to
the phono in jack (record deck) of your audio system.
Connecting to a TV & Satellite
Receiver
Make one of the following connections, depending on
the capabilities of your existing equipment.
Basic connection (AV)
11
Connect the EURO AV1 AUDIO/VIDEO on the rear
panel of the DVD+VCR to the scart input socket on
the TV using a SCART lead (S).
2
2
You can connect such a Satellite, Cable or Digital
set top box to the DVD+VCR (D).
Basic connection (RF)
11
Connect the RF aerial cable (A) from your indoor/
outdoor aerial to AERIAL jack on the rear panel of
DVD+VCR.
2
2
Connect the supplied RF aerial cable (R) from the
RF.OUT jack on the rear panel of DVD+VCR to
your television’s Aerial Input.
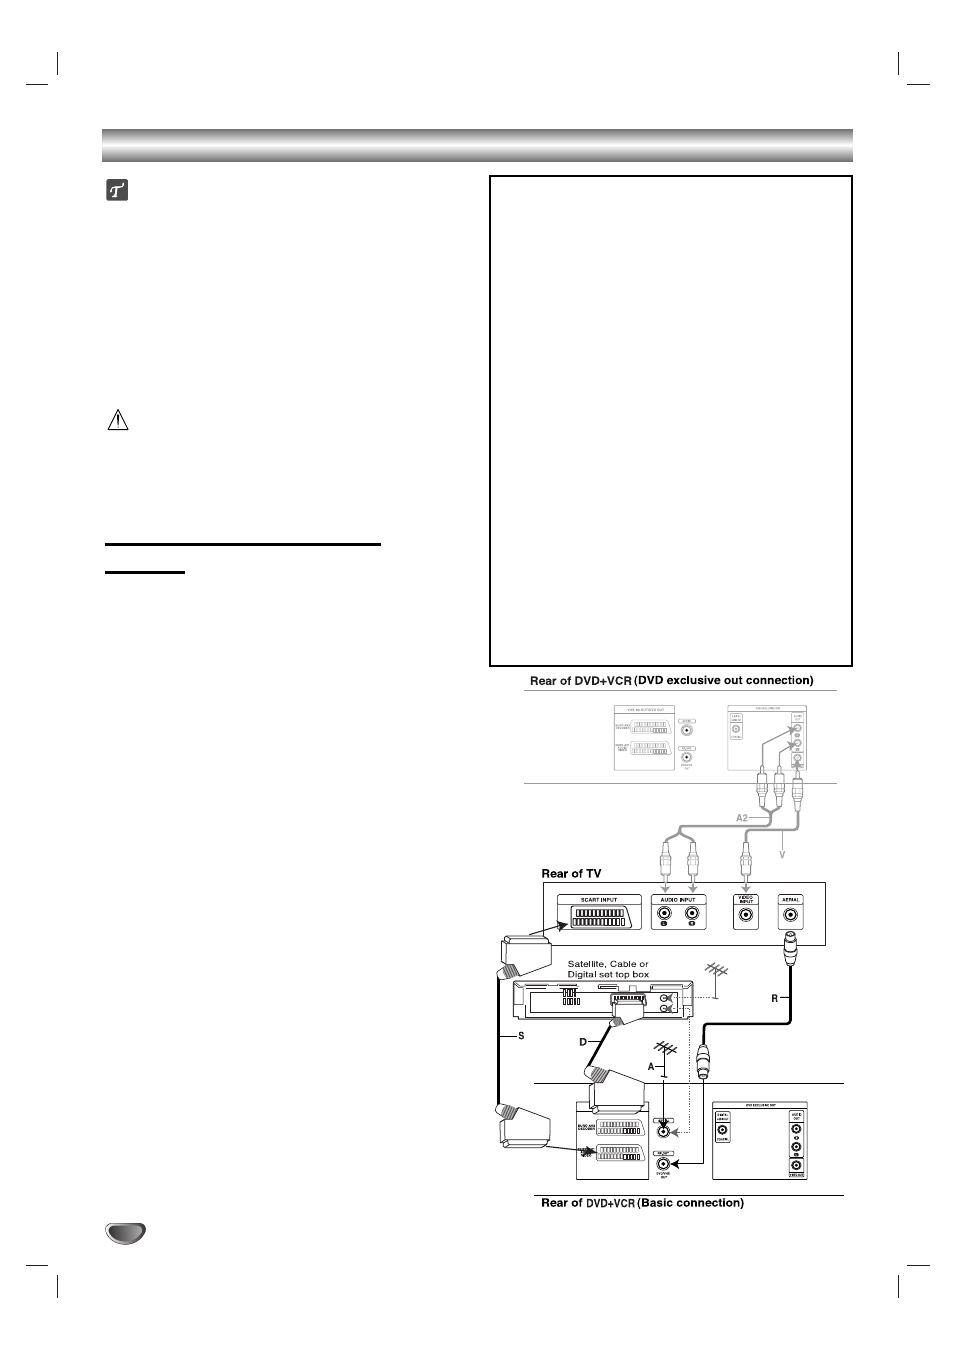
DVD exclusive out connection
You can only watch the DVD playback.
11
Connect the VIDEO OUT jack on the DVD+VCR’s
DVD EXCLUSIVE OUT to the video in jack on the
TV using the supplied video cable (V).
2
2
Connect the Left and Right AUDIO OUT jacks of
DVD+VCR’s DVD EXCLUSIVE OUT to the audio
left/ right in jacks on the TV using the supplied
audio cables (A2).
POWER:
This DVD+VCR operates on a mains supply of
200-240V~, 50Hz
.
This appliance is supplied with BS 1363 approved
13 Amp fused mains plug. When replacing the fuse
always use a 5 Amp BS 1362 approved type.
Never use this plug with the fuse cover omitted.
To obtain a replacement fuse cover contact your
supplying dealer.
If the mains sockets in your home differ, or are not suit-
able for the type of plug supplied, then the plug should
be removed and a suitable type fitted.
If the mains plug becomes severed from the mains
lead it must be destroyed. A mains plug with bared
wires is hazardous if engaged in a mains output line
socket.
If a 13 Amp BS 1363 plug is not suitable or any
other type of plug used, then this appliance must be
protected by a 5 Amp fuse.
Should you need to change the plug
The wires in this mains lead are coloured in accordance with
the following codes
BLUE ~ Neutral
BROWN ~ Live
As the colours of the wires in the mains lead of this
appliance may not correspond with the coloured markings
identifying the terminals in your plug proceed as follows :
The wire which is coloured BLUE must be connected to
the terminal which is marked with the letter N or coloured
BLUE or BLACK.
The wire which is coloured BROWN must be connected to the
terminal which is marked with the letter L or coloured BROWN
or RED.
DO NOT connect either wire to the EARTH terminal.