Locating the satellite, If no, find another location – Shaw SAC-00-094 User Manual
Page 5
5
30
20
10
40
50
60
FiGUre B
1/4˝ x 1 3/4˝ Long
Carriage Head Bolt
(Antenna Mounting Bolt)
Centre Pivot Pin
Dish Socket
Clamp Mount
Assembly
1/4˝ Flat Washer
1/4˝ Whiz Nut
FiGUre e
skew
elevation
azimuth
1 40
1 3
0
12
0
110
10
0
8
0
70
6
0
50
40
SK
EW
S
K
EW
9
0
FiGUre c
Skew Alignment Mark
NOTE:
Each Scale mark
is 2 degrees
Boss Holes
Azimuth Clamp Bolts
Skew Adjustment Nuts
FiGUre d
Dish Socket
1/4˝ Whiz Nut
Flat 1/4˝ Washer
Spacer Sleeve
Feed Support Arm
1/4˝ x 1 1/2˝ Long Hex Head Bolt
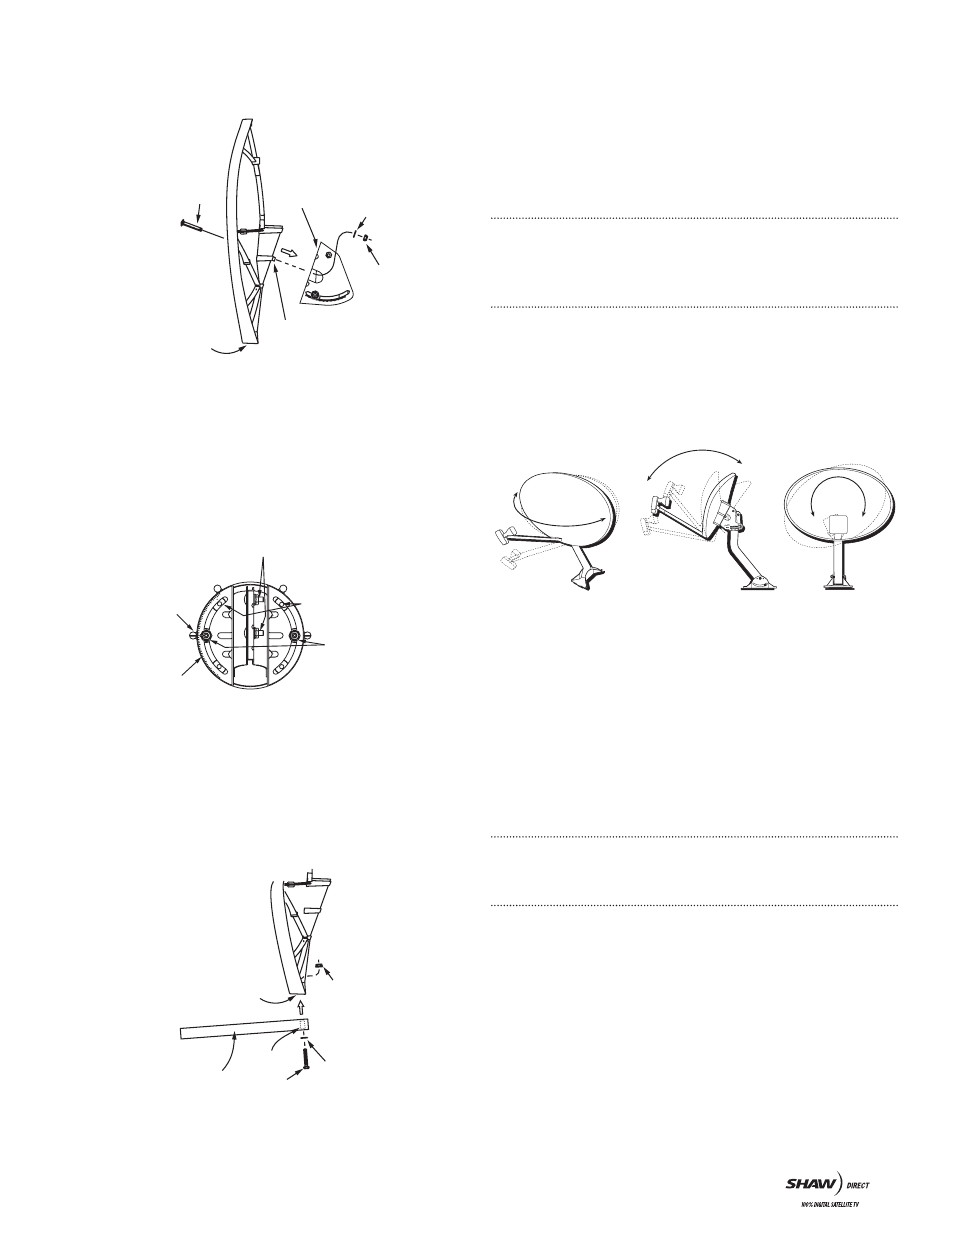
Step 4: Before tightening the bolts, adjust the skew alignment to
the 90 degree mark on the Clamp Mount Assembly (see Figure C).
Tighten the bolts just enough to hold in place. You’ll have to make
further adjustments to this setting later.
tip: Initially setting the skew to 90 degrees will make it easier to
aim the dish.
Step 5: Attach the Feed Support Arm to the dish using the (1) 1/4˝ X
1-1/2˝ Hex Head Bolt (1), Spacer Sleeve, (1) 1/4˝ Flat Washer and
(1) 1/4˝ Whiz Nut, making sure the Feed Support Arm and Spacer
Sleeve are positioned as shown (See Figure D). Position the 2 plastic
cable clips (packaged with the LNB) around the support arm to
secure the coax cable(s) from the LNB to receiver.
YoU’ve jUSt FiniShed aSSemBLinG the diSh.
4. LocatinG the SateLLite
Step 1: Determine the direction in which to point the dish.
The primary satellite (SAT A) is located at 107.3 west longitude; the
secondary satellite (SAT B) will be located at 111.1 west longitude.
important: For dual satellite (elliptical) dish installation, use the Sat B
azimuth, elevation and Skew listings in the dual Satellite Locator chart at the
back of this manual for the city nearest your location.
Write them here:
Azimuth
Elevation
Skew
SAT A: _________ SAT A: _________ SAT A: _________
SAT B: _________ SAT B: _________ SAT B: _________
Step 2: Use a compass to determine roughly where to point your dish.
Step 3: Choose a dish installation location with a clear line of sight
to both SAT B and SAT A based on the settings you recorded
earlier. There should be no trees, buildings or other obstructions
between the dish and the satellite. Do you have a clear line of sight
to both SAT A and SAT B?
■
if YeS, go to Step 4 and continue with the installation.
■
if no, find another location.
■
if you’re not sure, contact Shaw direct for more information.
note: to ensure an accurate compass reading, stay away from large metal
objects. to double-check accuracy, take multiple readings several feet apart.
Step 4: At the dish install site, hold a compass level and still in the
palm of your hand. When the needle stops rotating (dark half of the
needle always points north), slowly rotate the body of the compass
so that the “N˝ marking is aligned with the dark half of the needle.
Locate the tick mark on the compass edge corresponding to the
SAT B azimuth number you wrote down earlier (see Figure F). This
is the direction in which to point your dish to receive both SAT A
and SAT B signals.
tip: Use a stick or other object to mark the correct azimuth direction.