Directives d’usage, Operating instructions – Shark EP600NF User Manual
Page 6
Orifice
Orifice
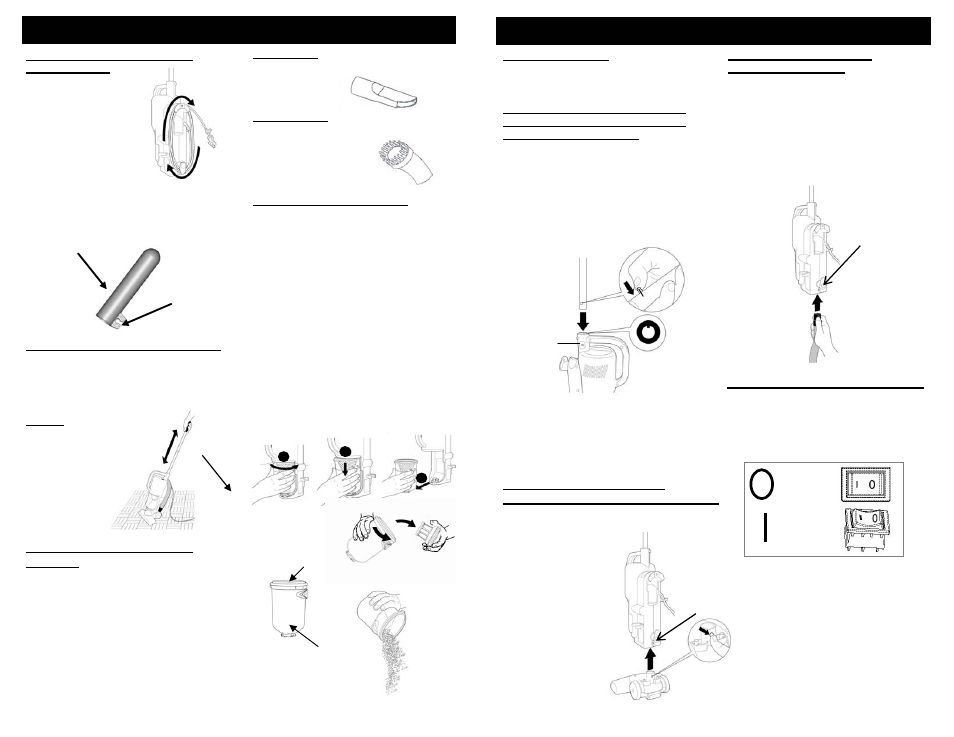
DIRECTIVES D’USAGE
AVERTISSEMENT:
Toujours
débrancher l’aspirateur avant
l’assemblage ou l’enlèvement
d’accessoires.
FIXATION DE LA BROSSE À
PLANCHERS AU BOÎTIER PRINCIPAL
•
Appuyez sur la tige de l’accessoire à
planchers tel qu’illustré ci-dessous.
• Insérez la brosse en
place, dans la
direction de la flèche.
• Si vous l’insérez bien,
la tige ressortira
de l’orifice. (Fig. 2)
FIXATION DU BOYAU AU
BOÎTIER PRINCIPAL
• Retirez la brosse à planchers de
l’aspirateur.
• Appuyez sur la tige à l’extrémité du
boyau. (Fig. 3)
• Insérez le boyau (voir la flèche dans
l’illustration).
• Si vous l’insérez bien, la tige
ressortira de l’orifice.
COMMUTATEUR MARCHE/ARRÊT
23
•
Le commutateur marche/arrêt est doté
de deux positions.
• Appuyez sur le côté « I » pour mettre
l’aspirateur en marche.
• Appuyez sur le côté « O » pour
éteindre l’aspirateur. (Fig. 4)
Tige
Orifice
Fig 1
Fig 2
Fig 3
Fig 4
= ARRÊT
= MARCHE
•
Pour insérer la pièce supérieure de la
poignée en métal, appuyez sur la tige
qui se trouve sur la pièce supérieure et
insérez la pièce supérieure dans la
pièce inférieure en vous assurant que
la tige ressorte de l’orifice de la pièce
inférieure.
INSERTION DE LA POIGNÉE EN
MÉTAL EN DEUX PIÈCES DANS
LE BOÎTIER PRINCIPAL
Appuyez sur la tige à l’extrémité de la
pièce inférieure de la poignée en métal
(voir l’illustration).
• Insérez la poignée en métal dans
l’orifice à côté de la poignée. Assurez-
vous que la fente dans la poignée
s’ajuste correctement dans l’ouverture.
(Fig. 1)
• Si vous l’insérez bien, la tige ressortira
de l’orifice.
lo
w
er
OPERATING INSTRUCTIONS
WINDING & UNWINDING THE
POWER CORD
• To wind the cord
after usage, wrap the
power cord in a
clockwise direction.
(Fig. 5)
• To unwind the power
cord, follow Fig. 5
but in the opposite
direction.
Cord
Holder
Top of Retractable
Handle
• When using the vacuum, attach the
cord to the cord holder so that the
cord is out of the way when you are
vacuuming. (Fig. 6)
USING THE UNIT AS A HAND
VACUUM
• Disconnect the metal handle.
• Disconnect the floor brush.
• Attach the hose.
• Attach the crevice tool or the dusting
brush.
• Attach the shoulder strap.
Crevice Tool
For radiators, crevices, corners,
baseboards and
between cushions.
Dusting Brush
The dusting brush is used for the
furniture, venetian blinds,
books, lamp shades
and shelves.
USING THE UNIT AS AN UPRIGHT
• Unwind the power cord and plug into
the 120V outlet.
• Push down in the direction of the arrow
to obtain best results on carpets or on
hard wood floors.
NOTE:
When vacuuming
deep pile carpets or
hard to vacuum
carpets, lower the
angle of the 2-piece
metal handle
(Fig. 7) for
easier
maneuverability.
5
EMPTYING THE DUST CUP
Warning:
Always unplug the unit from
electrical outlet before opening the Dust
Cup (container).
Fig 5
Fig 6
Fig 7
Dust Cup
Fig. 11
Fig. 12
8
9
10
Filter assembly
• Hold the dust cup in your hand.
• Turn it a complete 90° counter
clockwise as shown in Fig .8 (If turning
less than 90° the dust cup will not
detach.)
• Let the dust cup come down slightly as
shown in Fig. 9.
• Slide the dust cup out towards you.
(Fig.10 )
• Hold the dust cup in your hand, twist
filter assembly 90° counter clockwise.
(Fig. 11)
• Remove the HEPA-Type dust cup filter
and debris screen. (Fig.11 )
• Empty the dust cup. (Fig.12 )