Shop-Vac 90LN User Manual
Page 5
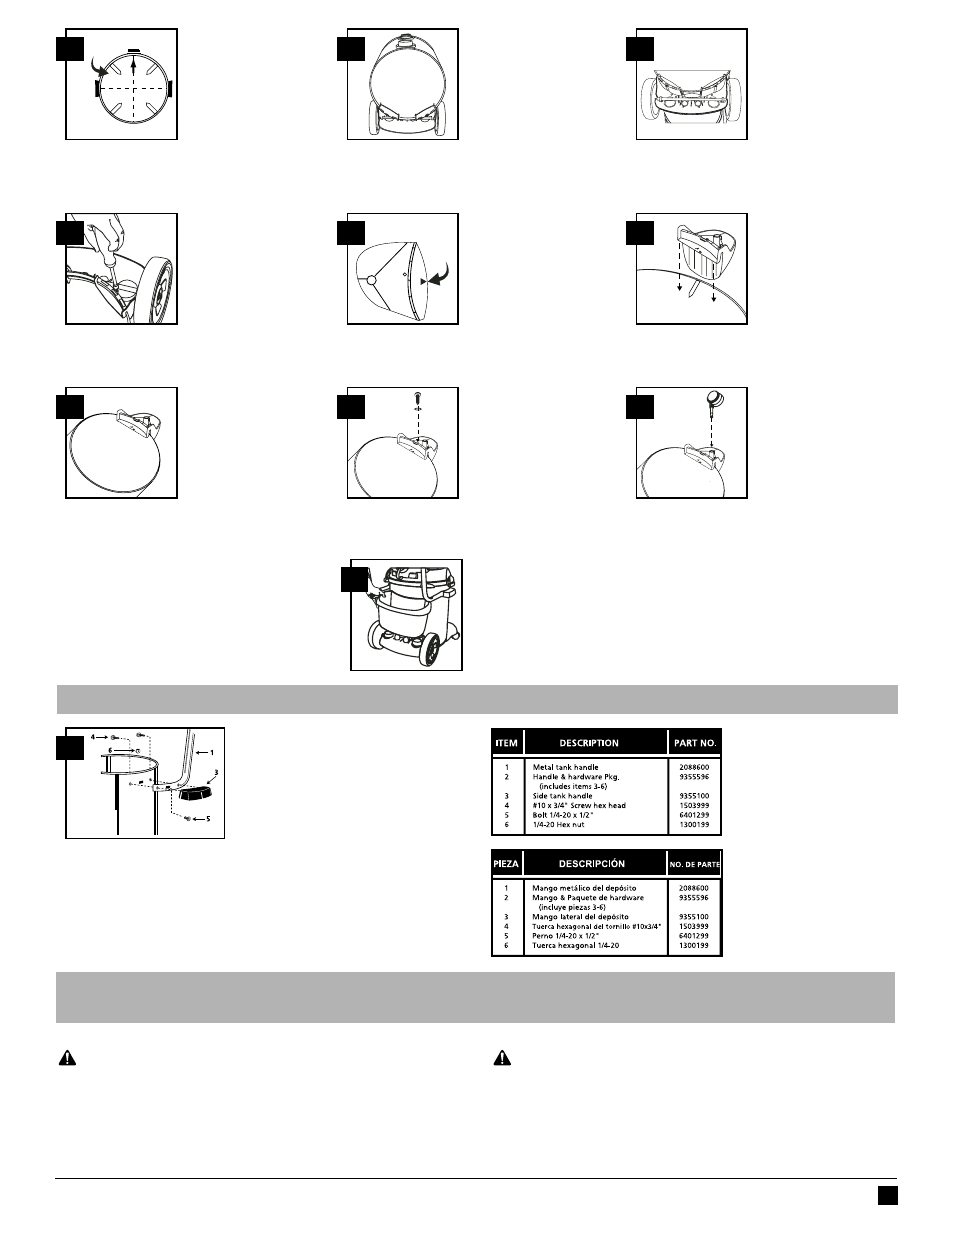
14. Once template is cut
out, place on bottom of
tank, align inlet arrow on
template with center of
inlet on tank ((FFiig
guurree 4
4)).
14. Una vez que se haya
cortado la plantilla,
colóquela sobre el fondo
del depósito, alinee la flecha de entrada en la
plantilla con el centro de la entrada del depósito
((FFiig
guurra
a 4
4)).
15. Align cutouts in center
of rear dolly with bars on
template ((FFiig
guurree 5
5)).
15. Alinee los recortes en
el centro de la carretilla
posterior con barras en la
plantilla ((FFiig
guurra
a 5
5)).
16. Place groove of rear
dolly over rim of tank and
push until the dolly is tight
against bottom of tank
((FFiig
guurree 6
6)).
16. Coloque la ranura de la
carretilla posterior sobre
el borde del depósito y
empuje hasta que la carretilla esté firme contra el
fondo del depósito ((FFiig
guurra
a 6
6)).
Questions? Visit Shop-Vac at www.shopvac.com or call (570) 326-3557. • Ante cualquier consulta, visite Shop-Vac en www.shopvac.com o llame al (570) 326-3557.
5
INSTALLING FOAM SLEEVE AND REUSABLE DRY FILTER/
INSTALACIÓN DEL MANGUITO DE ESPUMA Y FILTRO PARA ASPIRACIÓN DE SÓLIDOS REUTILIZABLE
WARNING: ALWAYS DISCONNECT THE PLUG FROM THE WALL OUTLET
BEFORE REMOVING THE TANK COVER
ADVERTENCIA: SIEMPRE DESCONECTE EL ENCHUFE DEL TOMACORRI-
ENTE DE PARED ANTES DE RETIRAR LA CUBIERTA DEL DEPÓSITO.
(Not standard with all models)
(No es común a todos los modelos)
26. To pick up dust and dry material, you must install foam sleeve and reusable
dry filter to ensure proper filtration. If the vacuum has been used to pick up liq-
uids, the foam sleeve must be cleaned and dried before installing for dry pick up.
26. Para aspirar polvo y material seco, es necesario instalar el manguito de
espuma y el filtro para servicio en seco reutilizable para garantizar un filtrado
adecuado. Si la aspiradora ha sido utilizada para aspirar líquidos, se deberá
limpiar y secar el manguito de espuma antes de instalarlo para una aspiración
en seco.
B
B
A
A
Template
Bottom of Tank
4
5
6
17. Secure dolly with
screw and washer provid-
ed. ((FFiig
guurree 7
7)).
17. Asegure la carretilla
con el tornillo y la aran-
dela provistos ((FFiig
guurra
a 7
7)).
18. If caster feet are
attached together, sepa-
rate by removing webbing.
Take caster foot marked
with the letter A ((FFiig
guurree 8
8)).
18. Si las bases de la rueda
están unidas, sepárelas
retirando la cinta gruesa.
Tome la base de la rueda marcada con letra A
((FFiig
guurra
a 8
8)).
19. Align arrow A on foot
with arrow on template
also marked with the letter
A ((FFiig
guurree 9
9)).
19. Alinee la flecha sobre
la base con la flecha en la
plantilla también marcada
con la letra A ((FFiig
guurra
a 9
9)).
A
Arrow
A
7
8
9
20. Place groove of foot
over rim of tank and push
until the caster foot is tight
against bottom of tank
((FFiig
guurree 110
0)).
20. Coloque la ranura de
la base sobre el borde del
depósito y empuje hasta
que la base de la rueda se encuentre firme contra
el fondo del depósito ((FFiig
guurra
a 110
0)).
21. Secure feet with screw
and washer provided
((FFiig
guurree 1111)).
21. Asegure las bases con
tornillo y la arandela pro-
vistos ((FFiig
guurra
a 1111)).
22. Insert casters into
holes provided in feet and
push until casters snap into
place ((FFiig
guurree 112
2)).
22. Inserte las ruedas en
los orificios de las bases y
empuje hasta que las
ruedas se fijen a presión
en su lugar ((FFiig
guurra
a 112
2)).
Tank Bottom
10
11
12
24. Place tool basket, with curved surface against tank, on rear wheel dolly assem-
bly ((FFiig
guurree 113
3)).
24. Coloque la cesta de herranientas, con la superficie curvada contra el depósi-
to, sobre el montaje de la carretilla de rueda posterior ((FFiig
guurra
a 113
3)).
13
CARRIAGE HANDLE ASSEMBLY /MONTAJE DE LA MANIJA DEL CARRO
25. Be sure to spread ends of carriage han-
dle when assembling to prevent damage to
tank. Attach carriage handle to tank by
inserting bolt through the center hole of han-
dle and tank, secure with nut provided.
Attach side handles with screws provided.
((FFiig
guurree 114
4)).
25. Asegúrese de extender los extremos de
la manija del carro durante el montaje para evitar daños al depósito. Acople
la manija del carro al depósito insertando el perno a través del orificio cen-
tral de la manija y del depósito, asegure con la tuerca provista. Acople las
manijas laterales con los tornillos suministrados ((FFiig
guurra
a 114
4)).
14
23. Repeat steps 18-22 with caster foot marked
with the letter B.
23. Repita los pasos 18-22 con la base de la rueda
marcada con letra B.