Swann Advanced Quad Processor User Manual
Page 4
4
5
1
2
3
9
7
8
Color Quad Processor
4
5
6
11
10
CAM1
CAM2
CAM3
VCR
IN
VCR
OUT
MONITOR
OUT
CAM4
DC 12V
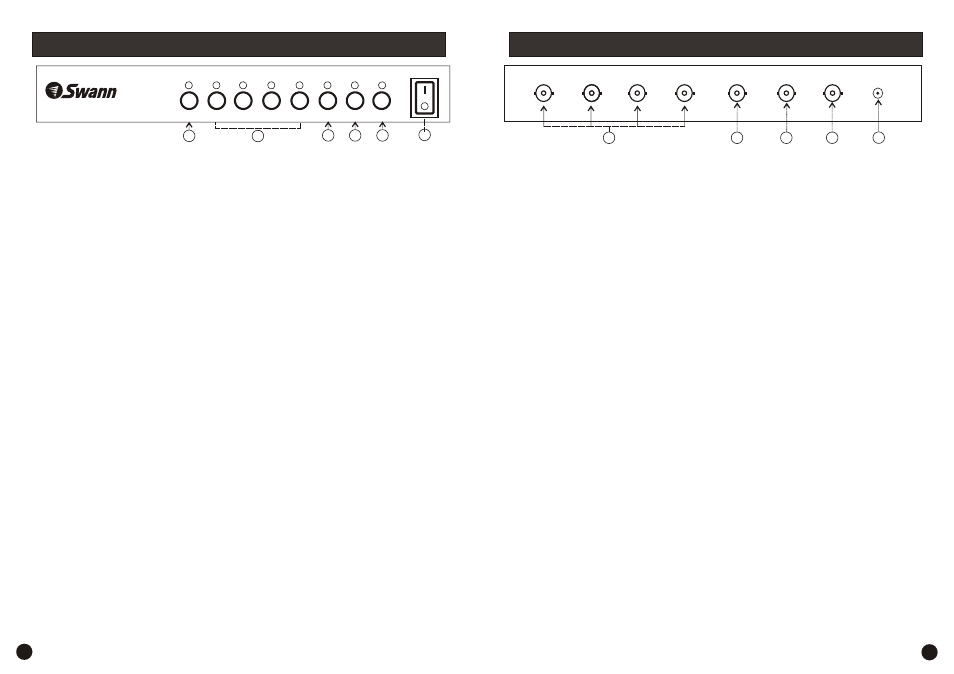
Please refer to the panel diagram above for additional information.
(1)
Power Switch -
to turn the unit on.
. Press the button
for less than 1 second twice to turn Auto Mode off, or press the Menu Button to
return to the normal view.
Press
(2)
Zoom/Mode Button - Press this button for less than 1 second to switch
through the different screen modes ~ 8 screens - 2 x Picture in Picture - 1 x
Picture in Picture - Split Screen. When in Picture in Picture or Split Screen mode,
press the Enter Button to enable configuration mode. Once in configuration
mode press the Up and Down buttons to select one of the channels you are
viewing, then press the Left or Right button to make changes. You can change
which camera appears in which box, and also where the PiP boxes appear on
the screen. Press the Enter button again to save your settings when you have
finished. To enter & exit the ZOOM mode, press this button for longer than 1
second. Once in configuration, use the UP/DOWN & LEFT/RIGHT buttons to
move the zoom box, then press ENTER button to view zoomed area.
(3)
Channel 1, 2, 3 and 4 (Left, Right, Down and up) Buttons - Press the
Channel Buttons to view each camera independently in full screen mode. Use
the UP/Down buttons to navigate the Configuration Menu and the Left/Right
buttons to change the highlighted setting.
(
4) Enter/PB Button - Press this button for longer than 1 sec to switch to VCR
Playback mode. To use VCR Playback mode effectively you must have a cable
connected from your VCRs Video Out to the VCR In Socket (8) and the VCRs
Video In to the VCR Out Socket. While in VCR Playback mode, press Play on
your VCR to see the recorded footage play on your TV or Monitor. Press any of
the channel Buttons to show that channel in full screen mode.
(5)
Freeze/Auto Button - Press this button for less than 1 second to Freeze the
current image on screen. Press for longer than 1 second to start automatically
switching between Quad Screen and Individual camera views
(6)
Menu Button - Press this button for less than 1 second to change back to
quad screen mode from any other display mode. Press for longer than 1 second
to enter and exit the configuration menu.
(7)
Channel 1, 2, 3 and 4 Video Input Sockets - Connect the BNC to RCA
adaptor to each socket to which you will connect a camera that uses a Male
RCA plug on the end of it’s cable. If you are using a camera that comes with a
cable that uses BNC connectors then you do not need to use the BNC to RCA
adaptor for that camera socket.
(8)
VCR In Socket - Plug the Video Out socket of your VCR into this socket to
allow you to view individual cameras in Full Screen mode when playing
recorded footage back.
(9)
VCR Out Socket - Plug the Video In socket of your VCR into this socket to
allow you to record footage to your VCR while you view the Quad Screen on
your monitor.
(10) Monitor Out
Socket - Plug the Video In socket of your TV or Security
Monitor into this socket to allow you to view the video signal generated by the
Quad Processor.
(11)
12Volt DC Power Socket - Connect the supplied Power Adaptor to this
socket to power the Quad Processor. Use of Power Sources other than the one
supplied will void your warranty.
Operation - Front Panel
Operation - Rear Panel
MENU
AUTO
ZOOM
CH4
CH3
CH2
CH1
ENTER FREEZE
MODE
▲
►
▼
◄
PB
POWER