Using the vacuum, Emptying the dust cup assembly – Shark Navigator Vacuum NV100 User Manual
Page 5
6
TOLL FREE: 1-800-798-7398
7
www.sharkclean.com
English
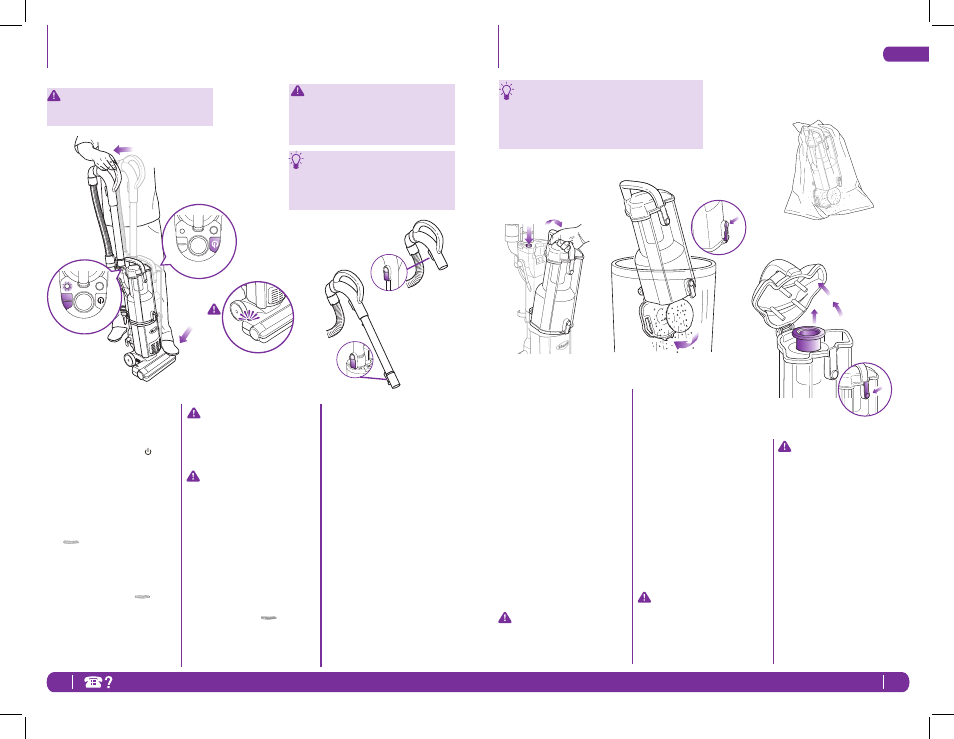
Using the Vacuum
Your Shark
®
Navigator
™
can be used
to clean all surface types.
1
Plug in the vacuum.
2
Push the Power button ( ).
(Fig. 7)
3
Place your foot on the power
nozzle and pull the handle back
towards you. (Fig. 8)
NOTE: This vacuum has a
separate brushroll button
(
)on the top of the vacuum.
(Fig. 9)
4
CLEAN CARPETS:
Engage the brushroll by pushing
the brushroll button (
) to
the “ON” position. The brushroll
light will turn green. (Fig. 9)
IMPORTANT: To protect your
carpets, the brushroll will only
turn on when you have pulled
the handle back towards you
and released the power nozzle.
IMPORTANT: The brushroll
indicator light on the power
nozzle will illuminate solid red if
there is a blockage.
(Fig. 10) This feature is designed
to protect your Lifetime Belt
that powers your brushroll. See
Checking for Blockages on
page 11.
5
CLEAN BARE FLOORS:
For cleaning bare floors or to
clean with the hose, push the
brushroll button (
) to the
“OFF” position for suction only.
The brushroll light will turn off.
The brushroll will not spin in this
mode.
Indicator Light
6
CLEAN ABOVE-FLOORS WITH
HOSE:
You can attach the accessories onto
the handle or onto the extension
wand for a longer reach.
a
Stand the vacuum into upright
position.
b
To remove the handle only, press
the handle release button.
(Fig. 11)
c
To remove the handle with
the extension wand, press the
extension wand release button
on the back of the vacuum.
(Fig. 12)
d
Push the selected tool into the
end of the handle or handle with
extension wand for longer reach
and begin cleaning.
To order additional parts and accessories,
go to www.sharkclean.com.
For suction to reach the power nozzle, the
extension wand and stretch hose must be
attached securely on the vacuum body.
The height of your power nozzle has been
optimized for easy pushing and superior
cleaning on all floor types. There is no need
to make any height adjustments as you
transition to different floor & carpet types.
Fig. 10
DO NOT pull vacuum cleaner around by
the hose.
DO NOT over-extend the hose. Always
hold the vacuum so that it does not tip
over.
Fig. 11
Emptying the Dust Cup Assembly
For best results empty the Dust Cup Assembly after
each use; or as needed during prolonged usage. or
when it reaches the MAX fill line.
DO NOT OVERFILL.
Turn vacuum off before emptying.
TO EMPTY THE DUST CUP
ASSEMBLY:
1
Press the Dust Cup release
button and remove the dust cup
from the vacuum. (Fig. 13)
2
Grip carry handle and press the
bottom Dust Cup Door release
button. (Fig. 14)
3
Option A: for Quick Empty:
Insert Dust Cup Assembly deep
inside trash receptacle to contain
dust and debris. (Fig. 15)
Press the bottom Dust Cup Door
release button; tap container
gently to dislodge and release
dust and debris.
Close the bottom door until it
snaps in place.
Important: If the Dust Cup
Door does not swing open freely
after pressing the release button,
push the door open using the
bottom door tabs.
4
Option B: For Allergy Sufferers:
Wrap a trash bag around the
Dust Cup Assembly leaving
space at the bottom for the door
to swing open. (Fig. 16)
Locate the Dust Cup Door
release button within the trash
bag and press to release as you
shake the dust cup to empty
dust and debris.
Close the bottom door until it
snaps in place.
Note: Option B can also be
performed outside of the home
to further minimize releasing
dust back into the air. Carry just
the Dust Cup Assembly and trash
bag outside.
Note: It may become necessary
to occasionally clean the metal
screen inside the dust cup. To
clean, press the top dust cup
release button (Fig. 17), pull out
the metal screen and remove
any excess dirt. Then replace the
metal screeen inside the dust
cup and close the top lid.
(Fig. 18)
Fig. 18
Fig. 14
Fig. 15
Fig. 16
Fig. 17
Fig. 12
Fig. 8
Fig. 7
Fig. 9
Fig. 13
Dust cup
Release
Button
NV100_26_IB_ENG_110317_2.indd 6-7
11-03-17 10:40 AM