Assembling your cordless sweeper, Operating instructions, Charging instructions – Shark V1940Q User Manual
Page 3
ASSEMBLING YOUR CORDLESS SWEEPER
Your cordless sweeper will require very little assembly. You should remove it from
the carton and familiarize yourself with all the components listed per the exploded
view drawing on page 2. This will help you in the assembly and operation of your
cordless sweeper.
NOTE:
The charging adapter and lower handle may be shipped inside the dust
cup or the packaging.
3
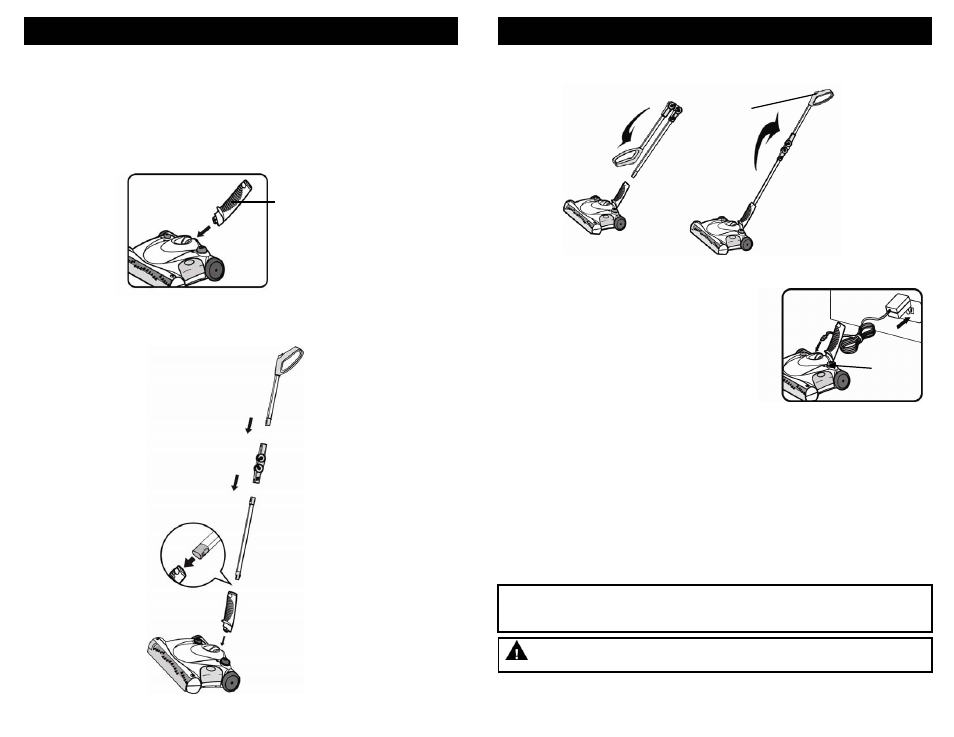
OPERATING INSTRUCTIONS
1. Insert the lower handle - small end - into the sweeper power head. Push until
firmly in place. (Fig. 1)
Lower
Handle
Fig. 1
2. Assemble the handle by inserting the lower handle extension tube into the lower
handle. Push until you hear it snap into place. Next, push the plastic folding pivot
onto the lower handle extension tube until you hear them snap into place. Finally,
insert the upper handle into the folding pivot until you hear it snap into place. (Fig. 2)
Fig. 2
Fig. 4
Fig. 3
Handle
Release
Button
Fig. 5
Charging
Light
Indicator
CHARGING INSTRUCTIONS
1. Connect the charger plug to the charging jack or
hole on the back of the sweeper. Plug the charging
adapter into the wall outlet. (120V., 60Hz.) Use only
KA12D090020023U. (Fig. 5)
2. This cordless sweeper is powered by Ni-Cd batteries.
Before first use, they must be charged for a
minimum 20 hours.
IMPORTANT
: After initial charging, your new
cordless sweeper should not be left connected to
the charging adapter for a period in excess of 24
hours. A normal charge cycle is approximately 20 hours.
The manufacturer recommends that when charging the cordless sweeper, the
unit be allowed to charge for approximately 20 hours and then be disconnected
from the charging adapter. The charging adapter should be unplugged from the
wall receptacle and stored in a convenient place until next use.
3. When recharging the unit, the on/off switch must be in the “off" position.
4. The charging light indicator on the top of the sweeper will illuminate to indicate that
the sweeper is properly charging.
5. To recharge, repeat step #1 above. Charging times will vary depending upon the
amount of usage between charging cycles.
NOTE:
If you connect the charging adapter to the sweeper to recharge and the
charging indicator light does NOT illuminate, then press the on/off button once to
turn the sweeper “Off”. The charging indicator light should now light up.
NOTE:
Peak performance may only be realized after the unit has been charged
and discharged two (2) or three (3) times.
4
OPERATING INSTRUCTIONS
3. To fold the handle, press on the handle release button firmly while bending the
handle forward. The folding pivot will click into the bent position. (Fig. 3) To
straighten the handle, simply lift the upper handle. The folding pivot will click into
the straightened position. (Fig. 4)
IMPORTANT:
To maintain peak performance of your cordless sweeper, it is
recommended that the unit be fully discharged, then completely
re-charged at least once a month.
CAUTION: Use only the charging adaptor supplied with the sweeper
Do not clean the sweeper while unit is charging.