Npacking, Rand, Iano – Suzuki Musical Instrument Corp. HG-425e User Manual
Page 2: Edal, Ssembly, Ttaching, Ttachment
1.
U
NPACKING
Y
OUR
N
EW
G
RAND
P
IANO
2. U
NPACKING
P
IANO
L
EGS
& P
EDAL
A
SSEMBLY
1
7
4
8
3
5
2
9
6
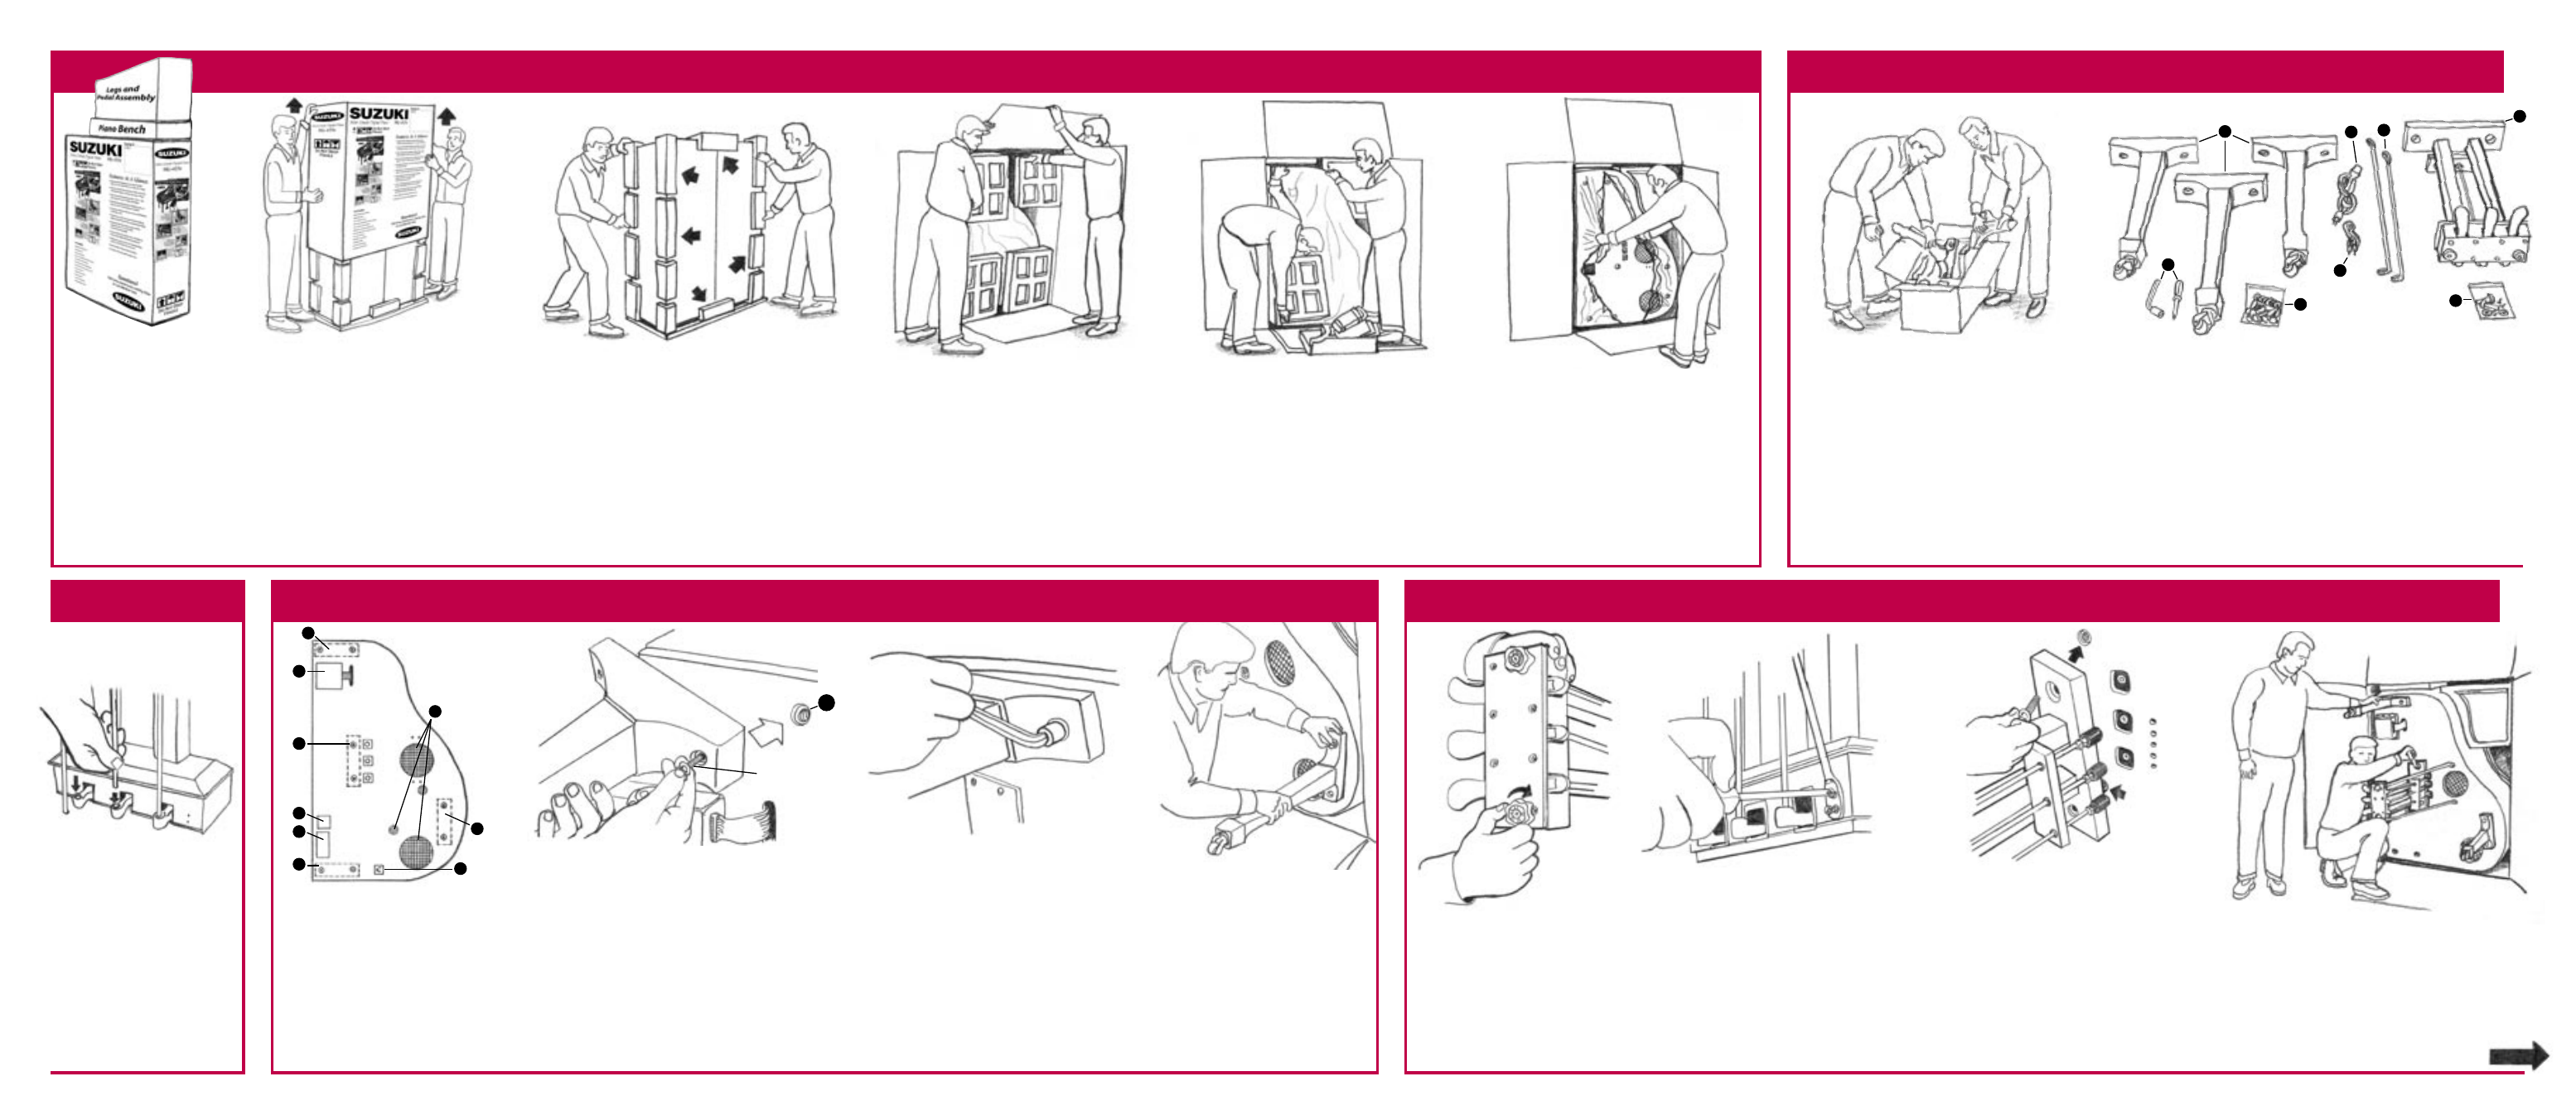
A.
You should have 3 car-
tons as pictured above.
• Large Carton:
Grand Piano
• Medium Carton:
3 piano legs and piano
pedal assembly
• Small Carton:
Piano bench
• You will need 2 people to
set up this large product.
Do not attempt to set up
your piano by yourself.
B.
To Begin Remove Outer Carton:
• Take the small & medium cartons.
Set them aside for now.
• Use a small sharp knife or box cutter to
cut the bottom of the outer carton just
above the staples.
• Slide the outer carton up and off of the
inner carton as shown. (top arrows).
• You may have to lay the box down
on its back to do this depending on
your ceiling height.
• Do NOT use a long knife or insert it
into the box more than
1
⁄
2
".
C.
Remove Protective Foam:
• Remove all the protective foam taped
around the outside of the inner carton
as shown (arrows).
• Be careful to support the piano box
from this point on. The box is tall and
narrow and could fall over if not
supported.
D.
Inner Carton:
• Locate the back of the inner
carton. It is marked with a sticker.
• Use a SMALL knife to slit the
center, top and bottom tape.
• Remove the foam pieces as
shown. This will reveal the bottom
of the piano.
• Do not open the front of the
inner carton. That will expose
the top of the piano.
E.
Piano Accessories:
• Remove the accessories listed below
from the foam and set aside.
F.
Plastic Cover:
• Tear the plastic covering away
from the piano bottom as shown.
• It is not recommended you use a
knife or sharp object to remove
the plastic. You are very close to
the high gloss finish at this
stage of unpacking.
A.
Get the Medium Sized box labeled
“Grand Pedal/Grand Leg.”
• Carefully slit the tape and open the box
as shown.
• Lift out all the parts inside this box and
gently remove the protective plastic
covering. Set aside on a soft surface.
• You are handling the high gloss lacquer
finish during this procedure. Be careful
not to scratch or hit these parts against
each other or let them come in contact
with any other items.
C.
Control Rod Position:
During unpacking, these
3 brass rods sometimes
come out of position.
Simply re-position the rods
back in their rubber
grommet holes as shown.
A.
Assembly Positions:
You will see the following areas
on the bottom of your piano:
1. Right Piano Leg Position
2. Pedal Assembly Position
3. Left Piano Leg Position
4. Back Piano Leg Position
5. Disk Drive
6. Connections
7. Speakers
8. Power Chord Input
9. Serial Number
2. U
NPACKING
3. A
TTACHING
T
HE
L
EGS
T
O
T
HE
P
IANO
B.
Install the Right Leg:
Install the Right Leg at the top of the piano.
• Take one of the piano legs (A) and line it up to
position #1.
• Use the longer bolts and washers in bag (G).
• Loosely thread both bolts and washers in the
threaded lugs. Then tighten completely.
• Again, be careful not to push the piano over
when attaching the legs and pedal assembly.
• Handle the high gloss lacquer finish carefully.
• Do not install the piano leg at the bottom of
the piano at this point.
4. P
EDAL
A
SSEMBLY
A
TTACHMENT
C.
Tighten the Bolts:
Tighten both bolts using the wrench
provided (D) or a
3
⁄
4
" socket wrench as
shown.
D.
Install the Back Leg:
Install the back piano leg in
position #4 as shown in
“Assembly Positions.” Use the
same procedure as steps B & C.
• So far you have attached
2 of the 3 legs. This is
correct. The third leg will
be attached later.
A.
Pre-Pedal Assembly:
• Tighten both knobs on the bottom
of the pedal assembly clockwise as
shown, until they are as close to
the pedal board as possible.
• After your piano has been placed
in its final position, these 2 knobs
will be adjusted down to stabilize
the pedals.
B.
Pedal Assembly Preparation:
• Locate the 2 brass support rods (C).
• The ends of these rods have 2 differ-
ent angles. One angle is very gentle,
the other is more sharp.
• Using the gentle angle, attach the
2 supporting rods using the screws
(H) with screwdriver (D) to the back
of the pedal assembly as shown.
Tighten securely.
IMPORTANT!
• Remember! It is important that one
person hold the piano while the other
person performs the installation
functions. Be careful not to push or
pull the piano over while installing
these parts.
C.
Pedal Assembly Attachment:
The pedal assembly attaches to the 2 threaded
lugs as shown above. Also pictured are 3 square
holes for the pedal rods. Thread the 2 shorter
bolts with washers (H) into the lugs and tighten.
While tightening, make sure the 3 pedal rods are
positioned at the 3 square holes.
When you have finished tightening the pedal
assembly, there may be a space between the
3 pedal rods and the top of their 3 square
position holes. This is normal. They do not fit
tightly against the piano bottom.
A
E
C
B
H
F
G
D
B.
Parts and Pieces:
After you have completed unwrapping everything,
here is what you should have:
A. 3 Piano Legs
B. 1 Pedal Assembly
C. 2 Brass Support Rods
D. 1 Wrench and Screwdriver
E. 1 Power Cord
F. 1 Accessory Cord
G. 1 Bag of Bolts with: 6 long bolts, 6 washers
H. 1 Bag of Bolts with: 2 short bolts, 2 washers, 8 screws
Accessories:
1. Instruction Manual
2. Play-Along Songbook
3. Microphone & Cord
4. Karaoke Cable
5. Lesson Book with Disk
6. Demonstration Disks
7. Quick Start User Guide
8. Assembly Guide
9. Polish & Polishing Cloth
#1
Bolt &
Washer
(Continued)
(Continued)
To lay box flat,
the full color
poster side
goes up
ONLY.