Xm radio, Vm9511ts xm radio operation – Jensen Tools VM9511TS User Manual
Page 22
20
VM9511TS
XM RADIO OPERATION
Listeners can subscribe to XM
®
Radio on the Web by
visiting www.xmradio.com, or by calling (800) 967-2346.
Customers should have their Radio ID ready (see
“Displaying the Identification (ID) Code”). Customers can
receive a limited number of free-to-air channels without
activation.
Accessing XM
®
Radio Mode
Press the SRC button (15) on the front panel or remote
control (8) to switch to the XM source.
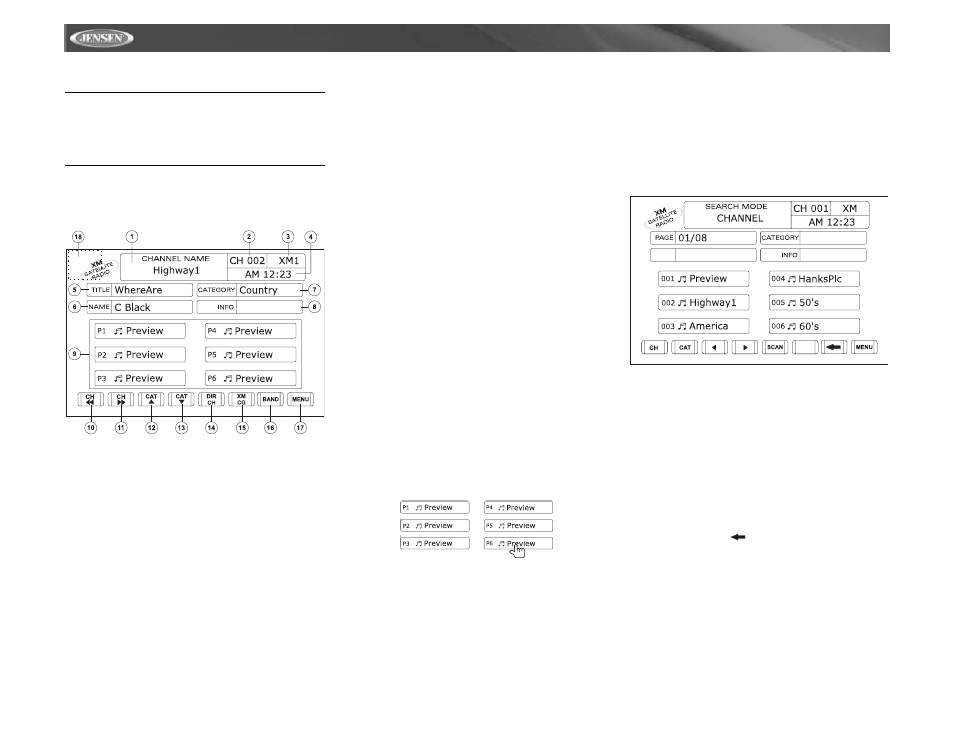
1.
XM channel name
2.
XM channel number
3.
XM band
4.
Time
5.
Song title
6.
Artist name
7.
Song category
8.
Data services information
9.
Current preset channels/on-screen preset buttons
10. CH <<: Select the previous channel
11.
CH >>: Slect the next channel
12. CAT /\: Select next channel in current category only
13. CAT V: Select previous channel in current category only
14. DIR CH: Press to enter channel directly using keypad on
screen
15. XM CG: Access Channel/Category Guide mode
16. BAND: Change between XM, XM1, XM2 and XM3
bands
17. MENU: Access the XM Setup Menu
18. Touch this area to return to the MAIN MENU
Displaying the Identification (ID) Code
Before you listen to XM
®
Radio, you must subscribe to the
service using your radio’s identification number. To display
the radio ID, press the < or > buttons (16, 17) on the joystick
or the CH << or CH >> buttons on the touch screen
repeatedly to tune to channel “000”. The screen displays the
8-character XM radio ID under “CHANNEL NAME”.
Selecting a Station
Press the < or > buttons (16, 17) on the joystick, the |<< or
>>| buttons (17, 19) on remote control, or the CH << or CH
>> buttons on the touch screen to change to another station.
Preset Mode
To enter preset mode, touch the BAND button on the screen,
or press the BAND button on the unit (14) or remote control
(20) to change between the following bands: XM1, XM2, or
XM3 (indicated in the top right corner of the TFT screen).
Six numbered preset buttons store and recall stations for
each band. All six stored stations (P1-P6) for the current
band appear on the TFT screen.
Storing a Station
1.
Select a band (if needed), then select a station.
2.
Touch and hold an on-screen preset button for three
seconds. The preset number appears at the top of the
screen.
Recalling a Station
1.
Select a band (if needed).
2.
Touch an on-screen preset button to select the
corresponding stored station.
Channel/Category Guide Mode
There are two search modes to help navigate through
channels and or categories. To access the Channel/Category
Guide mode press,
the ZOOM button (23) on the remote
control or th
e XM CG button on the touch screen.
Channel Guide is the default search mode. To access
Category Guide, press the TITLE button (2) on the remote
control or touch CAT on the touch screen. To return to
Channel Guide, press the SUBTITLE button (9) on the
remote control.
Channel Guide Mode
When Channel Guide mode is selected, “Search Mode” and
“CHANNEL” appear in the top half of the user interface. “XM”
appears in the top right corner and the first six XM channels
are displayed in the boxes in the bottom half of the TFT
screen.
•
While in Search Mode, to switch between Channel and
Category search modes, press the CH or CAT buttons in
the touch screen.
•
Press the >> button (14) on the remote control, the /\
button (18) on the joystick, or the > button on the touch
screen to view the next page of stations. Each page
contains six channels to select from.
•
Press the << button (22) on remote control, the V button
(19) on the joystick, or the < button on the touch screen to
view the previous page of stations. Each page contains six
channels to select from.
•
Press the on-screen SCAN button to preview each of the
6 channels on screen for 10 seconds.
•
Press the on-screen
button to return to the Preset
Mode screen.
•
Press the on-screen MENU button to access the XM
Setup Menu.
To select a channel while in Channel Guide mode, press the
corresponding preset number (1-6) on the unit, remote
control, or touch screen. The channel will begin playing and
the unit will return to the Preset Mode. While in Preset Mode,
press and hold an on-screen preset button (or 1-6 on the unit
or remote control) to store the channel playing.