Ieq45, Mount assembly – iOptron SMARTSTAR IEQ45TM User Manual
Page 8
8
Equatorial mounts require alignment of the mount components as well as star alignments for accurate OTA
tracking.
In order to provide the required Polar Axis alignment, equatorial mounts use a combination of both
mount types described above. The adjustable part of the mount moves in the Alt-Az mode in order to align
the R.A. axis, also known as the mount’s Polar Axis, with the CNP. These Polar Axis adjustments do not
involve any rotations of the OTA about the R.A. or DEC axes and can be performed without the OTA
installed. The first step is to make an approximate azimuth alignment of the Polar Axis by aligning the
specified tripod leg or reference point toward True North using a compass for reference (you must allow for
the variation between True and Magnetic North at your location). Precise horizontal alignment of the Polar
Axis is accomplished with azimuth adjustments on the mount. The second step is to adjust the Polar Axis
vertically (altitude) above the North horizon by setting the observer’s latitude on the provided latitude scale.
This procedure is based on the fundamental geometry of the Earth’s coordinate system in conjunction with
the concept of the celestial sphere. You can verify this by visualizing yourself at the North Pole (latitude
N90°) and Polaris will be 90° from the horizon, or directly overhead. These steps will place the Polar Axis
very close to the CNP. Both of the above adjustments can be enhanced by the use of an opening along the
R.A. axis that allows direct viewing of the North Star and the use of a polar scope to view through this
opening. If you are going to get the most out of your equatorial mount it is essential to understand the
concept of the Polar Axis and how the equatorial mount helps you establish and maintain a true Polar Axis
alignment. Now, you are ready to perform star alignments using the equatorial mount’s electronic controller
and enjoy the night sky.
The iEQ45
TM
mount is a next-generation equatorial mount that provides the precision alignment
capabilities required for today’s complete astronomy solution. The following sections of this manual provide
the detailed steps required to successfully set up and operate the iEQ45
TM
mount.
2.5. iEQ45
TM
Mount Assembly
NOTE: The iEQ45
TM
mount is a precision astronomical instrument. It is highly recommended that
you read the entire manual and become familiar with the
nomenclature and function of all components before
starting the assembly.
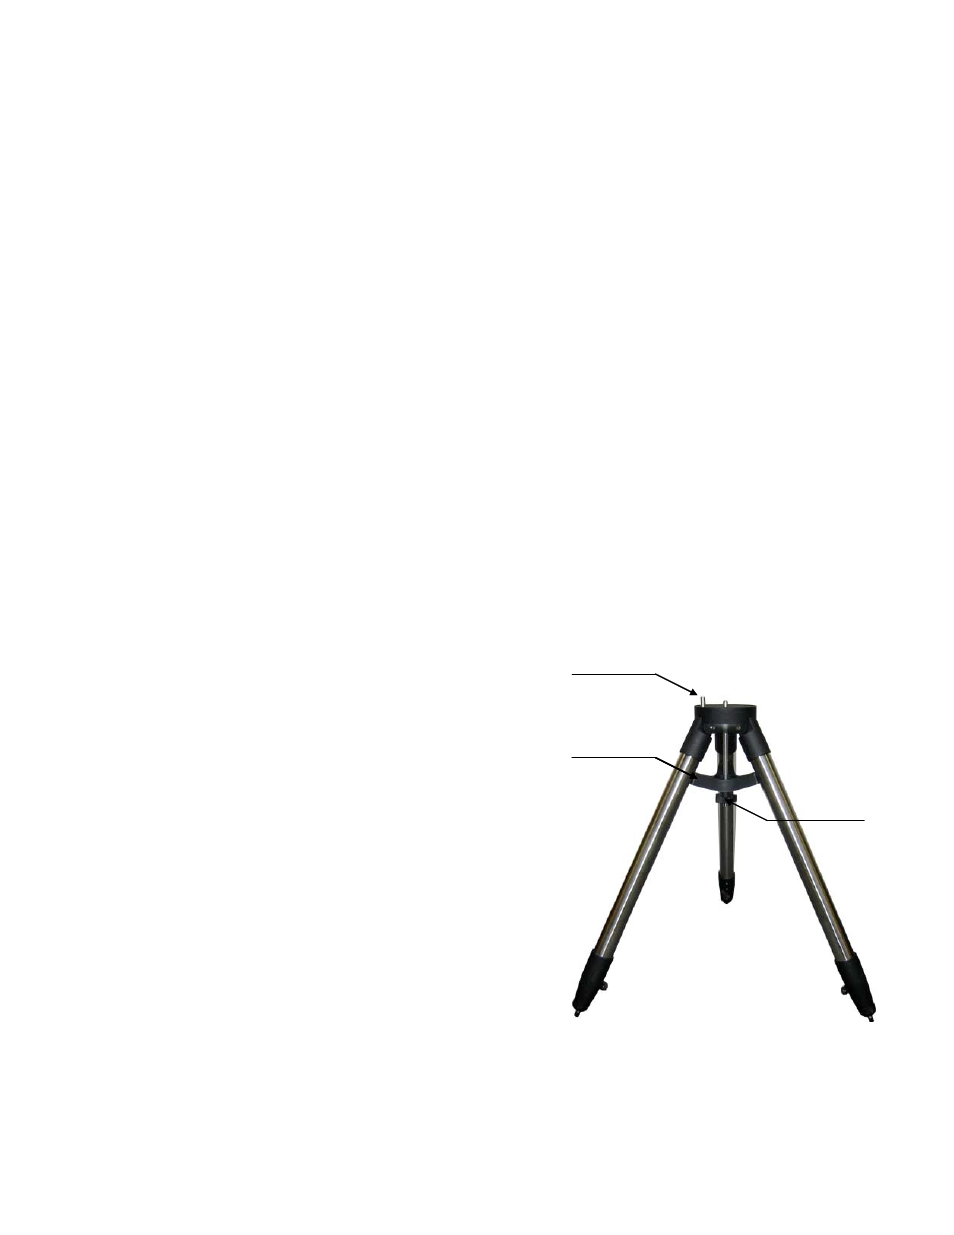
STEP 1. Setup Tripod
Expand the tripod legs and install the Tripod Support
using the Tripod Lock as shown in Figure 4. Tightening the
Tripod Lock will expand the tripod legs fully and provide
maximum support for the mount and the Optical Tube
Assembly (OTA). Adjust the tripod height by unlocking the
tripod Leg Lock Screws, sliding the lower tripod leg to the
desired length, and relocking the tripod Leg Lock Screws. It
is recommended that you extend the legs fully during the first
assembly and modify the length as required in subsequent
adjustments. After the legs are adjusted and locked, stand
the tripod with the Alignment Peg facing True North. If you
are located in the southern hemisphere, face the Alignment
Peg True South.
CAUTION: If the latitude of your location is below 20º,
you may move the Alignment Peg to the opposite
position to prevent the counterweights from hitting the tripod legs. If the latitude is below 10º, a pier
is recommended in place of a tripod. The mount can also be specially modified for the application
near the equator.
Alignment Peg
Tripod Lock
Tripod Spreader
Figure 4