Raccordement, Hook up – MTX Audio MTX Monitor Series MONITOR60I User Manual
Page 3
parleurs d’aigus des enceintes principales (Figure 3). Ceci empêche le ternissement de l’image sonore
quand des sons passent d’un côté à l’autre de la pièce.
RACCORDEMENT
Remarque: Si l’amplificateur ou le récepteur comporte un commutateur 4/8 W, la position 4 W ou
d’impédance minimale permet d’obtenir un fonctionnement optimal.
Utilisez du fil de haut-parleur de calibre 16 ou plus gros pour le raccordement à l’amplificateur ou au
récepteur. Coupez les fils en laissant une longueur de 30 à 60 cm à chaque extrémité pour permettre de
déplacer l’enceinte ou le récepteur.
Dénudez l’extrémité de chaque fil sur 13 mm à l’aide d’un coupe-fil ou d’un couteau bien aiguisé.
Torsadez les extrémités du fil pour l’empêcher de s’effilocher. Raccordez les conducteurs aux bornes de
raccordement sous ou derrière l’enceinte en dévissant suffisamment la borne pour en exposer l’orifice.
Glissez le conducteur dénudé dans le trou et serrez la borne. Répétez cette étape pour le raccordement
à l’amplificateur ou au récepteur. Consultez le manuel d’utilisation fourni avec l’appareil électronique pour
déterminer comment effectuer un raccordement correct.
Remarque : Pour assurer un bon fonctionnement, veillez à ce que le fil de la borne rouge (+) de
l’enceinte soit raccordé à la borne rouge (+) de l’amplificateur ou du récepteur. De même, veillez
à ce que le fil de la borne noire (-) de l’enceinte soit raccordé à la borne noire (-) de l’amplificateur
ou du récepteur. (Figure 4)
+
-
RED
BLACK
RED
BLACK
RED
BLACK
RED
BLACK
RED
BLACK
+
-
+
-
+
-
+
-
Une fois les enceintes raccordées, mettez l’électronique sous tension et faites un essai pour vérifier le
bon fonctionnement. Si le son des enceintes semble « ténu » avec peu de graves, c’est probablement
que les polarités des fils d’enceintes n’ont pas été respectées. Vérifiez à nouveau la polarité de tous les
raccordements.
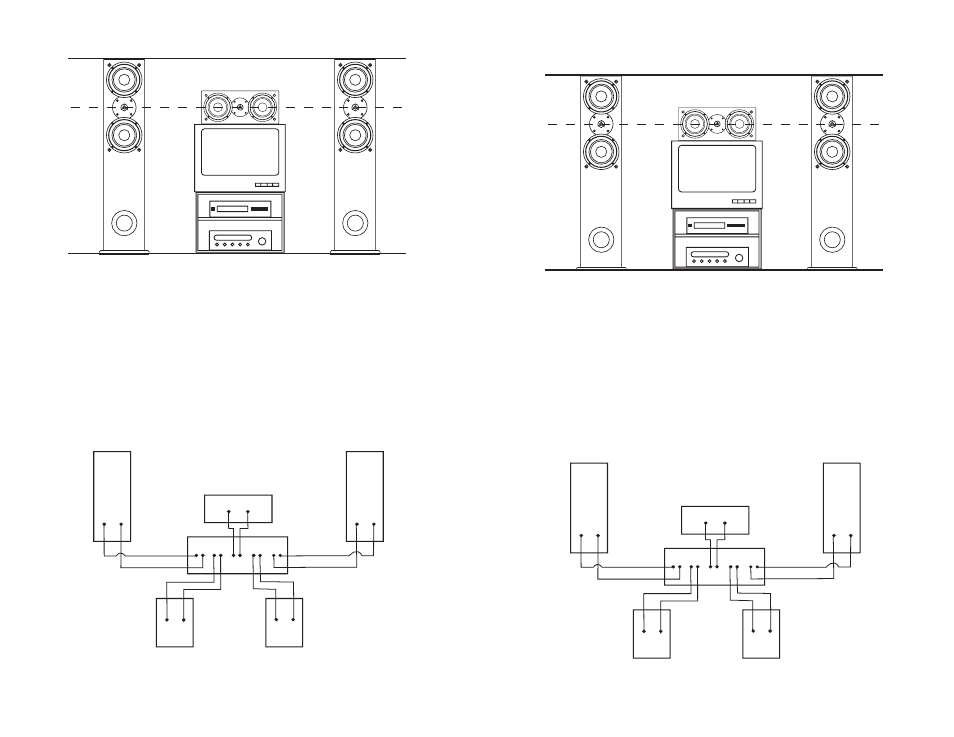
Place the center channel at an equal distance to the listening position as the main speakers are. Also,
place the height of the center channel’s tweeter as close to the same height as the main speakers’
tweeters (Figure 3). This will prevent image blurring when sounds are panned from the one side of the
room to the other.
HOOK UP
Note: If your amplifier or receiver has a 4/8Ω switch, optimum performance will be achieved using
the 4Ω or lowest impedance position.
Use 16 gauge or heavier speaker wire for connecting to your amplifier or receiver. Cut wire lengths leav-
ing an extra 12” to 24” at each end to allow for moving the speaker or receiver.
Using a wire cutter or a sharp knife, strip 1/2” of insulation off each end of the wire to expose the conduc-
tor. Twist wire ends to prevent from fraying. Connect the conductors to the binding posts on the bottom
or back of the speaker by unscrewing the post enough to expose the hole in the terminal post. Slip the
exposed conductor in the hole and tighten the post. Repeat this step for connecting to your amplifier or
receiver. Refer to the owner’s manual supplied with your electronics to assist with proper hook up.
Note: To ensure proper performance, make sure that the wire from the red (+) terminal on the
speaker is connected to the red (+) terminal on your amplifier or receiver. Likewise, make sure
the wire from the black (-) terminal on the speaker is connected to the black (-) terminal on the
amplifier or receiver. (Figure 4)
+
-
RED
BLACK
RED
BLACK
RED
BLACK
RED
BLACK
RED
BLACK
+
-
+
-
+
-
+
-
Once your speakers are hooked up, turn on your electronics and test to make sure they are functioning
properly. If your speakers sound “thin” with little bass and have a poor center image, one of the speaker
wires is probably hooked up backwards. Double check all connections for proper polarity.
Figure 3- Proper Placement of Center Channel Speaker
Figure 4- Connecting Speakers to Amplifier or Receiver
Figure 3
Figure 4