MTX Audio THUNDERFORM User Manual
Page 4
11. Ground amplifier to chassis of vehicle; connect the terminal provided
to the 10ga black wire from furnished wiring harness. A good ground is
as important as the power connection. The ground should be as short as
possible and the contact point should be free of paint and debris.
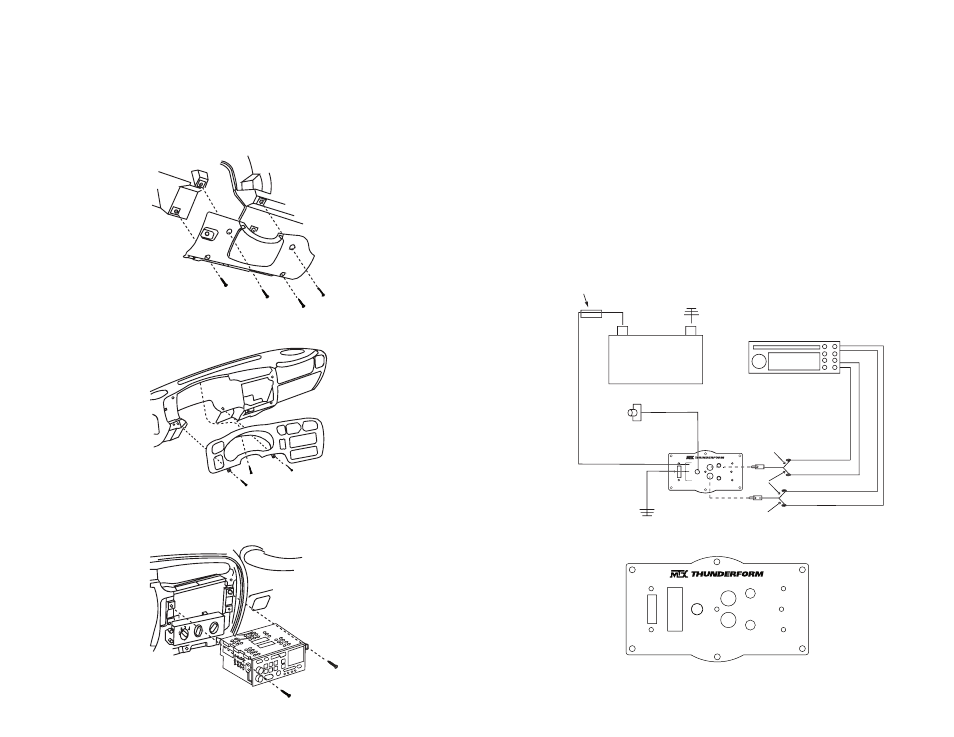
SPEAKER WIRES
12. The best place to find speaker wires is behind the radio.
13. Remove (4) 7mm bolts from trim underneath steering column.
14. Remove (3) bolts holding the instrument cluster trim panel. Pull along
edge to unsnap.
15. Unplug lights and air bag cut off switch on the backside of the trim
panel.
16. Remove (2) bolts holding the radio in the dash.
17. Behind the radio, locate the rear speaker wires. Colors are right
channel; dark blue (positive) light blue (negative), and left channel; brown
(positive), yellow (negative). Tap into wires with the supplied RCA High
Level input wires and route over to driver’s side threshold and to pre-amp
of enclosure
Although, MTX has made every effort to assure proper wiring colors,
MTX is not responsible for any changes made by the vehicle manufac-
turer which sometime occur. If wiring colors do not match then physical
verification is required.
CONNECTION TO ENCLOSURE
18. Connect speaker wire RCA's to the inputs of pre-amp.
Note: Patented BTL turn on circuitry- amplifier senses DC offset provided by “high
powered” or BTL type head units. This feature turns the amplifier on automatically
if you are using high level inputs.
_
+
20 Amp Fuse
PW
R
G
N
D
RE
M
EB
C
INPUT
RI
G
H
T
LE
FT
G
AI
N
X-
O
VE
R
ST
AT
U
S
G
AI
STRIPED
SOLID
SOLID
Dark Blue (+)
Light Blue (-)
Yellow (-)
Brown (+)
wn (+)
Optional EBC
(Electronic Bass Control)
19. Plug power wire harness into amplifier pre-amp.
20
A
PW
R
G
N
D
RE
M
EB
C
INPUT
RI
G
H
T
LE
FT
G
AI
N
X-
O
VE
R
ST
AT
U
S
20. Replace 20amp fuse under hood.
3
4