Meade Instruments ETX-90PE User Manual
Page 51
51
However, owners who wish to perform astrophotography or use the Meade LPI or Deep
Sky Imager (see
PHOTOGRAPHY WITH MEADE’S AUTOSTAR SUITE
, page 41, for more
information) will find equatorial mounting indispensible to their needs.
Equatorial Mount
Equatorial mounting lines up the telescope’s polar axis with the North Celestial Pole (or the
South Celestial Pole if observing in the southern hemisphere).
When using an equatorially mounted telescope, tracking (following) celestial objects is
possible by turning on your ETX telescope's motor drive. The motor counteracts the Earth's
rotation and keeps objects in the field of view of the eyepiece for hands-off tracking.
Equatorial Mounting Procedure
1.
Assemble the tripod as described in
Step #2 of
How to Assemble Your Telescope and
Tripod
, page 12.
2.
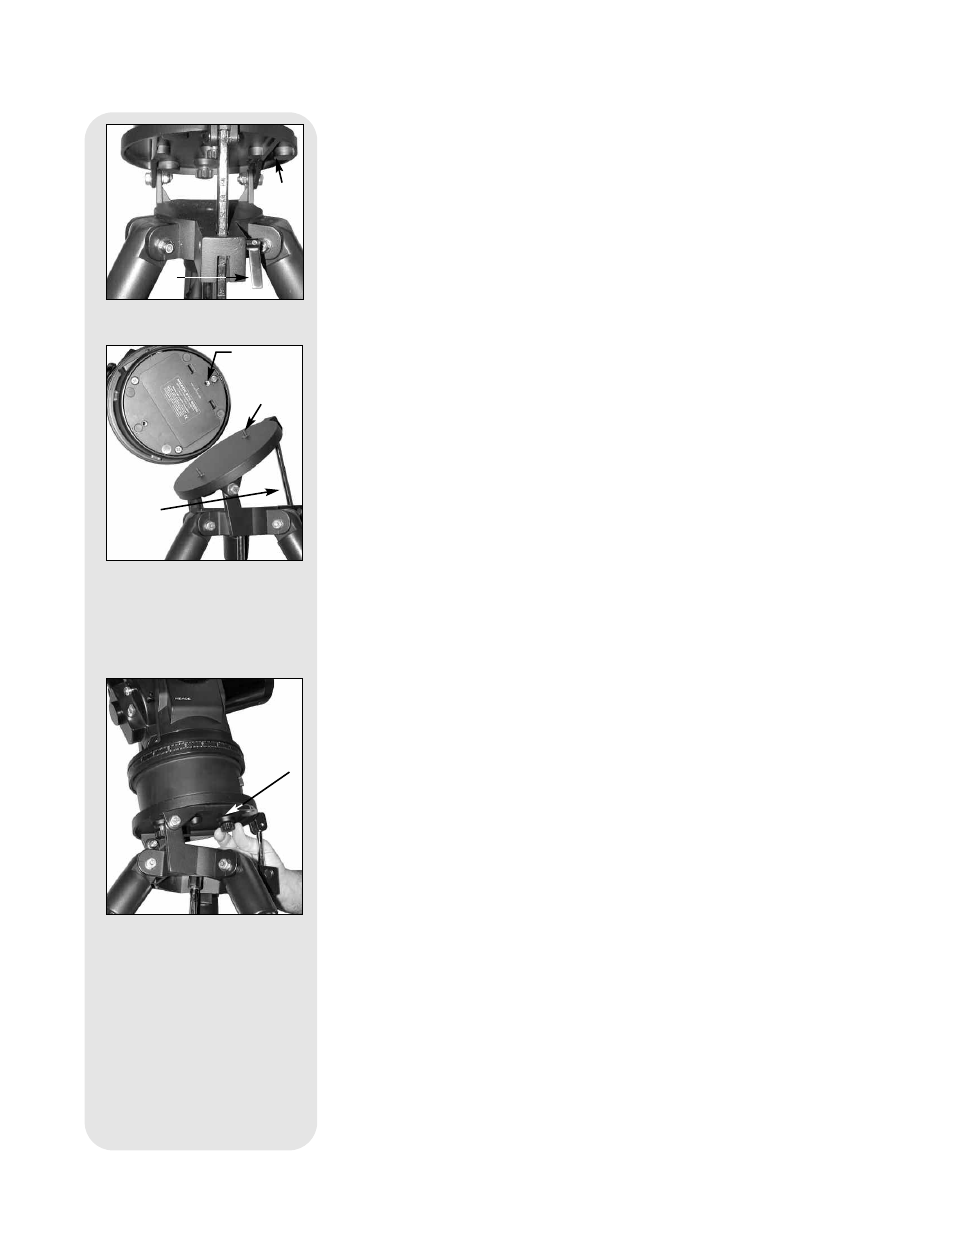
Loosen the latitude control latch (
1, Fig. 44) and lift up the tilt-plate (2, Fig. 44) so that
you can easily access the underside of the plate. Relock the latitude
control latch, so the assembly doesn't slip while you are attaching the telescope.
3.
Turn the tripod, so that the face of the tilt-plate points North (
Figs. 48 and 49, on next
page). If you attach the telescope to the tripod indoors, be sure to orient the face of
the tilt-plate to point North after moving the telescope outdoors. Equivalently, point the
tripod leg (
5, Fig. 48) North. This is the leg opposite from the latitude control bar (4,
Fig. 48).
4.
Line up the mounting hole on the base of the telescope labeled "High Latitude Leg"
with the attachment knob that is closest to the latitude control bar (
see Fig. 45). Line
up the other mounting hole with the remaining attachment knob. Thread both
attachment knobs into the base of the telescope. Tighten to a firm-feel only.
5.
Determine the latitude of your observing location from a road map, atlas or the
LATITUDE CHART FOR MAJOR CITIES OF THE WORLD
, page 54. Loosen the
latitude control latch (
1, Fig. 47, on next page) and adjust the latitude control bar (4,
Fig. 47) so that your observing site's latitude is just visible above the flat surface of the
tripod head. Retighten the latch.
6.
If you have not already done so orient the tripod leg (see
Step #3 and 5, Fig. 48) so
that it is pointing due North (if the location of Polaris, the North Star, is known, point
the telescope directly at Polaris. Observers located in the Earth’s Southern
Hemisphere must point the telescope due South).
7.
The telescope is now equatorially mounted; the tripod must not be moved or else the
alignment will be lost. Instead, use one of the following methods to move the
telescope's optical tube to a desired celestial object.
(a) Loosen the vertical and/or horizontal locks (
6 and 9, Fig. 1a and 1b) to permit
the optical tube to be freely moved manually. Tighten the locks once you center
on the object.
(b) With the horizontal and vertical locks in their “locked” positions, use the Arrow
keys to move the optical tube.
Note: For most astronomical observing requirements, approximate
settings of the telescope's latitude and North-pointing tripod leg (
Steps #5
and #6) are acceptable. Do not allow undue attention to precise equatorial
mounting of the telescope to interfere with your enjoyment of the instrument.
Using an Equatorially Mounted Telescope
Once your telescope is equatorially mounted, the telescope motor drive will keep a
celestial object in the telescope eyepiece's field of view.
To Track a Star When Polar Mounted:
Make sure you have initialized your telescope before you try out this feature (see
INITIALIZING AUTOSTAR
, page 17).
1. Tighten the vertical and horizontal locks (
6 and 9, Fig. 1a and 1b) if necessary.
2. Make sure that AutoStar is connected to the HBX port (
C, Fig. 2) of the
telescope’s computer control panel.
3. Flip the telescope power switch (
A, Fig. 2) to the ON position.
The AutoStar screen displays a copyright message displays, followed by a short beep.
Then AutoStar takes a few moments to start up the system.
4. A message displays that warns not to look at the Sun. At the end of this message,
press the key prompted by AutoStar to signify that the message has been read and
understood.
»
Fig. 46: Attach telescope to
tripod.
Fig. 45: High latitude leg
mounting hole and
corresponding attachment
knob.
High latitude
leg mounting
hole.
Attachment
knob.
ᕢ
Fig. 44: Loosen control latch.
Latitude
control
bar.
³