Mercur y mariner, Instrument panel features, The new 2009 – Mercury 2009 Mariner User Manual
Page 2
Your ne
w Mer
cury Mariner i
s about
to tur
n your e
veryda
y driving
experienc
e int
o an e
veryda
y
driving ad
ventur
e. You’r
e going
to love the w
ay thi
s smart, styli
sh
and s
ophi
sticate
d SUV handle
s
what
ever r
oad lif
e lays out bef
ore
you. Thi
s Qui
ck R
eferenc
e Guide
was de
signe
d to help y
ou qui
ckly
get to kno
w the man
y featur
es
of your ne
w Mariner. F
or mor
e
detaile
d inf
ormation and import
ant
safety inf
ormation, ple
ase see y
our
Owner’
s Guide.
Use e
xtreme c
aution when using
any de
vice or f
eatur
e that ma
y take
your at
tention o
ff the r
oad. Y
our
primary r
esponsibility i
s the saf
e
oper
ation o
f the v
ehicle. Only us
e
non-e
ssential f
eatur
es and de
vices
when it i
s saf
e to do s
o.
DU
AL
A
UT
OMA
TIC
CLIMA
TE CONTROL
WITH HEA
TED SEA
TS
(if equipped)
THE NEW 2009
MERCUR
Y
MARINER
potential
vehicle
problems
with a
display
of system warnings
followed by a long
indicator chime. For
more information,
please refer to your
Owner’s Guide.
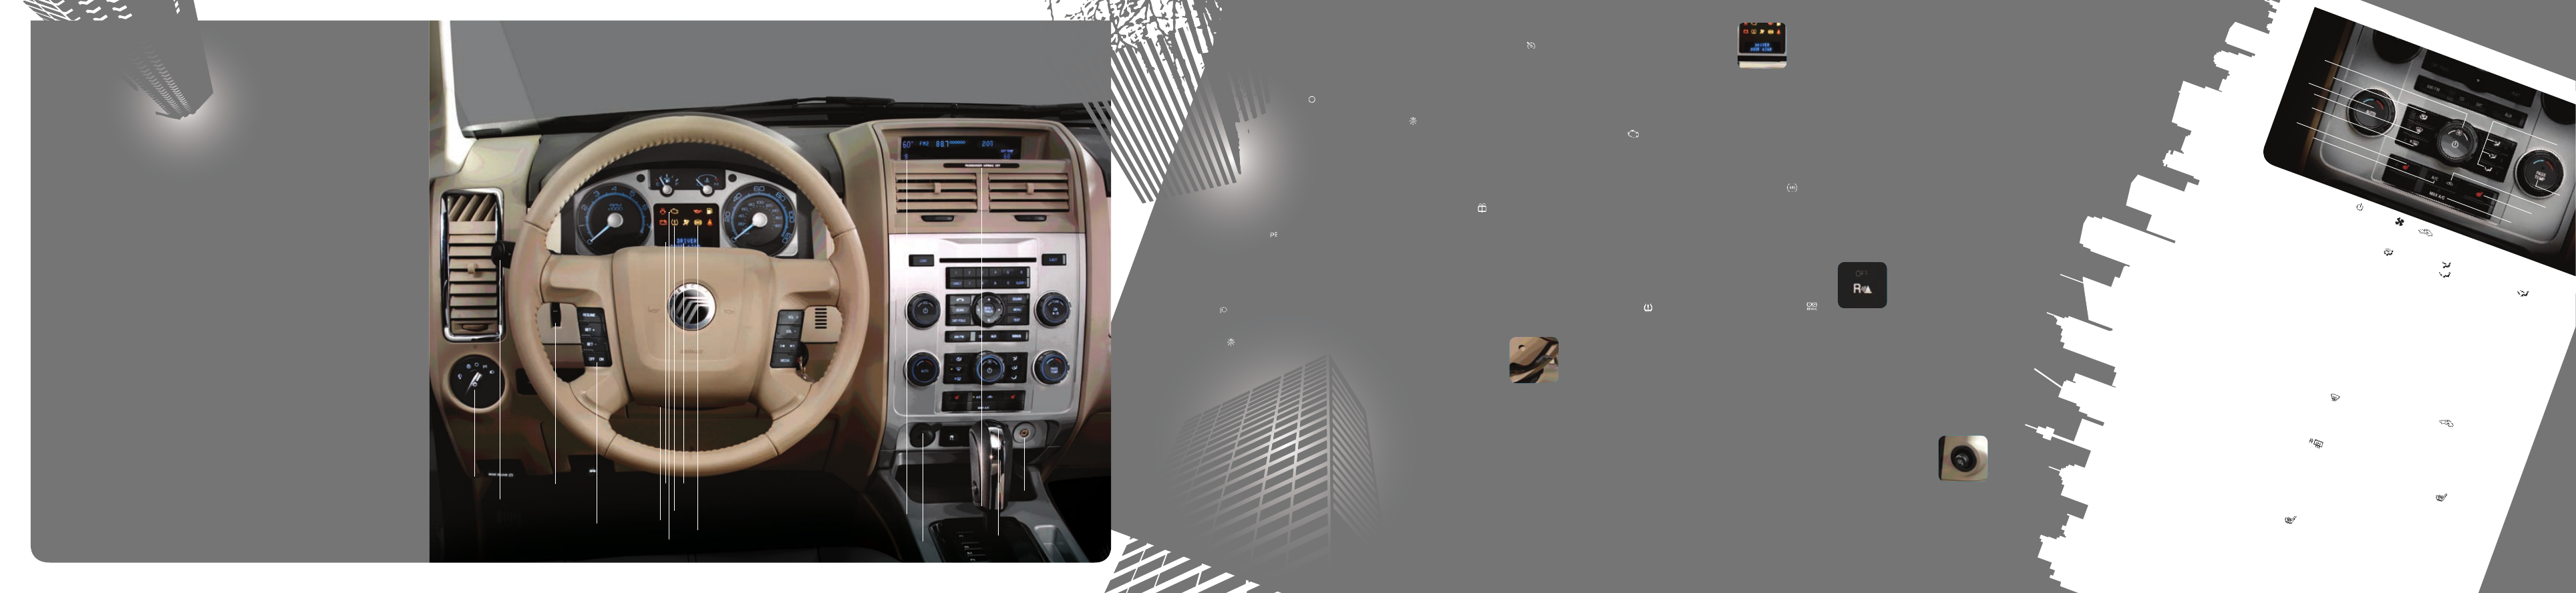
10.
ABS WARNING
LIGHT
The ABS light
illuminates briefly when
the ignition is turned on.
If the ABS light remains
on or continues to flash,
a malfunction has been
detected. Contact your
authorized dealer as
soon as possible. Normal
braking (less ABS) is still
functional unless the
brake warning light
is also illuminated.
11.
COMPASS
The compass heading (N,
NE, E, SE, S, SW, W or
NW) is displayed in the
center stack display.
The compass reading
may be affected when
you drive near large
buildings, bridges,
power lines and powerful
broadcast antennas. For
more information, please
see your Owner’s Guide.
12.
AUXILIARY POWER
POINTS (12V)
The 12V power point
outlets, located on the
instrument panel and
the rear of the center
console, are designed
for accessory plugs only.
Do not insert any other
object; damage may
occur and blow the fuse.
13.
PASSENGER
AIRBAG OFF
The passenger airbag
off indicator light will
illuminate when the
passenger’s front airbag
is off. Please refer to
your Owner’s Guide for
safety information and
more details.
14.
REVERSE SENSING
(if equipped)
Your
vehicle
may be
equipped
with a
reverse sensing system
which can warn you if
there is a large object
behind the vehicle that
you may be unable to
see. The system will
sound a warning
tone that increases in
frequency as the object
gets closer and will
sound continuously
when the object is less
than 10 inches away.
Refer to your Owner’s
Guide for safety
information and
more details.
15.
AUXILIARY
INPUT JACK
The auxiliary input
jack provides a way to
connect your portable
music player to the
in-vehicle audio system.
This allows the audio
from a portable music
player to be played
through the vehicle
speakers. For more
information, please see
your Owner’s Guide.
FOUR-WHEEL DRIVE
(4WD) SYSTEM
(if equipped)
Your vehicle may be
equipped with an
intelligent 4WD system
that continuously
monitors vehicle
conditions and
automatically adjusts
the power distribution
between the front
and rear wheels. The
4WD system is always
active, requires no
input, and is capable
of handling all road
conditions, including
street and highway
driving as well as
off-road and
winter driving.
POWER SIDE VIEW
MIRRORS
Rotate
the
control
clockwise
to adjust
the right mirror, and
counterclockwise to
adjust the left mirror.
Then move the control in
the direction you wish to
tilt the mirror. Return
to the center position to
lock the mirror in place.
1
2
1
3
5
9
11
13
4
7
10
14
8
6
15
12
2
3
4
5
6
7
12
11
10
9
8
INSTRUMENT
PANEL
FEATURES
the exterior lamps on
and off, based on available
daylight. Pull the control
towards you to activate the
fog lamps. (The fog lamps
will not operate when the
headlamps are turned off
or when the high beams
are on).
2.
MULTI-FUNCTION
LEVER
Rotate the end of the
control up to increase
the speed of the wipers
and rotate down to
decrease the speed of
the wipers. Briefly press
the end of the stalk for
a single swipe of the
wipers without washer
fluid. A quick push and
hold results in three
swipes with washer fluid
while a longer push and
hold activates the wash
pattern for up to five
seconds. A ‘courtesy
wipe’ will automatically
occur after the
washing
cycle to
ensure
that
any drips have been
cleared from your
windshield. For better
visibility, your vehicle
will also automatically
turn on your headlights
(during daylight hours)
if your windshield
wipers and autolamps
(if equipped) are on.
To operate your rear
window wiper, turn the
rear wiper control to 1
(intermittent speed),
2 (normal speed), or
off. For a rear wash
cycle, turn the rear
wiper control to the
position. To turn on the
highbeams, push the
lever away from you.
Pull the lever toward you
to deactivate. Pull the
lever toward you briefly
to activate the ‘flash to
pass’ feature.
3.
PANEL DIMMER
CONTROL
Use the dimmer control
to adjust the brightness
of the instrument
panel and all applicable
switches in the vehicle
when the headlamps
and parking lamps are
on. Move the control to
the full upright position,
past the detent, to turn
on the interior lamps.
4.
SPEED CONTROL
To set the speed control,
press and release ON.
Accelerate to the desired
speed. Press and release
the SET+ control.
Take your foot off the
accelerator pedal. The
speed control indicator
light will illuminate
in the cluster. To set
a higher speed: press
and hold SET+ until the
desired speed is reached,
or briefly press SET+
to increase the speed
by small amounts. To
set a lower speed: press
and hold SET- until the
desired speed is reached,
or briefly press SET- to
decrease the speed by
small amounts. Press
RSM to return to the
previously set speed. To
turn speed control off,
press OFF.
5.
TILT STEERING
WHEEL LEVER
To adjust the steering
wheel, push the lever
down to unlock the
steering column. While
the lever is down, tilt the
steering
wheel
to your
desired
position.
Then, while holding the
steering column in place,
pull the lever up to its
original position to lock
the steering column.
6.
HAzARD FLASHER
Push the flasher control,
located on the steering
column, and all front
and rear direction
signals will flash. Use
it when your vehicle is
disabled or is creating a
safety hazard for other
motorists. The hazard
flashers will operate
when the ignition is in
any position or if the
ignition is turned off.
7.
SERVICE ENGINE
SOON LIGHT
The service engine soon
light
illuminates
briefly when the
ignition is turned on.
If it remains on or is
blinking after the engine
is started, the On Board
Diagnostics System
(OBD-II) has detected
a malfunction. Drive in
a moderate fashion and
contact your authorized
dealer as soon as possible.
8.
LOW TIRE PRESSURE
WARNING LIGHT
This light illuminates
when the ignition is
turned on. If the light
does not turn on or
begins to flash, contact
your authorized dealer
as soon as possible.
For more information,
please refer to Tire
pressure monitoring
system (TPMS) in the
Tires, Wheels and
Loading chapter of
your Owner’s Guide.
9.
MESSAGE CENTER
The message center
displays important
vehicle information
through a constant
monitoring of vehicle
systems. The system
will also notify you of
1.
HEADLAMPS AND
FOG LAMPS
Turn the control one
position to the right
to turn on the parking
lamps, instrument panel
lamps, license plate
lamps and tail lamps.
Turn the control to the
second position on the
right to turn on the
headlamps. Turn the
control one position to
the left to activate
the autolamp feature
(if equipped), which
automatically turns
1.
POWER
AND
FAN
Press t
o tur
n the sy
stem on/o
ff. Tur
n the
contr
ol to incr
ease/decr
ease the f
an spe
ed.
2.
FLOOR
AND
DEFROS
T
Distribut
es air thr
ough the wind
shield
defrost
er vents, demi
ster v
ents, floor v
ents
and r
ear s
eat floor v
ents.
3.
AUTO/D
RIVER
TEMPER
ATURE
Press the c
ontr
ol to eng
age ful
l aut
omati
c
oper
ation. The sy
stem wil
l aut
omati
cally
determine f
an spe
ed, airflo
w di
stribution,
A/C on or o
ff and e
ither outside or
recir
culat
ed air t
o he
at or c
ool the v
ehicle
to reach the de
sired t
emper
atur
e. Turn
the c
ontr
ol to incr
ease/decr
ease the
temper
atur
e on the driv
er side o
f the v
ehicle.
Note:
This c
ontr
ol wil
l also de
termine the
temper
atur
e for the entir
e vehi
cle c
abin
when the pas
senger t
emper
atur
e contr
ol
(PASS TEMP) i
s no
t eng
aged.
4.
DEFROS
T
Distribut
es outside air thr
ough the
wind
shield def
roster v
ents and demi
ster
vents. Can be us
ed to cle
ar the wind
shield
of fog and thin i
ce.
5.
REAR
DEFROS
TER
Press t
o activ
ate the r
ear windo
w
defrost
er and cle
ar the r
ear windo
w of
thin i
ce and f
og. Pr
ess ag
ain t
o de
activ
ate.
The r
ear windo
w def
roster wil
l tur
n off
automati
cally aft
er a pr
edeter
mine
d
amount o
f time, if a lo
w bat
tery c
ondition
is de
tected, or when the ignition i
s tur
ned
off or t
o the ac
cessory po
sition.
6.
DRIVER
HEA
TED
SEA
T
Press t
o activ
ate or de
activ
ate the
driv
er he
ated s
eat.
7.
A/C
Press t
o activ
ate/de
activ
ate air
conditioning. Us
e with r
ecirculat
ed air
to impr
ove cooling perf
ormanc
e
and ef
ficiency.
8.
PANEL
, PANEL
AND
FLOOR
,
FLOOR
Press the de
sired c
ontr
ol for airflo
w to be
direct
ed thr
ough the P
anel (instrument
panel v
ents), P
anel and Floor (instrument
panel v
ents, demi
ster v
ents, floor v
ents and
rear s
eat floor v
ents) or the Floor (demi
ster
vents, floor v
ents and r
ear s
eat floor v
ents).
9.
PASS
TEMP
Press t
o activ
ate pas
senger side
temper
atur
e contr
ol. T
urn the c
ontr
ol to
decr
ease/incr
ease the t
emper
atur
e setting
for the pas
senger side o
f the v
ehicle. Pr
ess
again t
o de
activ
ate (the driv
er side s
ettings
will then de
termine the t
emper
atur
e for the
entir
e vehi
cle c
abin).
10.
RECIRCULA
TED
AIR
Press t
o activ
ate/de
activ
ate air cir
culation
inside the v
ehicle c
abin. R
ecirculat
ed air
may r
educ
e the amount o
f time ne
eded t
o
cool do
wn the v
ehicle and ma
y als
o help
reduc
e unde
sirable odor
s from ent
ering
the v
ehicle. R
ecirculat
ed air eng
ages
automati
cally when MA
X A/C i
s select
ed.
11.
PASSENGER
HEA
TED
SEA
T
Press t
o activ
ate or de
activ
ate the
passenger he
ated s
eat.
12.
MAX A/C
Press t
o distribut
e recir
culat
ed air thr
ough
the instrument panel v
ents t
o cool the
vehicle. Thi
s mode i
s mor
e ec
onomi
cal and
efficient. Pr
ess ag
ain t
o retur
n to nor
mal
A/C oper
ation.