2. installing torch, Warning – Miller Electric APT-1000 User Manual
Page 9
OM-1572 Page 3
3-2.
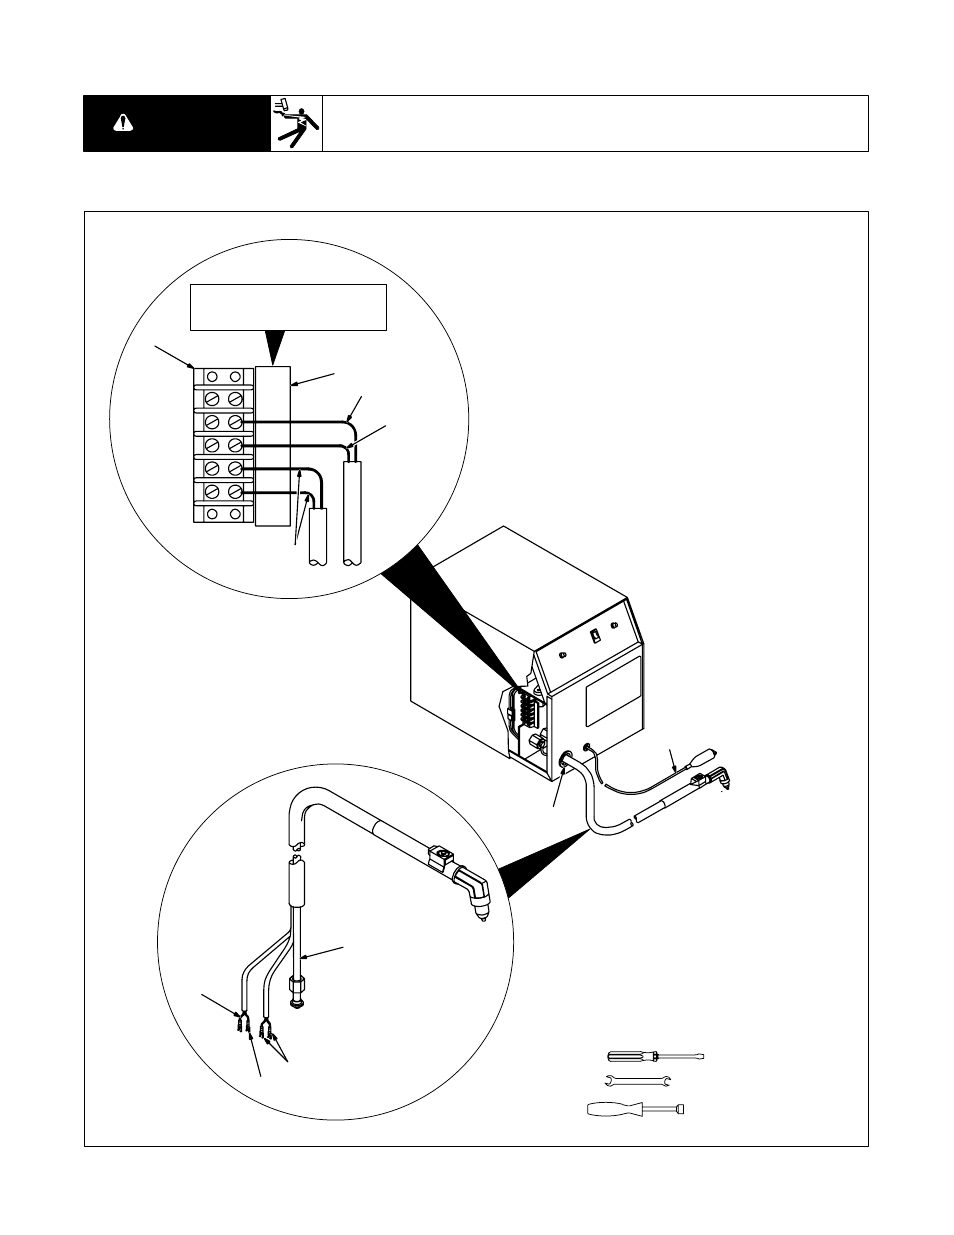
Installing Torch
READ SAFETY BLOCK at start of
Section 3 before proceeding.
WARNING
A. Installing Torch In Standard Power Source
ST-128 701-C
Turn Off power source, and
disconnect input power plug. Re-
move wrapper.
1
Torch Cable
2
Front Panel Opening
3
Pilot Arc/Shield Cup Detector
Lead 1
4
Shield Cup Detector Lead 2
5
Torch Switch Leads 3 and 4
Route cable and leads through front
panel opening.
6
Terminal Strip 1T
7
Connection Label
Connect cable to air/torch (–) out-
put connector which is not visible in
Figure 3-2, but is located behind
terminal strip 1T.
Refer to label and connect leads as
shown.
Install wrapper.
8
Work Cable (Supplied With
Power Source)
5/8 in
Tools Needed:
1/4 in
1
2
3
4
1
2
3
4
5
6
7
8
3
4
5
S-137 691
Figure 3-2. Installing Torch In Standard Power Source
- OM-2241 (32 pages)
- ICE-27C (36 pages)
- Arc Welding Power Source (4 pages)
- INVISION 456 CC (44 pages)
- Welder (132 pages)
- SS-75D12 (44 pages)
- Load Bank LBP-350 (2 pages)
- OM-193 084E (36 pages)
- 750MPa (2 pages)
- OM-220 390F (48 pages)
- 271 (48 pages)
- Welding (32 pages)
- DC (72 pages)
- OM-129 (70 pages)
- XLi (24 pages)
- S-64 (36 pages)
- ICE-27T (36 pages)
- PipePro 304 (76 pages)
- AA40GBU (28 pages)
- D-64 (40 pages)
- Auto Arc XLT 165 (48 pages)
- 185 DX (56 pages)
- S-32S (4 pages)
- Big 40 DC/TIG 55500 A (8 pages)
- Big Blue 600D (60 pages)
- Millermatic 140 (60 pages)
- pmn (36 pages)
- LMSW Series (2 pages)
- 1250 (46 pages)
- Trailblazer Pro 350 D (8 pages)
- TS (76 pages)
- S-22P12 (28 pages)
- 602 (40 pages)
- Axcess 300 (56 pages)
- MOG-400 (40 pages)
- WC-24 (20 pages)
- Big Blue 502P (64 pages)
- Dimension 1000 (44 pages)
- DS-74DX12 (52 pages)
- 350 VS (36 pages)
- 24A (32 pages)
- GA-16C (12 pages)
- Big Blue 502D (116 pages)
- OM-229 038D (36 pages)