Mercur y mariner, Instrument panel features, Du al a ut oma tic clima te control – Mercury 2008 User Manual
Page 2: Hybrid, The new 2008
THE NEW 2008
is 100% SUV and 100% Hybrid. I
t
requir
es no special fuels and ne
ver
has t
o be plug
ged in.
all you ha
ve to
do is ge
t in and driv
e.
With al
l the c
onfidenc
e of an
authenti
c Mer
cury SUV c
ombine
d
with the benefits o
f a ful
l hybrid
system, e
very Mer
cury Mariner
Hybrid i
s equip
ped to help y
ou go
anywher
e and do an
ything no
w
mor
e efficiently than e
ver and in an
environment
ally c
onscious manner.
In or
der t
o help y
ou ful
ly ap
preciat
e
the f
eatur
es of y
our ne
w vehi
cle and
its unique char
acteri
stics, w
e invit
e
you t
o explor
e thi
s easy-t
o-us
e
Quick R
eferenc
e Guide.
This v
ehicle has unique driving
char
acteri
stics t
o ma
ximiz
e its
hybrid oper
ation. Driv
e with c
are
and w
ear a saf
ety belt at al
l time
s.
Mercury ur
ges you t
o read the
owner’
s Guide and the Driving
Your SUV or T
ruck Sup
plement f
or
further inf
ormation on saf
e driving
precautions and instructions.
10.
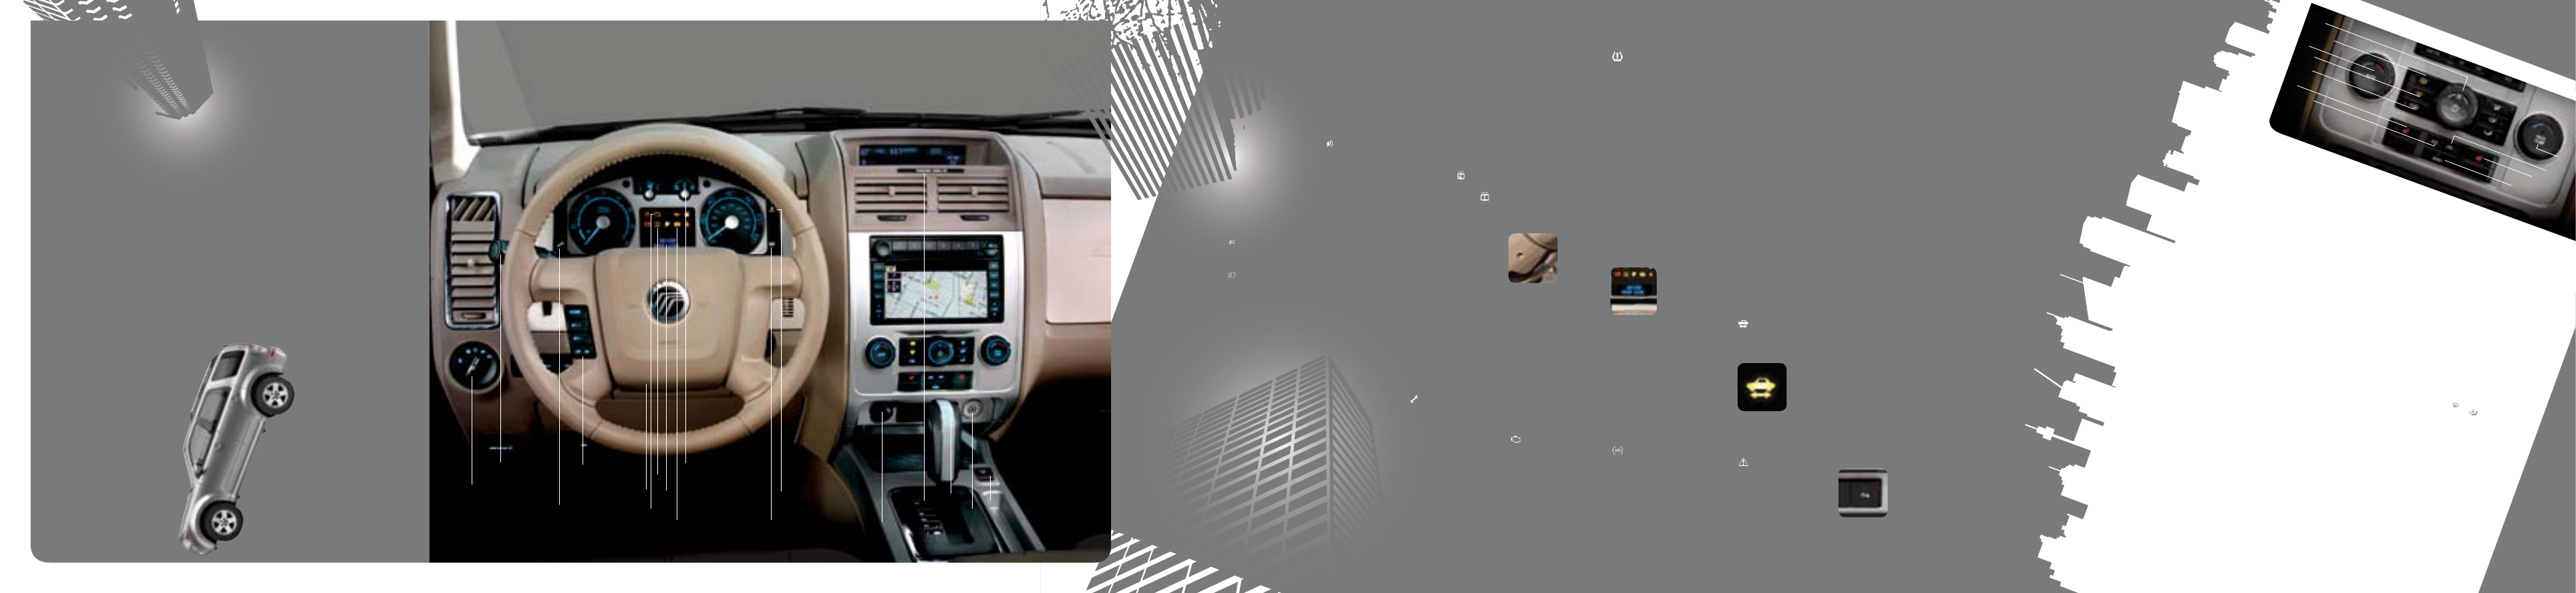
baTTERY GaUGE
The battery gauge
provides information
about your vehicle’s
energy usage. When
the pointer is directed
at aSSIST, this means
the battery is providing
extra power to boost the
vehicle’s acceleration.
When it’s pointing to
CHaRGE, extra energy
is being stored in the
battery while idling,
coasting or slowing
down. When you
press the brake pedal,
the pointer swings
counterclockwise into
the CHaRGE zone to
report that regenerative
braking is underway.
If the needle does not
move when braking, the
battery is fully charged.
11.
REaDY INDICaToR
Illuminates after the
vehicle has successfully
started. The vehicle is
ready to drive even if
you don’t
hear the
engine
running.
12.
MaSTER VEHIClE
ElECTRICal HazaRD
WaRNING laMp
Indicates a hybrid
component failure or
fault that will cause
the vehicle to shut
down or fail to start.
For additional
information, please see
your owner’s Guide.
13.
poWER poINT – 110
VaC (if equipped)
This outlet, located on
the floor console in
front of the gearshift,
is used for powering
electrical devices that
require up to 150W.
Exceeding this limit will
cause the power point
to cut off the power
temporarily to provide
overload protection.
The green indicator light
will illuminate when the
power point is ready to
supply power, will blink
when it is in fault mode,
and will turn off when
the power supply is off
(ignition is not in the
RUN position).
This outlet does not
require an adapter
in order to plug in an
electrical device.
14.
paSSENGER
aIRbaG oFF
The passenger airbag
off indicator will
illuminate when
the passenger’s
frontal airbag is off.
For additional
information, please see
your owner’s Guide.
15.
REVERSE SENSING
SYSTEM (if equipped)
This
system
sounds
a tone
to warn
the driver of obstacles
near the rear bumper
when R (Reverse) is
selected and the vehicle
is moving at speeds less
than 3 mph (5 km/h).
as you move closer to
the obstacle, the rate
of the tone increases.
When an obstacle is less
than 10 inches (25 cm)
away, the tone sounds
continuously. The
system is not effective
at speeds above 3 mph
(5 km/h) and may not
detect certain angular
or moving objects. With
the ignition on, press
the RSS control, located
below the climate
control system, to turn
the RSS off. an indicator
light will illuminate
when the system is off.
16.
aUXIlIaRY INpUT
JaCK
The auxiliary input
jack provides a way to
connect your portable
music player to the
in-vehicle audio system.
This allows the audio
from a portable music
player to be played
through the vehicle
speakers. For additional
information, please see
your owner’s Guide.
17.
aUXIlIaRY poWER
poINTS (12V)
The 12V power point
outlets, located on the
instrument panel and
the rear of the center
console, are designed
for accessory plugs only.
Do not insert any other
object; damage may
occur and blow the fuse.
DU
AL
A
UT
OMA
TIC
CLIMA
TE CONTROL
MERCUR
Y
MARINER
Hybrid
1
2
3
4
5
6
8
9
1
2
4
5
6
7
8
9
13
15
16
10
17
14
3
11
12
INSTRUMENT
PANEL
FEATURES
The foglamps can
be turned on when
the headlamp control
is in the parking
lamp, headlamp or
autolamp position and
the high beams are not
on. pull the headlamp
control toward you to
turn on the foglamps.
The foglamp indicator
light will illuminate.
push the control in to
deactivate. Remember,
the foglamps will not
operate when the
high beams are on.
The foglamps are also
deactivated when the
ignition is turned to the
loCK position.
2.
MUlTIFUNCTIoN
lEVER
The multifunction lever
controls the front and
rear wipers and washers,
high beam headlamps
and turn signals. Rotate
the end of the
control away
from you to
increase
the windshield wiper
speed or toward you
to decrease the speed.
press the end of the stalk
to activate the washer.
one extra wipe will
happen a few seconds
after washing the front
window to clear any
water that is dripping
down from the top of the
windshield caused by the
washing. For rear wiper
operation, rotate the rear
wiper control to the
desired position. Rotate
the control to either
position to activate the
rear washer. To activate
the high beams, push
the lever toward the
instrument panel. pull
the lever toward you to
deactivate. To use the
“Flash to pass” feature,
pull the lever towards
you slightly to activate
and release to deactivate.
For more information,
please see your owner’s
Guide.
3.
THRoTTlE CoNTRol/
poWERTRaIN
Illuminates when
the vehicle has detected
a malfunction. Report
the fault to your Hybrid
certified dealer at the
earliest opportunity.
4.
SpEED CoNTRol
For your speed control to
work, it must be in the
oN position. pressing
and releasing the oN
button will engage it.
pressing and releasing the
oFF button disengages
it. To set a desired speed,
press SET+. You can
increase speed using the
speed control by pressing
and holding SET+. You
can decrease speed by
pressing and holding the
SET- button. pressing
the RESUME button will
automatically return the
vehicle to the previously
set speed. To disengage
the speed control, press
the oFF button or press
the brake pedal.
5.
TIlT STEERING
WHEEl lEVER
To adjust
the
steering
wheel,
push the
adjustment lever down
to unlock the steering
column. While the lever
is in the down position,
tilt the steering wheel
to your desired position.
Then, while holding the
steering column in place,
pull the lever up to its
original position to lock
the steering column.
6.
CHECK ENGINE laMp
Illuminates briefly
when ignition is turned
to the RUN position. Solid
illumination after start
indicates the on-board
Diagnostics System has
detected a malfunction.
Have your vehicle
serviced immediately at
a Hybrid certified dealer.
7.
TIRE pRESSURE
MoNIToRING SYSTEM
(TpMS)
Using radio-
frequency pressure
sensors, this system
monitors tire pressure
on all road tires and
provides the driver
with a warning light
when air needs to be
added. For additional
information, please see
your owner’s Guide.
8.
MESSaGE CENTER
When the ignition is in
the RUN position, the
message center in your
vehicle’s instrument
cluster will display
information through
constant
monitoring
of vehicle
systems.
You may
select display features on
the message center for
a display of status. The
system will also notify
you of potential vehicle
problems with a display
of system warnings
followed by a long
indicator chime.
9.
abS WaRNING laMp
Illuminates briefly
when ignition is turned
to the RUN position.
If the light remains
illuminated or continues
to flash, a malfunction
has been detected.
Normal braking is still
functional unless the
brake warning light is
also illuminated.
1.
HEaDlaMp aND
FoGlaMp CoNTRol
Rotate the headlamp
control to the first
position to turn on
the parking lamps.
Rotate to the second
position to turn
on the headlamps.
To use the autolamp
(if equipped) light
sensitive on-off control
for the headlamps, turn
the headlamp control
to the position. To turn
the autolamps off, turn
the control back
to the o (off)
position.
1.
poWER
aND
FaN
press t
o activ
ate or
deactiv
ate the climat
e contr
ol sy
stem. T
urn to
manual
ly incr
ease or decr
ease the f
an spe
ed;
the f
an s
etting wil
l be di
spla
yed in the shar
ed
displa
y at the t
op o
f the c
enter panel ar
ea. To
retur
n to aut
omati
c fan oper
ation, pr
ess aUT
o.
When the climat
e system i
s off, outside air i
s
shut out.
2.
Floo
R aND
DEFR
oST
Distribut
es air thr
ough
the wind
shield def
roster, demi
ster, floor and
rear s
eat floor v
ents.
3.
aUTo/D
RIVER
TEM
pERaTURE
press t
o
engage ful
l aut
omati
c oper
ation. T
urn to
increas
e or decr
ease the t
emper
atur
e on the
driv
er side o
f the v
ehicle. The t
emper
atur
e
setting wil
l be di
spla
yed in the shar
ed di
spla
y at
the t
op o
f the c
enter panel ar
ea. The c
ontr
ol als
o
adjusts the pas
senger side t
emper
atur
e when
paSS TEM
p is di
seng
aged.
4.
DEFR
oST
Distribut
es outside air thr
ough the
wind
shield def
roster v
ents and demi
ster v
ents.
It can be us
ed to cle
ar the wind
shield o
f fog and
thin i
ce.
5.
REaR DEFR
oSTER
press t
o cle
ar the r
ear
windo
w of fog and thin i
ce. The r
ear def
roster
turns o
ff aut
omati
cally aft
er a pr
edeter
mine
d
amount o
f time or if the ignition i
s tur
ned to the
loCK or
aCCE
SSoRY po
sition. Thi
s but
ton als
o
contr
ols the outside he
ated mirr
ors
(if equip
ped).
6.
DRIVER
/paSSENGER
HEaTED
SEaTS
(if equip
ped)
press t
o activ
ate or de
activ
ate
the driv
er or pas
senger he
ated s
eat. The
system aut
omati
cally shuts o
ff aft
er
10 minut
es.
7.
a/C
press t
o activ
ate/de
activ
ate air
conditioning. Us
e with r
ecirculat
ed
air t
o impr
ove cooling perf
ormanc
e
and ef
ficiency.
8.
paSS
TEM
p
press t
o
engage
/diseng
age sep
arate pa
ssenger
side t
emper
atur
e contr
ol. T
urn to
increas
e/decr
ease the
temper
atur
e on the pas
senger side o
f
the v
ehicle. The pas
senger t
emper
atur
e
setting wil
l be di
spla
yed in the shar
ed
displa
y at the t
op o
f the c
enter panel ar
ea,
if the
paSS TEM
p is eng
aged.
9.
RECIRCU
laTED
aIR
press t
o
activ
ate/de
activ
ate air r
ecirculation in
the v
ehicle. R
ecirculat
ed air ma
y reduc
e
the amount o
f time ne
eded t
o cool do
wn
the int
erior o
f the v
ehicle and ma
y als
o help
reduc
e unde
sired odor
s from r
eaching the
interior o
f the v
ehicle.
10.
ECoN
press thi
s but
ton t
o activ
ate/
deactiv
ate ec
onom
y air c
onditioning oper
ation.
ECoN mode wil
l help t
o impr
ove fuel ec
onom
y
by al
lowing the g
as engine t
o tur
n off when
it’s no
t neede
d to driv
e the v
ehicle. When the
gas engine tur
ns o
ff, the
a/C c
ompr
essor doe
s
not oper
ate to c
ool the c
abin and c
omf
ort ma
y
be reduc
ed. T
o select c
ooling c
omf
ort o
ver
maximum fuel ec
onom
y, de
activ
ate E
CoN.
ECoN c
anno
t be s
elect
ed in
or
.
TIpS:
MaX a
/C op
ERaTI
oN
automati
c oper
ation:
press a
UTo for ful
l aut
omati
c oper
ation. Do
not override
a/C or r
ecirculat
ed air. Se
t the
temper
atur
e to 60°F (16.
0°C). De
activ
ate E
CoN.
override
oper
ation:
Select air di
stribution.
Select
a/C and r
ecirculat
ed air. Us
e
recir
culat
ed air with
a/C t
o provide c
older
airflo
w. Se
t temper
atur
e to 60°F (16.
0°C). Se
t
to highe
st front f
an spe
ed initial
ly, then adjust
to maint
ain c
omf
ort. De
activ
ate E
CoN.
FUE
l ECoN
oMY
Fuel ec
onom
y can be
impact
ed by Climat
e Contr
ol usage. With
the Climat
e Contr
ol set t
o Def
rost or
Floor/Def
rost the engine ma
y run c
ontinuously,
reducing fuel ec
onom
y. Se
tting the Climat
e
Control
a/C to o
N also r
educes f
uel eco
nomy.
ECoN m
ode will
help im
prove fu
el econ
omy
by allow
ing the
gas eng
ine to tu
rn
off whe
n not ne
eded to
drive th
e vehicle
.
7
10
6