Chain belt, Rail assembly for chain drive opener, Rail assembly for belt drive opener – Genie Model 2022 User Manual
Page 10
10
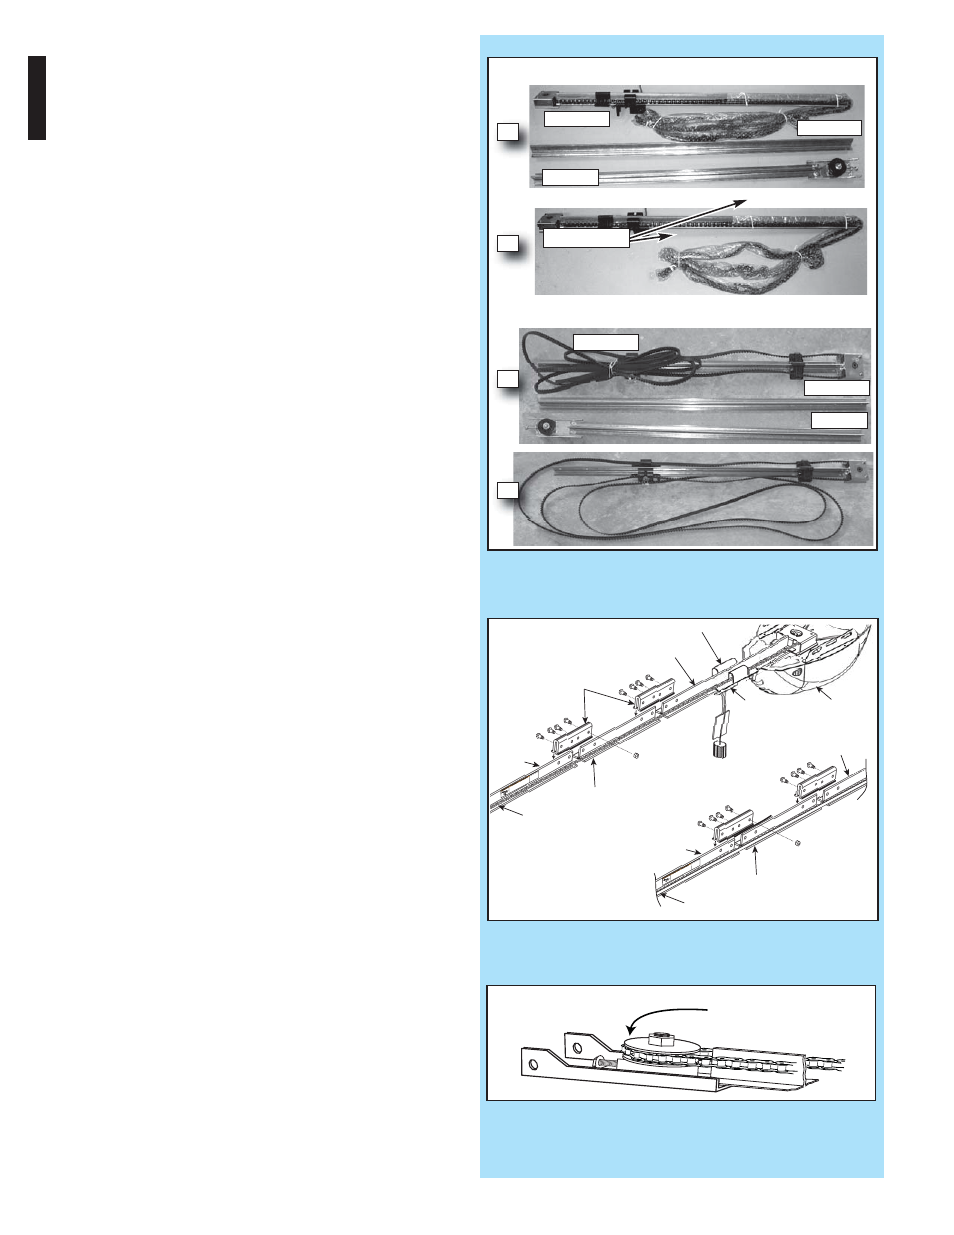
FIG. 1-2
Split Rail sections
.
FIG. 1-3
Split Rail assembly
.
A
B
Chain Rail
Center Rail
End Rail
Wire Tie(s)
Rail Assembly for CHAIN DRIVE OPENER
NOTE: For split rail clamps, nuts, and bolts
locate Bag 0 from Box 1.
3. Remove the two rail sections that are not
connected to the chain and place them on
floor (Fig. 1-2, A).
4. Carefully remove the third rail section with
chain and plastic sleeve. Place rail section on
floor and extend chain straight out
(Fig. 1-2, B).
Chain and rail should extend
approximately 7 feet.
5. Remove wire ties and plastic bag from chain.
Leave chain extended straight out on floor.
Avoid kinks in the chain by careful handling and
keeping chain flat on the floor.
6. Align the three rail sections by pulling the
chain straight and wrapping it around the
chain tensioner pulley (Fig. 1-3 & 1-4).
7. Attach the two rail clamps to the rail section
joints with (4) bolts and nuts.
After both rail
clamps have been assembled to the rail sections,
securely tighten the bolts and nuts.
PN# 37026500123, 02/26/2010 REV. 1
Rail Clamps
Rail Clamp Bolts
Rail Clamp Nuts
Rail with chain
Center Rail
End Rail
Chain
Release
Knob
ng
Power Head
NO
TE
So
me
do
ors
ne
ed
bra
cin
g. Co
nta
ct
door distr
ibu
to
r o
r
ma
nufa
ctur
er
for
instruc
tio
ns
.
HIG
H
SP
RIN
G T
EN
SIO
N
Ca
n C
au
se S
eri
ous
In
jury
or
D
eath
Re
pa
irs or
ad
justm
en
ts mus
t b
e m
ade b
y a tr
ain
ed
ser
vice
pe
rson
us
ing p
ro
pe
r t
ools
an
d in
str
uc
tio
ns
Rail with belt
Center Rail
End Rail
Belt
Release
Knob
NO
TE
So
me
door
s n
ee
d
br
acing
. C
on
tac
t
door dis
trib
ut
or or
ma
nufac
tur
er f
or
instr
uct
ion
s.
HI
GH
SPRI
NG
TE
NS
IO
N
Ca
n C
ause S
eriou
s In
jur
y or
De
ath
Repai
rs or
ad
jus
tm
ent
s m
ust
be
ma
de
by
a
tra
ine
d
se
rvi
ce
pe
rson u
sin
g prop
er t
oo
ls an
d in
str
uct
ion
s
Rail Assembly for BELT DRIVE OPENER
NOTE: For split rail clamps, nuts, and bolts
locate Bag 0 from Box 1.
3. Remove the two rail sections that are not
connected to the belt and place them on floor
(Fig. 1-2, A).
4. Carefully remove the third rail section with
belt. Place rail section on floor, remove ties on
belt and extend belt straight out (Fig. 1-2, B).
Avoid twists and kinks in the belt by careful
handling and keeping belt flat on the floor. Belt
and rail should extend approximately 7 feet.
5. Align the three rail sections by pulling the belt
straight and wrapping it around the tensioner
pulley (Fig. 1-3 & 1-4).
6. Attach the two rail clamps to the rail section
joints with (4) bolts and nuts.
After both rail
clamps have been assembled to the rail sections,
securely tighten the bolts and nuts.
Belt Rail
Center Rail
End Rail
CHAIN DRIVE RAILS
BELT DRIVE RAILS
FIG. 1-4
Mount chain/belt to tensioner pulley
.
Wrap around tensioner pulley
CHAIN
BELT
A
B
Chain Connector
Carriage Assembly