Frymaster 2836 Series User Manual
Page 12
2-3
2.3 Power Requirements
DANGER
The electrical power supply for this appliance must be the same as indicated on the
rating and serial number plate located on the inside of the fryer door.
DANGER
This appliance must be connected to the voltage and phase specified on the rating
and serial number plate located inside the fryer door.
DANGER
All wiring connections for this appliance must be made in accordance with the
wiring diagrams furnished with the equipment. Wiring diagrams are located inside
the fryer door.
DANGER
Copper wire suitable for at least 194°F (90°C) must be used for power connections.
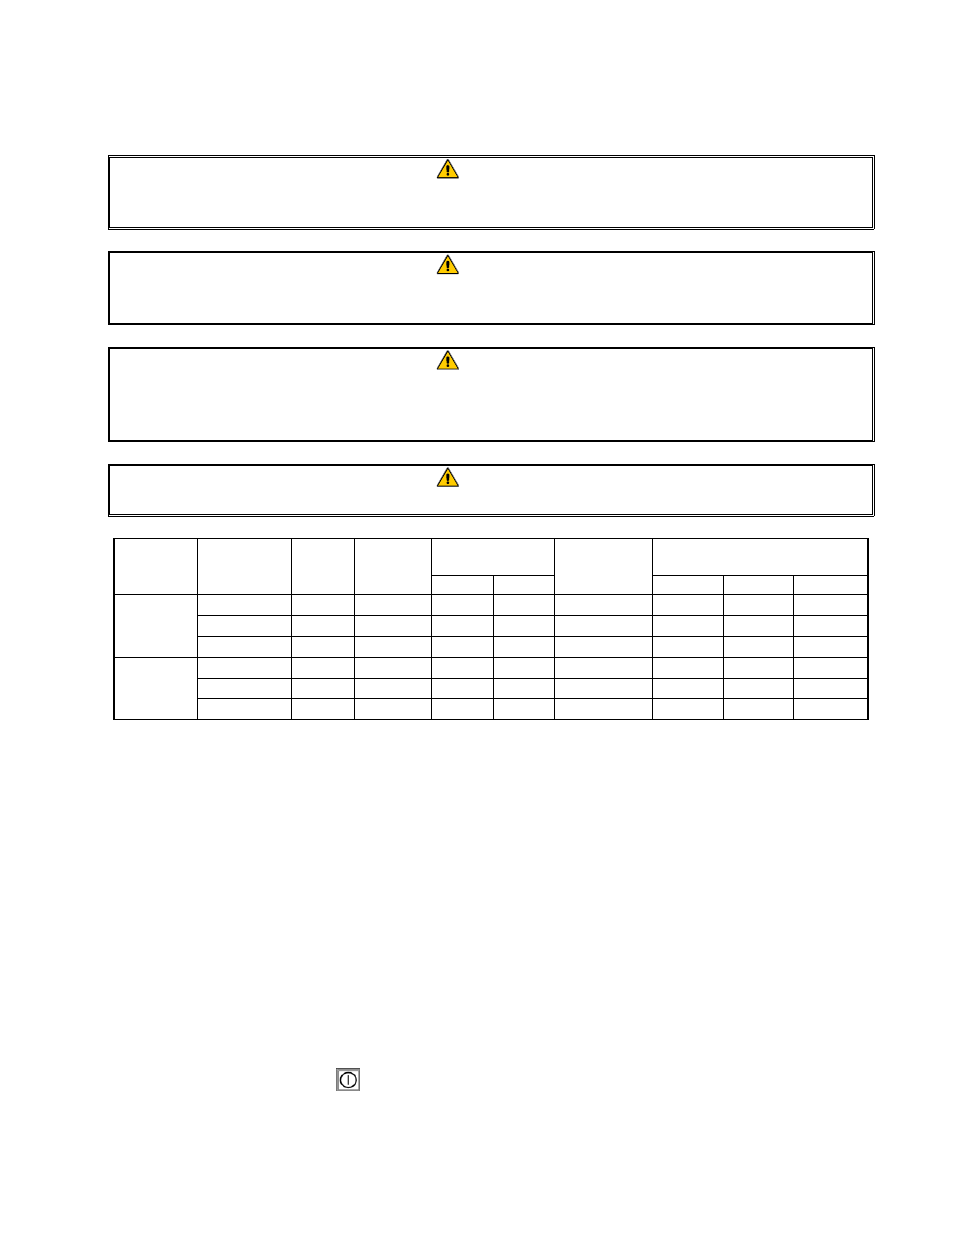
MINIMUM
WIRE SIZE
AMPS PER LEG
FRYPOT
SIZE
VOLTS/KW PHASE
WIRE
SERVICE
AWG mm
120 V
CONTROLS
& FILTER
L1 L2 L3
208/21.5 3
3
3 5.83 N/A 59.7 66.7 66.7
240/28.6 3
3
3 5.83 N/A 68.8 75.5 75.5
110 LB
480/28.6 3
3
6 4.11
11
AMPS
34.4 34.4 34.4
208/21.6 3
3
3 6.54 N/A 60.0 67.0 67.0
240/28.7 3
3
3 6.54 N/A 69.0 76.0 76.0
160 LB
480/28.7 3
3
6 4.11
11
AMPS
42.9 42.9 42.9
2.4 Frypot Boil-Out
Before the fryer is first used for cooking product, it should be boiled out to ensure that residue from
the manufacturing process has been eliminated.
After the fryer has been in use for a period of time, a hard film of caramelized cooking oil will form
inside the frypot. This film should be periodically removed by following the boil-out procedure.
Clean each frypot as follows before filling with cooking oil for the first time and at least once a
month thereafter:
1. Before switching the fryer "ON", close the drain valve and fill the frypot with a mixture of cold
water and detergent to the bottom oil level line. Follow the detergent manufacture’s instructions
when mixing.
2. Press the ON/OFF switch
to the "ON" position.