Assembly – Fisher-Price GROW TO PRO BASKETBALL H5556 User Manual
Page 3
Assembly
5
6
8
7
4
• While holding the ring assembly and rim together,
turn them over.
• Insert four screws into the holes in the rim, making
sure each hole in the rim is still aligned with each
screw hole in the net assembly.
• Partially tighten the screws with a Phillips screwdriver.
Turn the rim over to ensure that the net loops are still
in the grooves and through the ring tabs before
completely tightening the screws. Do not over-tighten
the screws.
Rim
4
5
6
Large Square Opening
Base
Upper Post
Curved
End
4
5
6
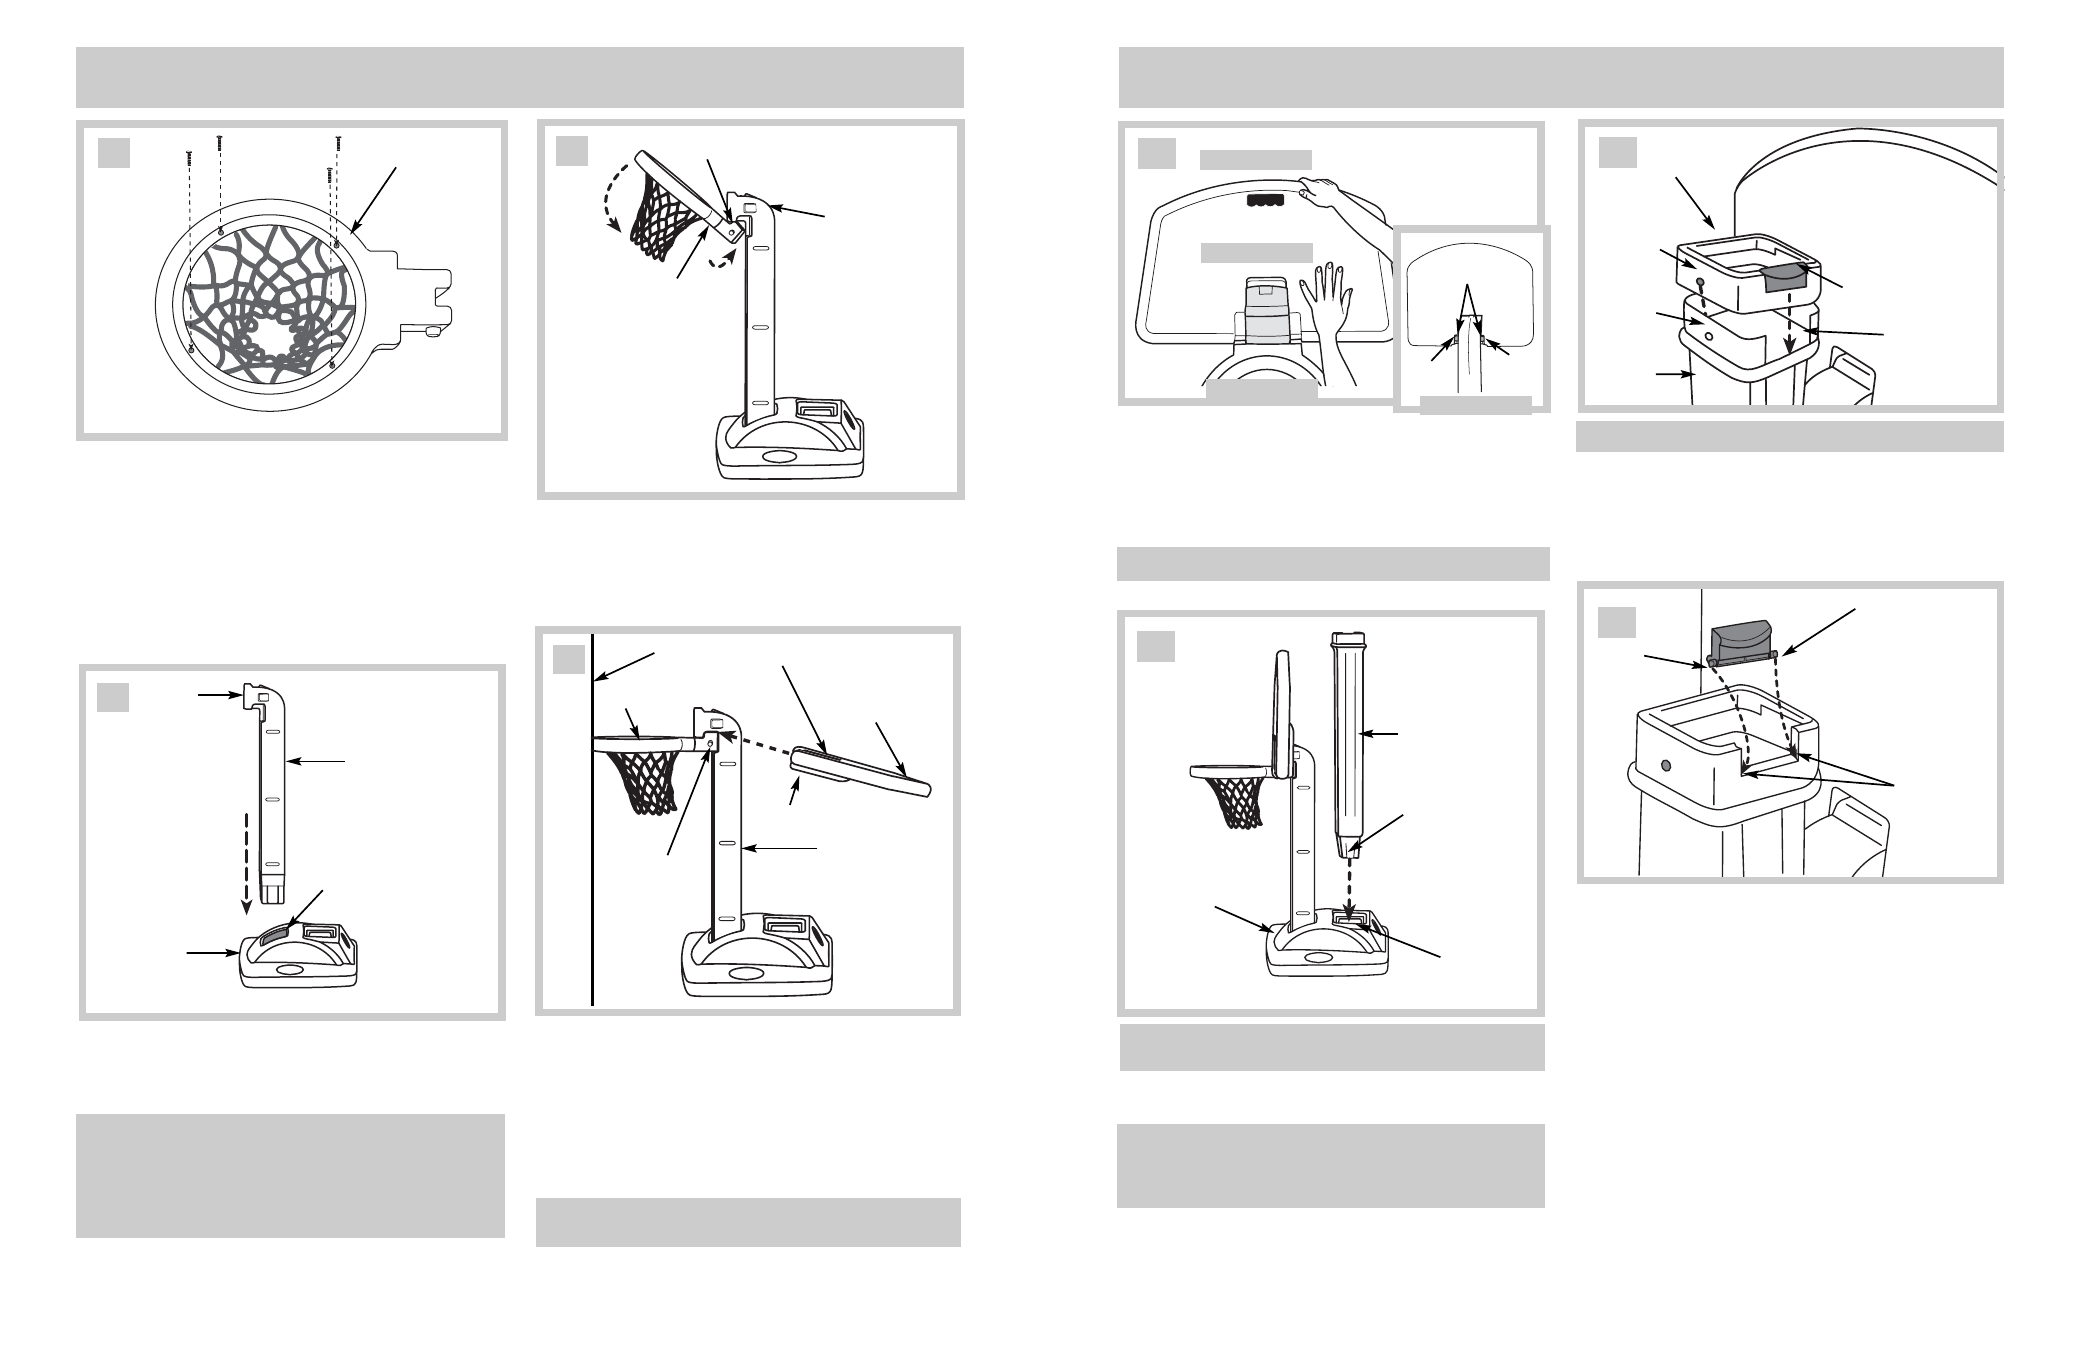
• Hook the rectangular tab on each side of the rim to
the upper post, as shown.
• Rotate the rim down until it snaps into place on
the upper post. Push down on the rim to be sure
it is secure.
Rectangular Tab
Rim
Upper Post
• Lean the rim against a wall for support.
• Locate the pegs on each side of the rim and the
grooves on the backboard.
• Position the backboard with the Fisher-Price
®
logo
facing up.
• Place your foot on the base to hold it steady and slide
the backboard onto the upper post at an angle, as far
as it will go.
Note: There should be no gap between the upper post
and the backboard.
• Move the assembly away from the wall.
6
4
5
Backboard
Fisher-Price
®
Logo
Peg
Groove
Wall
Rim
Upper Post
• Position the base as shown.
• Position the upper post so that the straight end is
down and the curved end is up and facing away from
the base.
Hint: For easier assembly, apply liquid soap or rub a
candle or bar soap around the bottom of the upper post
(especially on the corners) and the inside of the large
square opening. If assembling inside, place a tarp
under the base to protect the floor surface.
• Insert the upper post into the large square opening in
the base and, using a circular motion, push it all the
way down.
Assembly
5
Fisher-Price
®
• Move to the side of the assembly.
• Place your foot on the base to hold it steady.
• Press down firmly on the lower backboard while
rotating the backboard up.
• When properly assembled, the pegs on the upper
post rest in the grooves in the backboard, as shown.
9
Top View
PULL HERE
PRESS HERE
Peg
Peg
Grooves
Back View
Note: The height of the rim is three feet as assembled.
6
4
5
Lower Post
Rib
Groove
Base
10
• Align the rib on the bottom of the lower post with the
groove in the opening in the base.
• Insert the lower post into the opening and push down,
using a circular motion, until it snaps into place.
IMPORTANT! Assembly of the lower post is a
permanent assembly.
Hint: For easier assembly, apply a small amount of
liquid soap around the bottom of the post. If assem-
bling inside, place a tarp under the base to protect
the floor surface.
• Align the lever on the side of the collar with the
opening in the top of the lower post.
• Fit the collar onto the lower post, making sure the peg
on each side of the collar snaps into the hole on each
side of the post.
Collar
Lever
Opening
Lower
Post
Hole
Peg
11
Note: The collar may already be factory assembled.
• If the lever comes off, simply re-attach it.
• Insert the peg on one side of the lever into the hole in
the collar.
• Snap the other peg in the lever into the other hole in
the collar.
Assembly is now complete.
Please refer to assembly step 2 to fill the base with
water or approximately 50 lbs. of sand (water and sand
not included) to keep this product stationary.
Holes
Peg
Peg
12