Installation, Battery pack – Godox Witstro Ring Flash AR400 User Manual
Page 4
- 17 -
- 18 -
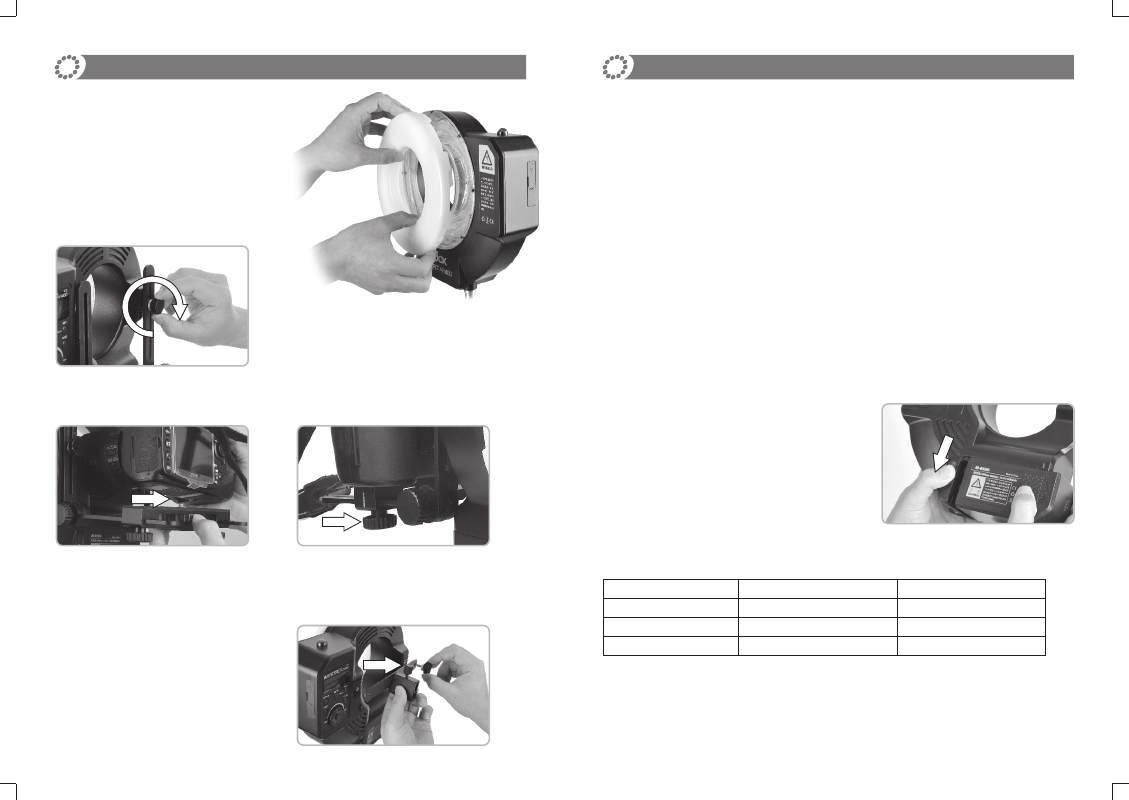
Installation
1. Aim the umbrella bracket at the Bracket
Mounting Hole (6) of the flash body. Then,
screw the two Bracket Mounting Bolts (28)
into the Bracket Mounting Hole (6) and
tighten them.
2. Insert the photo umbrella.
3. Tighten the bolt to fix the photo umbrella.
Installing the Umbrella Bracket
2. Screw the Camera Adjusting Knob
(25) into the camera’s tripod socket
and tighten it.
3. Adjust the Angle Adjusting knob (23)
to let the camera lens pass through
the ring flash.
Installing the Camera
1. Aim the Height Guide Rail (21) at the Bracket Mounting
Hole (6) of the flash body. Then, screw the two Bracket
Mounting Bolts (28) into the Bracket Mounting Hole (6) and tighten them.
Installing the Diffusion Cover.
1. Put the diffusion cover on the flash body
and make the claws of the cover correctly
fall into the hollow periphery of the body.
2. The diffusion cover can be detached by
lifting it lightly.
Battery Pack
Features
1. This flash unit uses Li-ion polymer battery which has long runtime. The available charge-
and-discharge times are 500.
2. It is reliably safe. The inner circuit is against overcharge, overdischarge, overcurrent, and
short circuit.
3. Take only 2.5 hours to fully charge the battery by using the standard battery charger.
Cautions
1. Do not short circuit.
2. Do not expose to rain or immerse into water. This battery is not water proof.
3. Keep out of reach of children.
4. No over 24 hours’ continuous charging.
5. Store in dry, cool, ventilated places.
6. Do not put aside or into fire.
7. Dead batteries should be disposed according to local regulations.
8. If the battery had ceased using for over 3 months, please make a full recharge.
Loading and Unloading the Battery Pack
Loading: (1)Put the battery pack into the battery
compartment. (2)Push the battery pack to the left
until it is locked with a click sound.
Unloading: (1) Push the Battery Locking Key (7)
downward. (2) Push the battery pack to the right
to unload it.
Battery Level
Battery Level
≥
25%
7% Battery Level ≤ 7% Battery Level Indication Note: When the LED light is on, the battery voltage is lower and the battery level indicator cannot display the correct amount. Battery Level Indication Not Displayed Displayed Blinking Flash Times (1/1 step) Approx.100~400 Approx.30~100 Approx.<30