10 block diagram & section details, Example settings 2, Block diagram – Empirical Labs EL-Rx User Manual
Page 9: Clean electric guitar, Crunchy distorted guitars, The input & output
Example Settings 2
Guitar Settings (cont’d)
On guitar, the studio quality compressor in the DocDerr can be used in a number of ways. It is
an extremely fast compressor, helping to tame pointy transients, while bringing up the sustain on
each and every note. One can control the amount of compression with the volume control on his
instrument. There are at least three different ways to use this limiter/compressor, on a guitar:
1) As a gentle peak tamer, using 100% Mix (mix on 10), averaging 3 – 6 dB of gain reduction,
but putting on 10 – 12 B of compression on the loudest percussive passages. The speed
and smooth knee will make this almost inaudible as actual “compression”.
2) As a smasher, crushing strumming parts to make it fit into an ensemble at a nearly
constant level, and bringing up solo lines so every note is heard. 12 to 20dB of
compression on peaks is quite usable here. 100% Mix.
3) As a natural sustainer, using the MIX control to enhance the uncompressed DRY level,
letting the compressed signal fill in the sustains, long after the main attack is gone. The
peaks will still come thru but low level notes and sustains will be more present. You can
use lots of compression here if you want (12 – 20dB), keeping the compressed level quite
a bit lower than the peak levels, and still sound quite natural.
The basic tone and character of your guitar can be greatly enhanced with this studio quality
Empirical Labs compressor, giving you a “finished” sound.
Clean Electric guitar
One can get great, clean electric guitar tones plugging into the DocDerr alone. Going in direct,
you will need the input jumper set to INSTRUMENT IN. Otherwise, you will probably use a mic and
preamp, setting the DocDerr for Line In. Again if this is a solo guitar, you can leave much of the low
frequencies in, perhaps just using the 70Hz High pass. The tone is in the 160 – 500 Hz range but as
noted, that is also a range that can make the guitar sound muffly, so treating these frequencies
properly is very important. If a guitar sounds thin and lifeless, sometimes boosting a little in that
range and pulling out 4k – 12K will make it fuller and more pleasing. A guitar amp has very little
above 10K, and an excess of these frequencies will make a guitar sound “tinkly” and unnatural.
The compressor is your greatest tool for getting album quality clean electric guitars. Harsh
plucked transients are often 20dB above the body of the sustain, and with its fast attack, the DocDerr
compressor can even these out, and bring up all the body of the strings. When in an ensemble,
100% mix (Mix on 10) can work wonderfully to help the guitar take up a nice space, without jumping
out. 6 – 12 dB will sound very natural, while even more compression can be quite tasteful when
playing with other instruments. When used on a solo instrument, one may want to use the Mix
control to keep the compression from being too obvious. Mixed in behind the dry, a very
compressed signal can sound like it has been run through a tube amp. The harmonics will add
crunch and sound less sterile, while the sustain will be dramatically enhanced.
Crunchy Distorted Guitars
You will usually need a microphone and mic preamp when using a real amplifier. However,
software tube amp emulators have come a long way. The DocDerr will then probably be used in
LINE IN mode (See Jumper Settings), since it will probably have too much gain for a mic pre or
workstation preceding it. Because distortion adds an incredible range of harmonics, and because of
the interaction between a guitar, amp, speaker and mic, really drastic frequency spikes and
resonances are common on guitar tracks. They can make or break the track… and they can also
make EQing very tricky. So spend time getting a great basic tone without processing.
Muffly guitars are a common problem. Adding 3 – 8KHz can bring out the “STING” and clarity.
Too much though, and you end up with a buzzy tone. Conversely, another method to get rid of the
“muffles” is to pull frequencies from 150 to 500Hz. Often there are frequencies below 80 – 140Hz
that just turn into mud in a mix. Here, the 100Hz high pass filter can do wonders. Soloing guitars in
mixes can be dangerous, especially with the guitarist present! If for instance, you use the 100Hz
High pass on the guitar while soloing, the fullness will be thinned out somewhat, and the guitarist
isn’t going to want that… but the “Mix” might! The warm tones are the same as the muffly area, 160
– 500, and sometimes it helps to add AND subtract adjacent frequencies in that range. Sometimes
a midrange boost in the 500 to 2KHz range can help a guitar fill out without getting brighter. Again,
there are no rules except what your ears tell you while listening in the mix.
Band limiting guitars is an extremely useful technique, not only on the low end as above, but on
the high end also. Try rolling off 5 – 12KHz on electric guitars and often, they will sound tighter,
quieter, and often warmer. Set the high PEQ band to 10KHz and pull it down 4 – 6dB and see if the
guitar gets warmer and tighter sounding. Often there’s just pick noise and hiss up there.
5
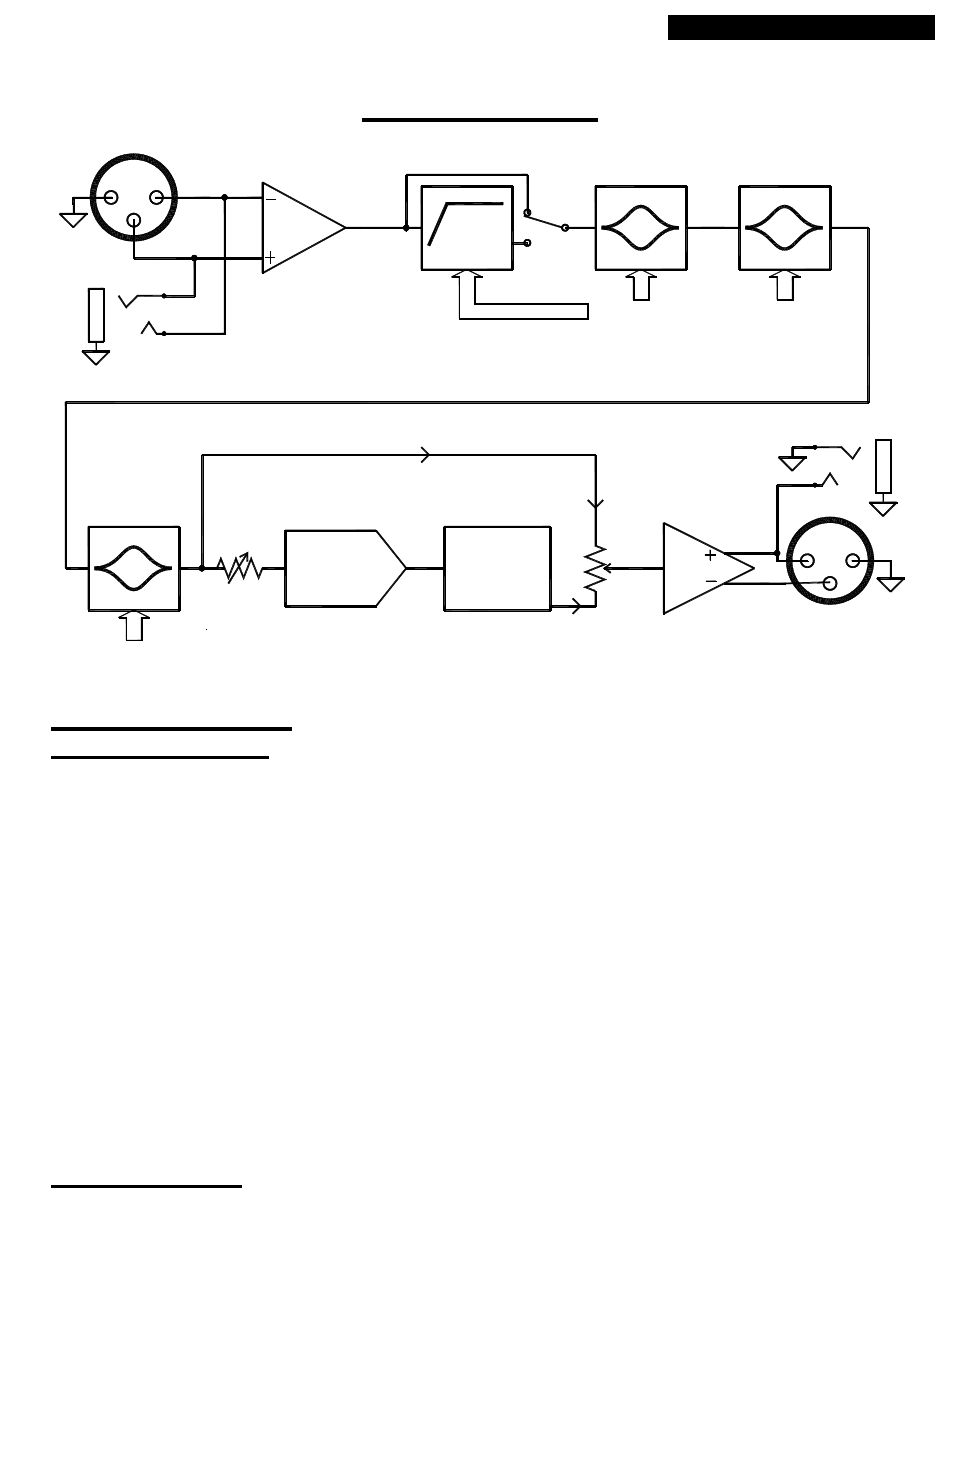
Block Diagram
1
3
2
2
3
1
Balanced In
Compressor
HP
Filter
Output Amp
Unbal
Dig Control
LF PEQ
Circuit
Saturation
Mix
Balanced Out
(Tip)
MID PEQ
Dig Control
Dig Control
HI PEQ
Input
(Drive)
Input
Amp
Dry
Compressed
(I/O Connectors Not On Module)
HF
Section Details
The Input & Output
The input has two modes of operation, Instrument In, and Line In. There is a 3 pin Jumper that
selects this, and is set to
Line In Mode
from the factory (see Jumper Settings on p3). The “Line In”
jumper setting changes the DocDerr into an electronically balanced line receiver circuit. It is
relatively insensitive to all kinds of wiring, be it balanced or unbalanced. If using an unbalanced
signal however, it is preferable that the unused pin 3 is grounded, or at least not left unconnected.
Pin 2 is “Hot” and complies with the AES standard. In Instrument Mode (jumper towards rear), a
mono guitar cable shorts out XLR pin 3 (Phone ring), and produces 16dB of very clean gain. 16dB
was selected as a safe gain that will not clip, but produce a line level signal out of most instruments.
The output section has the option to be single ended, or differential output. The select jumper
is set to differential mode from the factory (see Jumper Settings on p3). When in Dif Out mode, the
jumper produces differential out, applying an inverted signal to XLR pin 3. The gain is 6dB louder
over single ended mode. However, if there is a chance of clipping an amplifier, mixer, or whatever,
the single ended mode will be a safer way to go. The single ended mode has the other advantage of
not being sensitive to any wiring issues, since one cannot accidently short pin 3 to ground, causing
an amplifier to “dump” current into it. However, when recording straight into a recorder or
workstation, it may be better to keep the jumper in differential mode and get a hotter output signal.
The EQ Sections
There are 4 sections of EQ in the DocDerr. One selectable High pass filter, and 3 sections of
parametric EQ.
The High pass is 18dB per octave (3rd order) and has two selectable frequencies, 70Hz and
100Hz. The High Pass frequencies are selected by pressing the LF and MF parametric switches at
the same time (simultaneously). This is noted on the front panel. The 70Hz is largely to cut subs
from the instrument caused by “instrument body resonances” and pick or hand noise against the
instrument. It will leave the fundamental frequencies of a guitar alone. The 100Hz filter cuts out
more of
th
e sub frequencies, often making a more realistic guitar response. It also prevents some of
the low frequencies from getting in the way of other instruments in an ensemble (band).
10