ProgressiveRC DLS-90 IOTA User Manual
Page 2
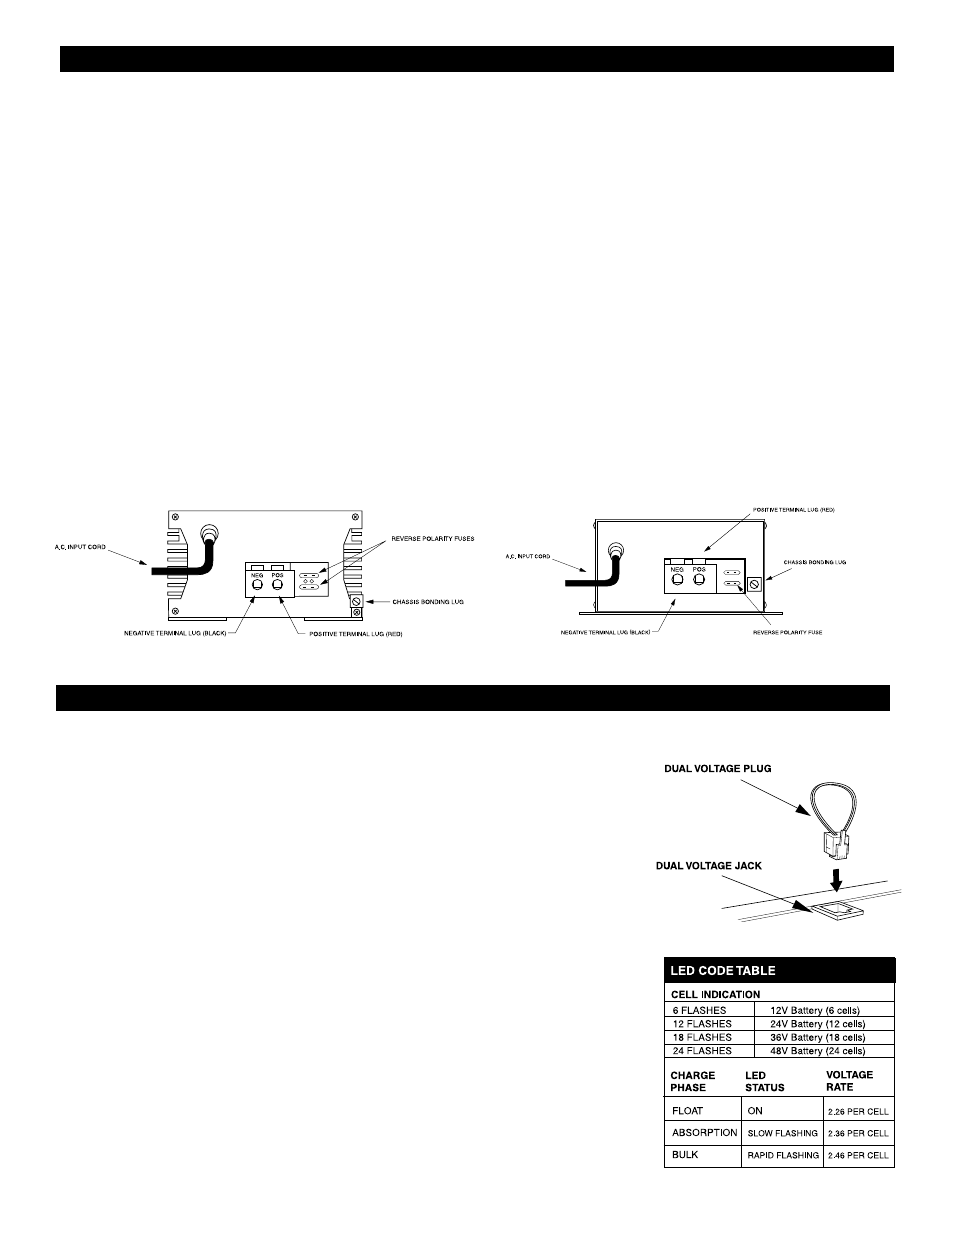
TWO-STEP VOLTAGE JACK
The two-step voltage jack allows switching from a long-term float voltage of 13.6vdc
up to 14.2vdc. When the included dual voltage plug is inserted in the jack*, the voltage
rises to 14.2vdc for occasional fast charging. When the plug is removed, the voltage
drops to 13.6vdc to reduce battery water loss.
WARNING: To avoid battery damage,
remove the Dual Voltage Plug when quick-charging is complete. NOTE: If the
unit is equipped with an internal IQ4 smart charger, two-step charging is not needed
and the Dual Voltage Jack is disabled.
There are no components within the IOTA Power Converters/Battery Chargers that, in their normal operation, produce
arcs or sparks. However, all electronic devices have some potential for generating sparks in the event of failure.
Therefore, never install this device in the same compartment with flammable items such as gasoline or batteries.
INSTALLATION GUIDELINES
MOUNTING LOCATION
The IOTA Power Converter/Battery Charger can be mounted
in any position within an enclosed or interior compartment.
Provide sufficient air space to allow unrestricted airflow in
and around the unit.
INSTALLATION
Disconnect the positive side of the battery before installation.
Connect the positive (red) and negative (black) terminal lugs
to battery or load. Always use the proper size wire based on
the amperage of the converter and the battery. When con-
necting to a battery, a breaker should be installed within 18”
of the battery, connecting the battery positive to the line side
of the breaker, and the IOTA unit to the load side. Connect
“Chassis Bonding Lug” on the IOTA unit to vehicle chassis or
other grounding source.
120 VOLT A.C. INPUT
Plug the unit A.C. input cord into a 120 volt 3 wire
grounded source. See chart for maximum current draw
and required input voltages.
REVERSE POLARITY FUSES
The IOTA Battery Charger/Power Supply is protected
against reverse polarity on the DC output. If a battery
or the unit is hooked up incorrectly, the fuses will blow
and can be easily replaced. Always use the same size
and style fuse that came with the converter. To change
the fuses, use a screwdriver to loosen the screws
and remove the fuses. Always replace the fuses with
the same type and rating. After inserting the new
fuses, tighten the screws firmly. Apply 5 inch-pound
maximum torque. DO NOT OVERTIGHTEN.
CHARGE CONTROL
THE IQ4 LED INDICATOR
(ONLY ON IOTA MODELS WITH INTERNAL IQ4)
IOTA Models with an internal IQ4 smart-charger give the user the benefit of automatic
Bulk, Absorption, and Float stage charging. This increases the charging capacity of the
IOTA charger, decreases charge times and insures proper and safe battery charging
without over-charging. The green LED on the fan end of the unit will indicate which
charging phase the IOTA unit is currently in. When the unit is first activated, the LED
will flash as it reads the number of cells in the battery. The unit will then proceed directly
to the Bulk charging or Float charging phase depending on the charge status of the
battery. Use the LED CODE TABLE for reference when checking the LED. Units that
do not have an internal IQ4 smart-charger can easily install an external IQ4 that plugs
into the available Dual Voltage Jack. Contact Customer Service for more information.
DLS MODEL*
DLS SERIES M MODEL*
*Actual component locations may vary depending on model.
*Location of the Dual Voltage Jack may vary depending on model.