Mini-slider troubleshooting guide – Losi LOSB0205 Quick Start User Manual
Page 2
Page 2
Page
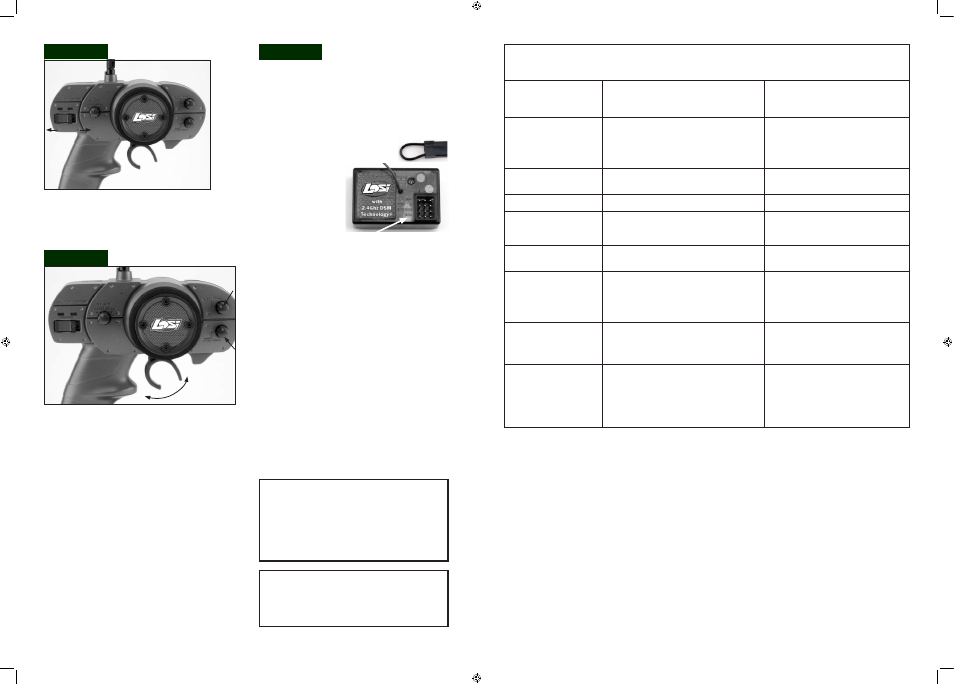
Always turn on the transmitter first by sliding the switch
on the left side of the wheel from left to right. The small
red and green lights above the switch should both light
up. If not ,you need to check for low or incorrectly
installed batteries.
Once the transmitter has been turned on, turn on the
Mini-Slider by sliding the switch on the speed controller to
the “On” position. If the rear wheels turn, adjust the “TH.
Trim” knob located to the lower right of the steering wheel
until they stop. To go forward, pull the trigger back. If you
should need reverse, wait for the model to stop then push
the trigger forward. When going forward the model should
move in a straight line. If not, adjust the “ST. TRIM” so that
it tracks in a straight line without having to turn the steering
wheel. After you are have finished, turn the Mini-Slider off
FIRST by sliding the switch to the “OFF” position. After the
model has been turned off, turn off the transmitter. If you
wish to clean your Mini-Slider, use compressed air and/or
a soft paintbrush to remove dust and dirt.
NEVER use
chemicals or anything wet as it can cause damage to both
electronics and plastic parts.
Although set at the factory, below are the steps required
to re-bind your transmitter to the receiver should the need
arise. During the bind process there is a unique ID from
the transmitter communicated to the receiver to ensure
trouble-free radio operation.
Steps to Re-Bind
1. Ensure that the transmitter and vehicle are both turned
off.
2. Using the supplied Bind plug (which
looks like a standard receiver plug with a
wire loop installed) insert
or plug into the receiver
slot labeled “BIND”.
Looking down on the
receiver this slot would be
below the LED and is the
farthest from the LED, or
nearest to the corner of
the receiver.
Note: you do not need to remove any of the other plugs to
re-bind.
3. With the Bind plug installed, turn on the vehicle. Notice
a blinking Orange LED within the receiver.
4. Now you are ready to turn on the transmitter. You
should notice on the back of the transmitter a similar blink-
ing Orange LED under the translucent cover.
5. Both the receiver and transmitter blinking Orange LED’s
will stop blinking and become solid, indicating they have
“bound” themselves together.
6. Please turn off both the vehicle and transmitter to
remove the Bind plug from the receiver. Failing to remove
the Bind plug will cause the transmitter to attempt to re-
bind every time you turn on the vehicle and transmitter.
7. Turn on both the vehicle and transmitter to ensure
operation. If the transmitter does not control the vehicle,
please repeat steps 1 to 6. Should this not correct the
problem, please call Horizon Service/Repair for further
assistance.
8. The Bind process is complete. Your vehicle’s radio
system should be ready for use.
ALWAYS
• Turn on the transmitter before the vehicle
• Use caution when running your vehicle near
people
• Turn both the Mini-Slider and transmitter “Off”
when done
• Check the battery condition of the transmitter
before running
NEVER
• Operate the Mini-Slider with low battery power
• Run the Mini-Slider through water or wet grass
• Use chemicals to clean the chassis
• Run the Mini-Slider without a gear cover
Step 5
Step 7
Doesn’t operate
Battery not charged or plugged in
Charge battery / plug-in
Receiver switch not “On”
Turn on receiver switch
Transmitter not “On” or low battery
Turn on / replace batteries
Motor runs but rear
Pinion not meshing with spur gear
Adjust pinion/spur mesh
wheels don’t move
Pinion spinning on motor shaft
Replace pinion gear on motor
Slipper too loose
Check & adjust slipper
Transmission gears stripped
Replace transmission gears
Drive pin in axle missing
Check & replace
Steering doesn’t work
Servo plug not in receiver
Check if plug in / all the way
Servo gears or motor damaged
Replace or repair servo
Won’t turn one direction
Servo gears damaged
Replace servo gears
Motor doesn’t run
Motor plugs loose
Plug in completely
Motor wire broken
Repair or replace as needed
ESC damaged
Call Electronics Tech
ESC gets hot
Motor over-geared
Put smaller pinion on motor
Driveline bound up
Check wheels & trans for binds
Poor run time and/or
Ni-MH pack not fully charged
Recharge
sluggish acceleration
Charger not allowing full charge
Try another charger
Slipper slipping too much
Check/adjust slipper
Motor worn out
Replace motor
Driveline bound up
Check wheels & trans for binds
Poor range/glitches
Transmitter batteries low
Check & replace as necessary
Transmitter antenna damaged
Check & tighten
Battery low in truck
Replace or recharge
Loose plugs or wires
Check motor and power plugs
Slipper won’t adjust
Drive pin missing in shaft
Replace drive pin
Spur gear face worn out
Replace spur gear & adjust slipper
Warranty Period
Exclusive Warranty- Horizon Hobby, Inc., (Horizon) warranties that the Products purchased (the “Product”) will be free from
defects in materials and workmanship at the date of purchase by the Purchaser.
Limited Warranty
(a) This warranty is limited to the original Purchaser (“Purchaser”) and is not transferable. REPAIR OR REPLACEMENT
AS PROVIDED UNDER THIS WARRANTY IS THE EXCLUSIVE REMEDY OF THE PURCHASER. This warranty covers
only those Products purchased from an authorized Horizon dealer. Third party transactions are not covered by this warranty.
Proof of purchase is required for warranty claims. Further, Horizon reserves the right to change or modify this warranty
without notice and disclaims all other warranties, express or implied.
(b) Limitations- HORIZON MAKES NO WARRANTY OR REPRESENTATION, EXPRESS OR IMPLIED, ABOUT NON-
INFRINGEMENT, MERCHANTABILITY OR FITNESS FOR A PARTICULAR PURPOSE OF THE PRODUCT. THE
PURCHASER ACKNOWLEDGES THAT THEY ALONE HAVE DETERMINED THAT THE PRODUCT WILL SUITABLY MEET
THE REQUIREMENTS OF THE PURCHASER’S INTENDED USE.
(c) Purchaser Remedy- Horizon’s sole obligation hereunder shall be that Horizon will, at its option, (i) repair or (ii) replace,
any Product determined by Horizon to be defective. In the event of a defect, these are the Purchaser’s exclusive remedies.
Horizon reserves the right to inspect any and all equipment involved in a warranty claim. Repair or replacement decisions
are at the sole discretion of Horizon. This warranty does not cover cosmetic damage or damage due to acts of God,
accident, misuse, abuse, negligence, commercial use, or modification of or to any part of the Product. This warranty does
not cover damage due to improper installation, operation, maintenance, or attempted repair by anyone other than Horizon.
Return of any goods by Purchaser must be approved in writing by Horizon before shipment.
Step 6
Mini-Slider Troubleshooting Guide
Off/On
St.Trim
Th.Trim
Left
Right
Brake/Reverse
Forward
Mini-Slider Troubleshooting Guide
Mini Slider QSG A4.indd 2-3
5/2/2007 2:31:15 PM