Double braid class i eye splice, Lock stitching procedure – Samson DOUBLE BRAID Class I Eye Splice User Manual
Page 4
PAGE 4 OF 4
SamsonRope.com
| Tel
+1.360.384.4669
Double Braid Class I Eye Splice
S A M S O N S P L I C I N G I N S T R U C T I O N S
9
step
Beginining at slipknot milk cover by
sliding hand toward loop.
Bury to
Point R
mark 2
r
mark t
crossover
throat
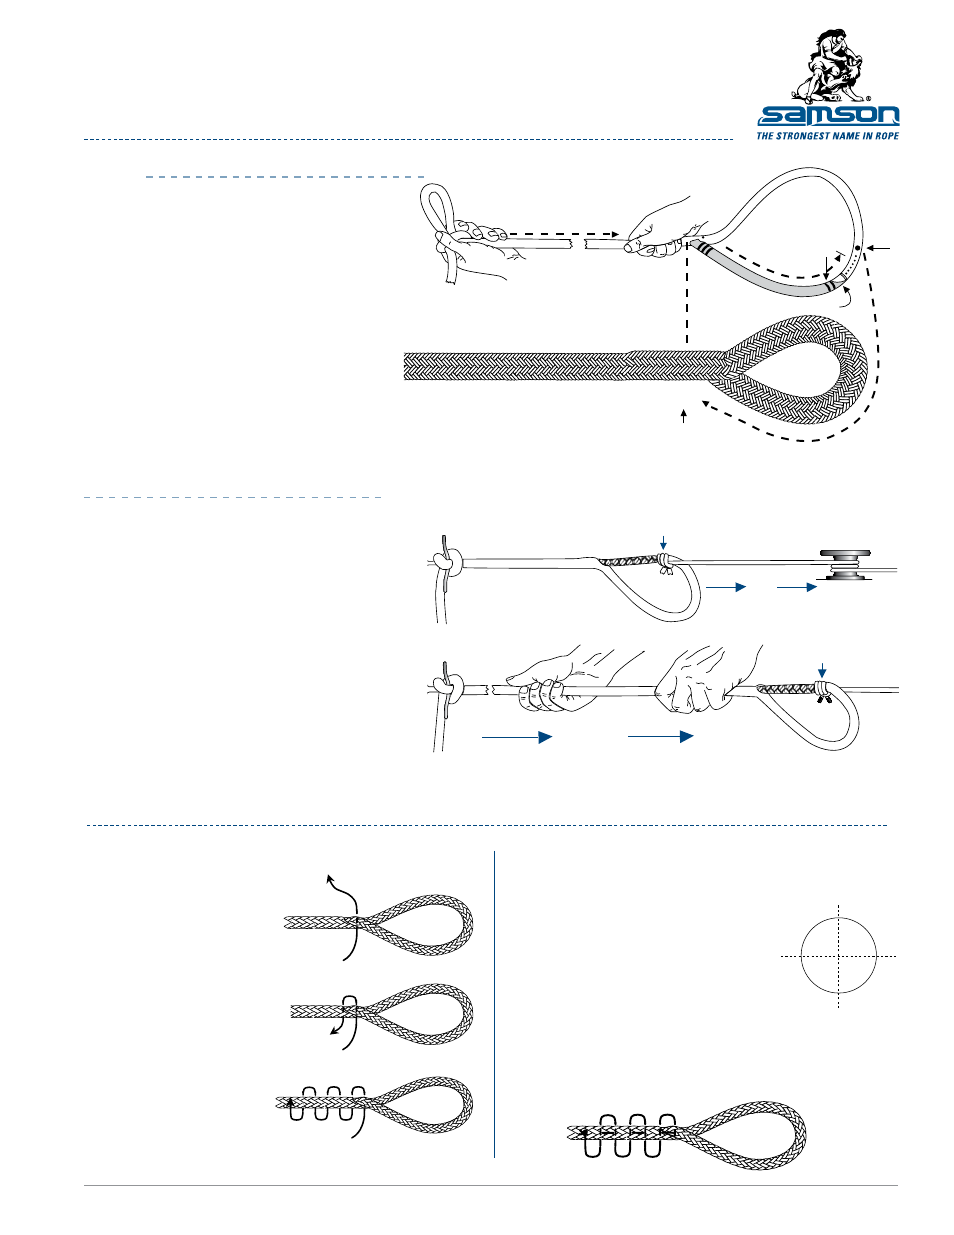
B u ry i n g t h e e x p o s e d c o r e
Hold the rope at the slipknot and with the
other hand milk the cover toward the splice,
gently at first, them more firmly. The cover
will slide over Mark 3, Mark 2 and crossover
Mark T up to Point R (it may be necessary to
occasionally smooth out eye during milking
to prevent reduced volume tail catching in
the throat of the splice.)
If bunching occurs at the crossover
preventing full burying, smooth cover from
Mark T to Mark X. Grasp crossover at
Mark T with one hand and then firmly
smooth cover slack (female side of eye)
with the other hand toward the throat (Mark
X). Repeat as necessary until bunching
disappears. Remove tape from crossover.
Continue milking until Point R meets Mark X.
A. Anchor the loop of the slipknot by tying it to a stationary
object before starting to bury. You can then use both hands
and the weight of your body to more easily bury the cover
over the core and crossover (see Fig. A and B).
B. Holding the crossover tightly, milk all
the excess cover from Point R to Mark X.
Flex and loosen the rope at the crossover point during
the final burying process. Hammering the cover
at Mark X will help loosen the strands.
With larger ropes it is helpful to securely anchor the
slipknot. Attach a small line to the braided core at the
crossover and mechanically apply tension with either
a block and tackle, capstan, come-a-long, or power
winch. Tension will reduce the diameter of the core
and crossover for easier burying (see Fig. A).
In order to prevent no-load opening of your eye splice,
Samson recommends lock stitching the eye.
figure a
figure B
crossover
core
Pull
Firmly secured
crossover
core
Pull
Small line
t i p : B e f o r e B u ry i n g t h e c o r e
Mechanical tension
lock stitching procedure
S t e p 4
After completing Step 3, rotate spliced part
of rope 90° and reinsert end A into spliced
area in the same fashion as in Steps 1,
2 and 3. The splice will now be stitched
on 2 planes perpendicular to each
other. Make sure you do not pull the
stitching too tight.
S t e p 5
After stitching at least 3 complete stitches as in Step 3, extract both
ends of the twine together through the same opening in the braid.
Tie them together with a square knot and reinsert back into braid.
For double braids, re-insert the knot between the cover and core.
B
A
A
B
1
2
3
A
B
1
2
3
A
B
S t e p 1
Pass stitching twine through
spliced area near throat of eye
as shown.
S t e p 2
Reinsert twine through the rope.
The twine should cover 2 strands
from the exit point. Pull the twine
snug, but not tight.
S t e p 3
Continue to reinsert as shown
until you have at least 3 complete
stitches on each side of the rope.
Each stitch should cross over 2
strands in the rope.
DOCUMENT DblBrd_C1_Eye Splice_AUG2012.pdf
© 2012 Samson Rope Technologies, Inc. All rights reserved.
S/WD #108294 7/2012