Strand class ii end-for-end splice – Samson 12-STRAND Class II End-for-End Splice User Manual
Page 2
PAGE 2 OF 2
SamsonRope.com
| Tel
+1.360.384.4669
12-Strand Class II End-For-End Splice
S A M S O N S P L I C I N G I N S T R U C T I O N S
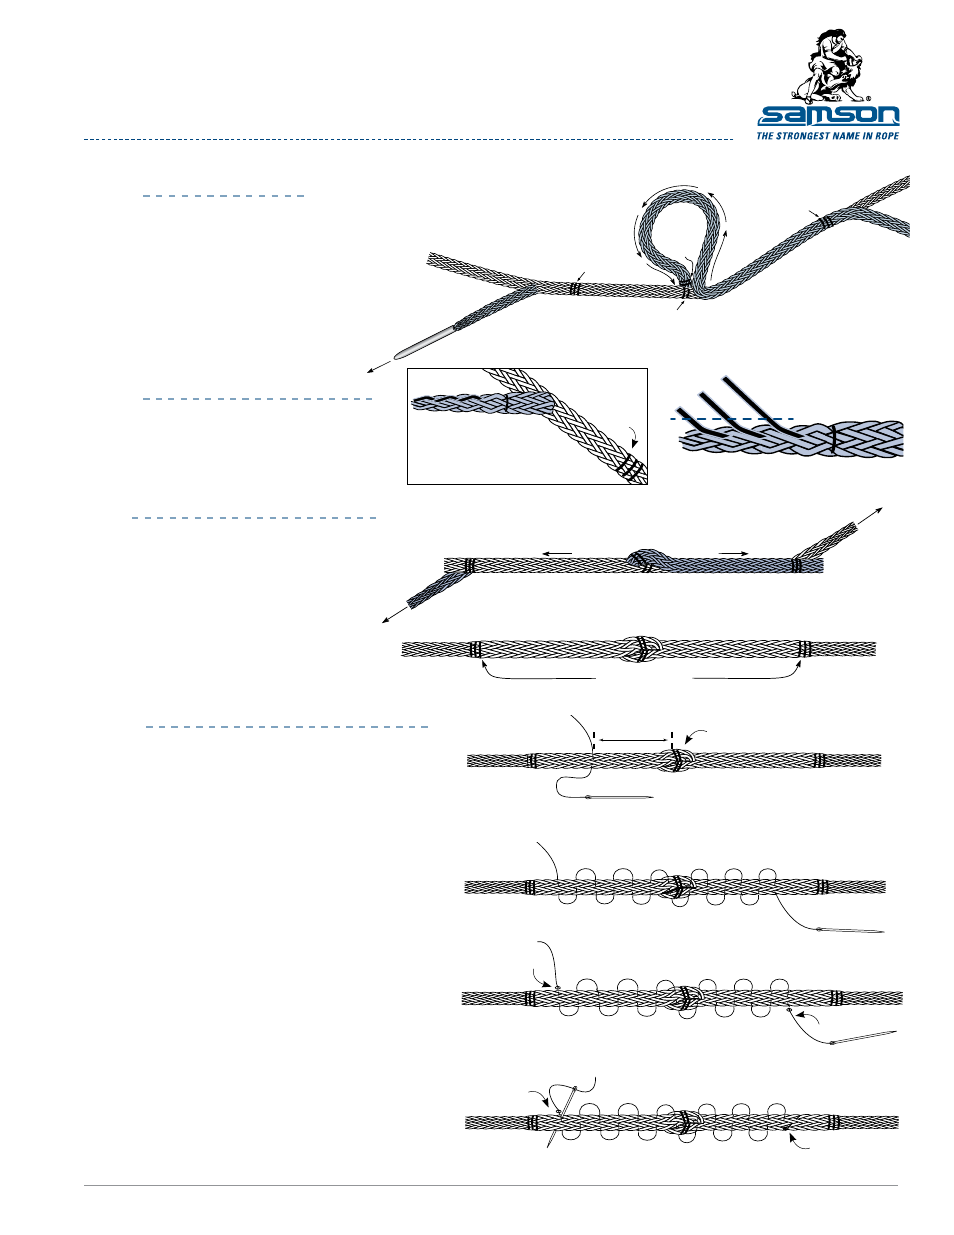
6
step
Pull both tails to tighten crossover. Next,
smooth braid in both directions away
from the crossover, stroking rope firmly.
Tails should bury inside cover.
ta p e r i n g s e c o n d ta i l
s m o ot h i n g o u t s p l i c e
7
step
Mark 3 consecutive strands as shown.
Pull out all 3 and cut off.
Repeat for other rope’s tail.
5
step
Attach tapered tail of Rope B to fid.
Insert the fid into Rope A at Mark 2,
approximately the diameter of the line
away from insertion point of Rope A
into Rope B. Bring fid and tail out at
Mark 3 of Rope A. Following same
procedures as Step 4A bury Rope
B up to its own Mark 2. Leave tail
sticking out.
f i n i s h b u ry i n g
Working towards the crossover, stitch
twine back and forth through splice until
a minimum of 3 complete stitches have
been made on each side of crossover.
From Mark 2 at crossover, count 8
picks in either direction and insert
stitching twine.
9
A
Tie an overhand knot in each end
of the twine, as close to its exit
point as possible.
9
B
Insert tail of stitching twine at exact
location where twine emerges.
Using needle or small fid, pull (or
push) through rope at a slight angle.
Pull hard on the end of the twine so
that the knot disappears inside the
rope. Trim off the remaining twine
close to the rope. Repeat on other
end of the twine.
l o c k s t i t c h i n g p r o c e d u r e
8
step
9
step
mark 3
Rope A
mark 2
mark 2
Rope B
mark 3
Rope A
Rope B
Tapered tail
fid
Rope B
Rope A
Tapered tail
Pull out marked
strands and cut off
Mark 3 consecutive strands
mark 3
8 picks
crossover
knot
knot
knot
mark 2
knot
Pull
Tail B
Rope A
Smooth
Smooth
Rope B
crossover
Pull
Tail A
Finished splice
Buried tails
DOCUMENT 12Strand_C2_End_For_End.pdf
© 2012 Samson Rope Technologies, Inc. All rights reserved.
S/WD #108294 7/2012