Craftsman 486.24414 User Manual
Page 12
12
1/4" x 1-1/2"
BOLT (N)
1/4" NYLOCK
NUT (R)
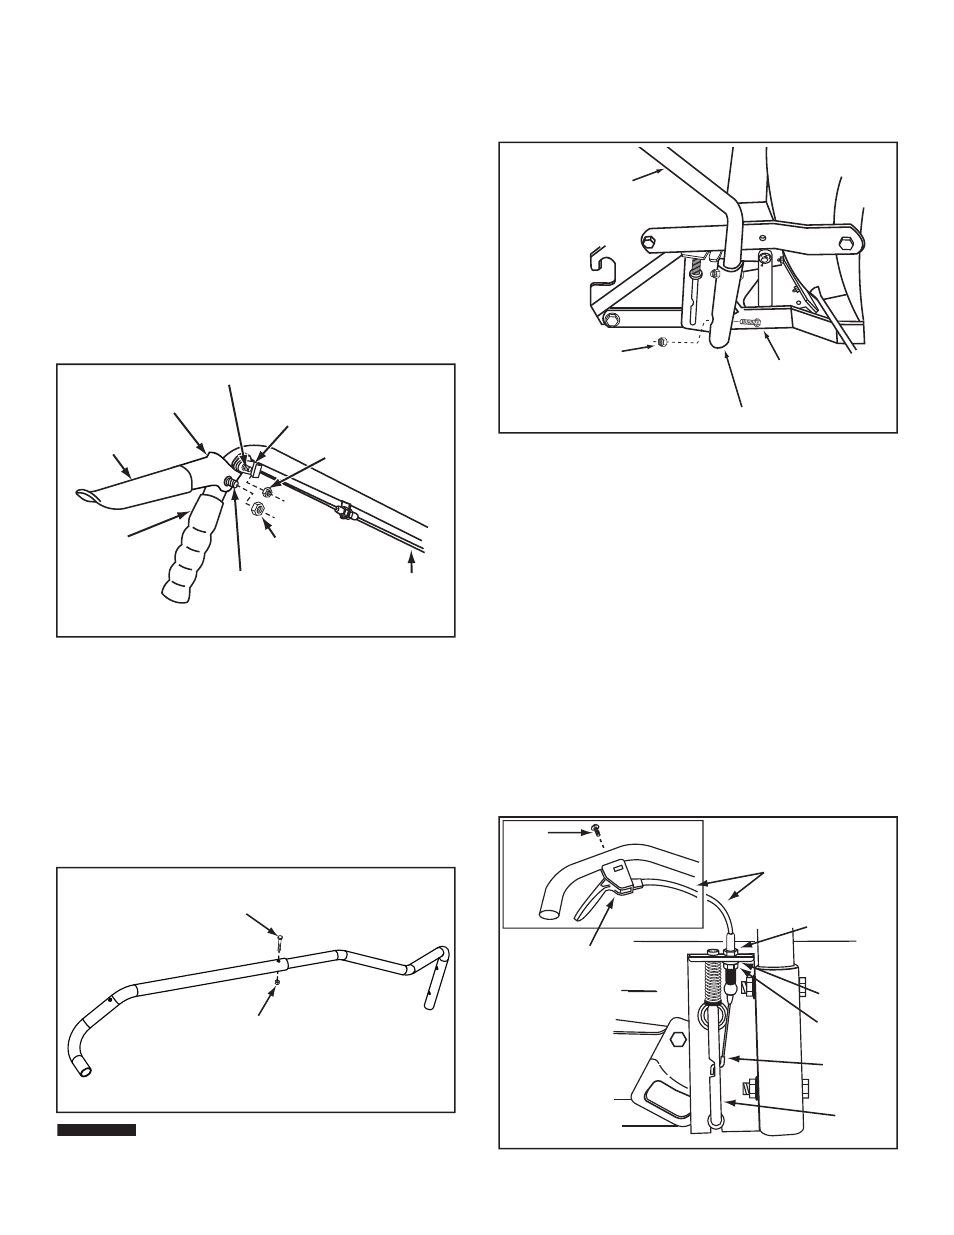
STEP 24:
(SEE FIGURE 25)
•
Assemble the upper lift handle onto the lower lift
handle and fasten using a 1/4" x 1-1/2" bolt (N) and
1/4" nylock nut (R).
OVAL
SCREW (AA)
LIFT RELEASE
CABLE
HEX NUT
JAM NUT
LOCK
WASHER
CABLE
WIRE
INDEX
LIFT
ROD
TRIGGER
ASSEMBLY
LIFT HANDLE
LIFT BRACKET
5/16" X 1-3/4"
HEX BOLT (D)
5/16" NYLOCK
NUT (V)
FIGURE 26
STEP 25:
(SEE FIGURE 26)
•
Attach the lower lift handle to the right side of the
frame assembly using two 5/16" x 1-3/4" hex bolts (D)
and 5/16" nylock nuts (V).
FIGURE 27
STEP 26:
(SEE FIGURE 27)
•
Install the trigger assembly to the lift handle using an
oval screw (AA).
•
Connect the hooked end of the cable wire into the
index lift rod. Install the threaded end of the cable into
the notch in the top of the lift bracket, placing one jam
nut on each side of the notch with the lock washer
below the notch.
•
Adjust the jam nuts so that when the trigger on the lift
handle is squeezed, the bottom of the index lift rod
raises enough to release from the latched position.
The index lift rod should also lower far enough to lock
in the latched position when the trigger is released.
•
Secure cable to handle with a plastic tie (HH) to
prevent cable from interfering with tractor. Cut off
extra plastic on end of tie.
GRIP ASSEMBLY
HANDLE
ASSEMBLY
5/16" X 1-1/2"
HEX BOLT (M)
CABLE END
FITTING (LL)
1/4" WELD BOLT
5/16" NYLOCK
NUT (V)
CABLE
1/4" NYLOCK
NUT (R)
GRIP (OO)
FIGURE 24
STEP 23:
(SEE FIGURE 24)
•
Assemble grip (OO) to grip assembly.
•
Assemble grip assembly to handle assembly using a
5/16" x 1-1/2" hex bolt (M) and 5/16" nylock nut (V).
•
Assemble the ball end of the cable wire (shown in
fi gure 23) up through the hole in a cable end fi tting
(LL) and then slide it back inside the curled edge of
the fi tting.
•
Assemble cable end fi tting (LL) over 1/4" weld bolt on
grip assembly and secure with one 1/4" nylock nut (R)
and then back nut off 1/2 turn.
NOTE: Do not over tighten 1/4" nylock nut, cable end
fi tting must pivot freely.