WolfVision VZ-27 Short User Manual User Manual
Page 2
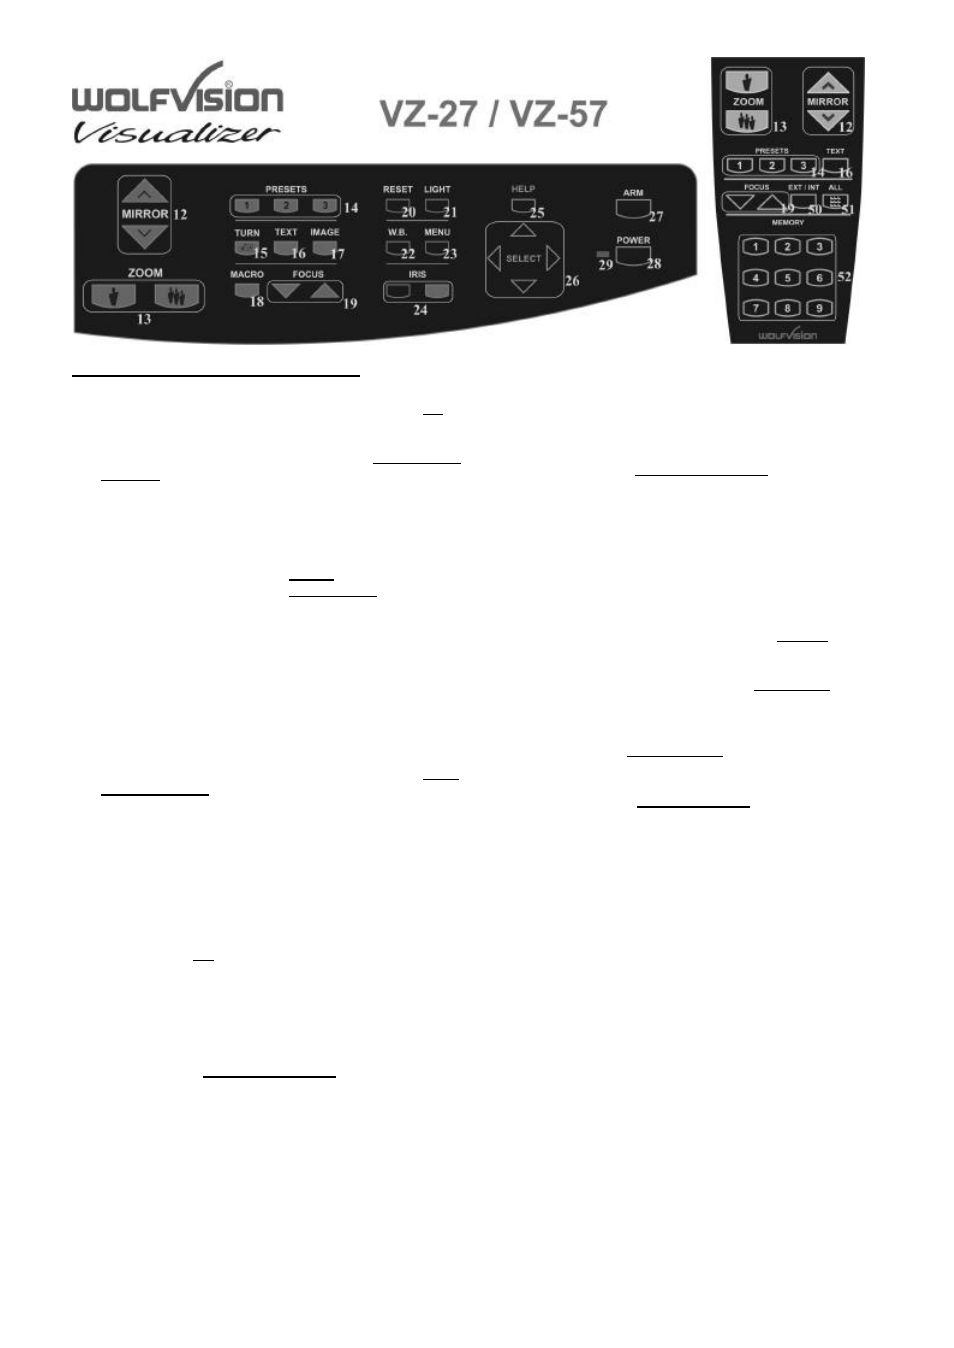
Control panel and infrared remote control:
#12 Upper MIRROR up and down (for scrolling)
The mirror can also be moved by hand! This does not
cause any harm to the unit
#13 ZOOM keys
When using the Zoom keys the size of the Synchronized
Lightfiled also changes. So the lightfield always
indicates the pickup area of the built-in camera. This
can be used for easy positioning of objects.
#14 User programmable PRESETS
You can use Presets to store certain positions of zoom,
focus, mirror, light etc.
Press one of the Preset keys quickly to recall a preset.
Press one of the Preset keys for 4 seconds to store a
Preset
In the on-screen menu it is also possible to assign a
specific function to a Preset (like Image on/off, IRIS,
Negative, Negative/Blue, Black/White etc.)
#15 IMAGE TURN key
For picking up a complete vertical (Portrait) page in A4
or US-letter/legal size in better quality, place your
document on the working surface in horizontal
(Landscape) direction and zoom in on it completely.
Then press the Image Turn key. Now the picture is
turned 90 degree and output the right way up with much
higher resolution. This is because in the Image Turn
mode all pixels of the camera are used to pick up the
letter.
#16 TEXT Enhancement key
Press this key to improve the contrast and the
readability of text or x-rays. Please note that the colors
are slightly darker in this mode.
#17 IMAGE key
Switches the output image on and off.
Please note that the Preview- and Video outputs (#40,
#44, #45) can not switched off with the Image key
because they are intended for control monitors
#18 MACRO function
When pressing the Macro key, the length of the arm is
reduced automatically for bigger enlargements.
Please note that in the "Macro mode" the lightfield no
longer marks the pickup area of the built-in camera
On the VZ-57 a Laser Center Marker shows the middle
of the picture in the macro mode
#19 Manual FOCUS key
Because of the high depth of focus of the professional
Visualizers focusing is seldom necessary.
The focus is optimized for flat objects when the unit is
switched on or when both focus keys on the control
panel are pressed simultaneously.
#20 RESET key
Resets the unit to the default settings (same as when
the unit is switched on). If you also want to reset the on-
screen menu simultaneously press the Reset key and
the Menu (#23) key.
#21 LIGHT key
Switches between "Top light", "Bottom light" and "Light
off". The bottom light is recommended for x-rays and
slides. Transparencies may look better with the top light.
On the VZ-57 a Laser Center Marker shows the middle
of the picture when the bottom light is used
If you use the Visualizer to record objects outside of the
working surface, the light it is no longer identical with the
pickup-area of the built-in camera.
#22 Manual WHITE BALANCE adjustment
Each time the lighting condition changes (sun light,
neon light, halogen light...), the user should adjust the
white balance of the Visualizer, in order to optimize the
color reproduction.
For adjusting the white balance to the top light of the
Visualizer, zoom in on a white object until there is only
white on the screen. Then press the W.B. key. For
adjusting the White balance to the bottom light of the
Visualizer, switch the bottom light on, remove everything
from the working surface and press the W.B. key
#23 MENU key
Press this key for one second in order to see the on -
screen menu on your screen. The on-screen menu can
be used for detailed settings of the Visualizer. It should
only be used by technically skilled persons.
#24 Manual IRIS
Using the Iris keys switches the Iris to manual. Using
the Zoom keys switches the iris to automatic again.
Special iris settings can also be made in the on -screen
menu.
#25 HELP key
Press the help key when you are in the on-screen menu
in order to receive a help text (in English) about the
selected function.
#26 SELECT keys
For navigating in the on-screen menu
#27 ARM key
Moves the motorized arm up and down
#28 (Standby) POWER key
Please note that the main power switch is on the back of
the unit (#34)
#29 Power LED light
Red=off, Green=on
#50 EXT/INT key
Switches between the image of the Visualizer and the
image from the external computer input (#42)
#51 ALL-key
Press this key for displaying all 9 pictures of the memory
as split image
#52 MEMORY keys 1-9
Press one of the Memory keys for 2 seconds for storing
an image. Press one of the Memory keys quickly for
recalling an image