Start-up, Startup checklist, The elite steam controller – GeneralAire EDMK4 Elite Steam User Manual
Page 18: Starting elite steam, Starting with a new cylinder, 1 startup checklist, 2 the elite steam controller, 3 starting elite steam, 4 starting with a new cylinder
Elite Steam +030222075 Rev. 3.5 – July 2012
18
4. START-UP
IMPORTANT WARNINGS:
1. Before starting, check that the humidifier is in perfect condition, that there are no water leaks and that the electrical parts
are dry;
2. Do not connect power if the humidifier is damaged or even partially wet!
When installation is completed, flush the supply pipe for around 10 minutes by piping water directly into the drain, without sending it
into the humidifier; this will eliminate any scale or residues that may cause foam when boiling.
4.1
Startup Checklist
Before starting the humidifier, the following should be checked:
Water is connected, the line has been flushed, and external valves are open.
Drain is connected, run to an open drain, and has a trap under the unit.
Electricity is connected in accordance with instructions, local codes and data labels in the unit.
The power fuses are installed and intact.
All control wiring is done and tested.
Airflow switch is wired to open on air flow loss.
Hi-limit humidistat is wired to open on humidity rise above set point.
Unit wires have been checked to make sure they and all connectors are tight from shipping.
The steam hose(s) are run correctly with no sags or kinks and sloped properly according to the manual.
Condensate hoses are run correctly with no sags or kinks and sloped properly according to the manual.
4.2
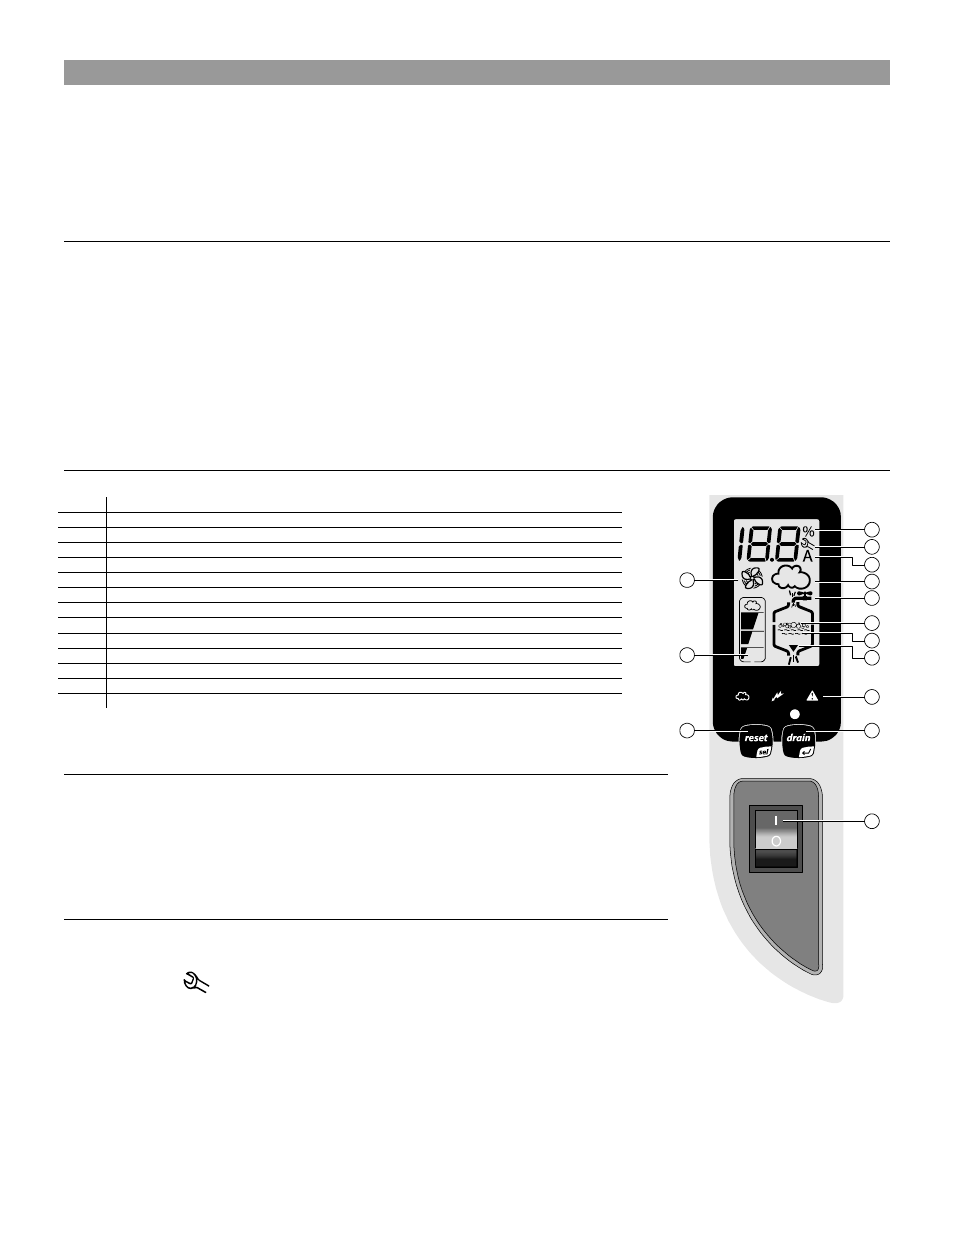
The Elite Steam Controller
The Elite Steam controller features a comprehensive information display that shows the operation of the system at a glance:
1.
Display is % of nominal capacity
2.
Maintenance
3.
Display is amperage (default)
4.
Steam is being produced
5.
Cylinder filling
6.
Foaming
7.
Water presence inside the cylinder
8.
Cylinder draining
9.
LEDs indicate: power (yellow), operation (green) and alarms (red)
10.
Drain button for manual draining of cylinder and confirming parameter values
11.
ON/OFF button
12.
Reset button to reset alarms and access parameters
13.
Level of output: 33%, 66%, 100%
14.
Fan relay is activated
The Elite Steam is now ready to operate.
4.3
Starting Elite Steam
Insure that the external power is turned on.
Push the top part of the On/Off button so that the I part is in. The yellow Power LED will be
lit. The Elite Steam is now ready to operate.
When there is a call for humidity, Elite Steam will close its power relays and send power to
the electrodes in the plastic steam generator. The green Operation LED will light, indicating
that operation has begun.
4.4
Starting with a new cylinder
When starting with a new cylinder, you should activate the cylinder cleaning function as follows:
1. Switch Elite Steam off.
2. Press and hold both buttons, “
reset” and “drain”, and switch Elite Steam back on. When the
wrench blinks
then release the two buttons.
3. Press and hold “
reset” until the display shows 04.
WARNING: DO NOT confirm any value higher than 04. If 05 or higher is displayed, press “reset” until the display goes back to
the normal operating mode and restart from step
4. Press “
drain” (minimum 1 second): the cleaning starts and the display shows PC.
During the cleaning, the electrodes are powered and water is filled in until it touches the high-level sensor or the phase current equals 20A,
whichever occurs first. After either of the events is detected, the boiler is fully discharged with the electrodes un-powered (the drain pump and
the drain tempering valve are activated for 3 minutes). Warming the filling water helps washing out any mould release or dirt. General Filters,
Inc. recommends doing two cleanings when starting a new boiler. After the cleaning ends, the humidifier starts the regular duty. When starting
the unit with a new or empty cylinder, it may take a significant amount of time (hours) for the unit to build up enough mineral concentration to
reach rated capacity. This time can be shortened by the addition of Alka-Seltzer through the steam outlet on top of the cylinder.
1
2
4
5
6
9
10
12
13
14
11
3
7
8