Activeforever Aquaguard Pool Alarm System User Manual
Page 7
AquaGuard Owner’s Guide
RJE Technologies, Inc.
12
AquaGuard Operating Modes
Indication
Condition
Detector Unit
Remote Unit
Response
“ARMED” Mode
Red LED blinks
once every two
seconds
Green LED shows
a steady series of
single blinks.
“ARMED” Mode is the normal operating mode for the AquaGuard
system. When the AquaGuard system is in “ARMED” Mode, an alarm
sounds whenever a fall is detected (or there is similar activity in the
pool).
“SWIM” Mode
Red LED is off
Green LED is off;
Red LED is off
You must place the AquaGuard system in “SWIM” Mode whenever
you wish to use your swimming pool. When the AquaGuard system is
in “SWIM” Mode, activity in the pool will not trigger the alarm. Be sure
a RESPONSIBLE ADULT is present to observe swimming activities
whenever the system is placed in “SWIM” Mode.
To place the system in “SWIM” Mode:
•
From the Detector Unit: Enter 1234 on the Detector Unit keypad.
or
•
From the Remote Unit: Press the Remote Unit OK button three
times.
Once you have placed the system in “SWIM” Mode, you must enter
the pool within 4 to 5 minutes, or the system will return to “ARMED”
Mode automatically. You can also manually reactivate the alarm as
described below.
Re-arm system
Red LED blinks
slowly, and
audible beeps
sound for 10
seconds before
the system returns
to “ARMED” mode
Green LED blinks
slowly while
arming
After swimming, the AquaGuard system will automatically return to
“ARMED” Mode after 4 to 5 minutes. If desired, you can manually
return the system to “ARMED” Mode when the pool is calm.
To reactivate the alarm manually:
•
From the Detector Unit: Press the OK button on the keypad
twice.
•
From the Remote Unit: Press the Remote Unit OK button three
times.
Alarm Condition
Siren sounds.
Siren sounds.
When an entry or another activity in the pool is detected, the alarm
sounds. YOU MUST RESPOND IMMEDIATELY. Press any key on
the Detector Unit keypad or the OK button on the Remote Unit to
silence the alarm.
NOTE: The alarm will turn off automatically three minutes after
activation.
OFF Mode
NONE
NONE
You can turn the AquaGuard system OFF to change the Detector
Unit batteries, or to perform other pool maintenance activities.
NOTE: Be sure a RESPONSIBLE ADULT is present to observe
swimming activities whenever the system is turned OFF.
To turn the system OFF: Enter 1234*99 on the Detector Unit keypad.
To turn the system ON: Enter 1234 on the Detector Unit keypad.
Managing the System
You can use the LED indicators and alarm siren on the Detector Unit or the Remote Unit to monitor
the current state of your AquaGuard system. The following table shows a list of possible system
conditions, the indications associated with each condition, and the proper responses/remedies to
restore normal system operation.
Be sure to correct system faults promptly to avoid an interruption in protection. If a fault cannot be
corrected, contact your reseller for assistance.
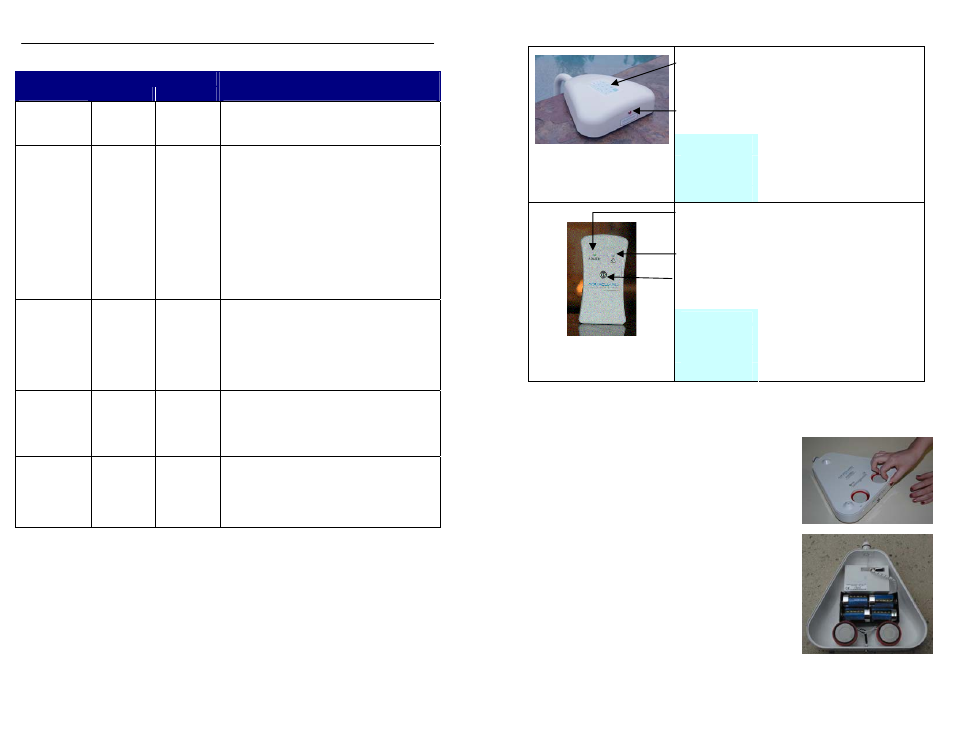
5
Detector Keypad – A PIN code places the detector unit in
standby for swimming, arms the detector and clears an
active alarm.
Detector LED – Provides visual confirmation that the
system is armed.
Low Battery
Audible beeps
(press “OK” once to acknowledge)
Armed
Slow blinking
Not Armed
LED off
Detector Unit is powered by four (4),
standard D-size batteries
Rough Mode
Fast blinking
Green LED on Remote Unit – Provides visual confirmation
when the system is armed. In this mode, an alarm sounds
whenever a fall in the pool is detected.
Red LED on Remote Unit – Provides visual confirmation of
low battery in remote or detector or loss of radio link.
OK Button on Remote Unit – Places the detector in
standby for swimming and also clears an active alarm.
Low Battery
Audible beeps + Red LED
Armed
Green LED blinking
Not Armed
No LED’s blinking
Remote Unit is powered by an AC
adapter
Loss of Radio Link
Red LED blinking fast (3 times/second)
ASSEMBLING THE AQUAGUARD SYSTEM
Installing the Batteries
It is recommended that you use “long life” Alkaline batteries in
both the Detector Unit and the Remote Unit.
Detector Unit:
1.
Remove the two screws at the rear of the Detector Unit.
2.
Turn the unit upside down. Lift up slightly on the base
plate (see photo). Slide the base plate toward the back
of the unit, and remove the base plate from Detector
Unit housing.
3.
Install four “D” size batteries in the battery compartment.
The unit is now on and is calibrating.
4.
Slide the tab on the front of the base plate into the slot in
the nose of the Detector Unit housing, and then lower
the base plate into place.
5.
Reinstall the two screws at the rear of the Detector Unit.
6.
The Detector Unit will emit 10 short beeps, followed by one long beep, indicating that the
system is armed. The rear LED will begin flashing. This can take 5-7 minutes.