Getting acquainted, How to use – Presto Electric Knife Sharpener User Manual
Page 2
1
2
3
Medium
Getting Acquainted
Your Presto
EverSharp
electric knife sharpener will sharpen knives of alloy, carbon, or stainless steel. It is designed to sharpen
kitchen knives and most sporting knives. Do not attempt to sharpen scissors, serrated electric knives, or any blade that does not fit
freely in the blade guides.
The knife sharpener features three interchangeable blade guides. Each guide is labeled at the
back (Heavy, Medium, or Fine) and has an illustration of the type of blade (Fig. A) the guide
should be used for. There is a guide for each of the following blade types:
Heavy blades – for sharpening hunting knives and cleavers.
Medium blades – for sharpening regular kitchen and chef’s knives.
Fine blades – for sharpening fillet, paring knives and other light blades.
Each guide has three pairs of sharpening slots (Fig. B) each corresponding to a sharpening
stage—Coarse Grinding (Stage 1), Medium Grinding (Stage 2), and Honing (Stage 3). The
stages are identified with a number (1, 2, or 3) behind each pair of slots (Fig. A).
If your knife is very dull, you will probably use all three stages, if a bit dull, two
of the stages (2 and 3 – medium and honing), and most frequently, only the third
stage, honing, to maintain your knives at the optimum razor sharp condition.
The interchangeable blade guides take the guesswork out of sharpening by insuring
that the optimum sharpening angle is used for each type of blade you sharpen.
When not in use, the blade guides nest on the sharpener base for compact storage.
Interchanging the Blade Guides
Caution: Always be sure the unit is unplugged before changing the blade guides.
To attach a blade guide to the knife sharpener base, position the guide so that the
stage number and blade description (Heavy, Medium, or Fine) are right side up and
you are looking down at them. Next rotate the guide away from you so that you
can insert the two hooks on the back of the guide in the two pockets on the back
of the base (Fig. C). Rotate the guide forward so the two sets of tabs on the front of the
guide fit into the two pockets on the front of the base. Press down until guide snaps into
place (Fig. D).
Remove the guide, by grasping it with both hands, placing your thumbs above the lip
(Fig. D) and your fingers on the back of the guide where the blade descriptions (Heavy,
Medium, or Fine) are printed. Push down on the front of the guide with your thumbs and
use your fingers to lift and rotate the back of the guide towards you. That will release the
two back hooks. Continue lifting to free the two front tabs.
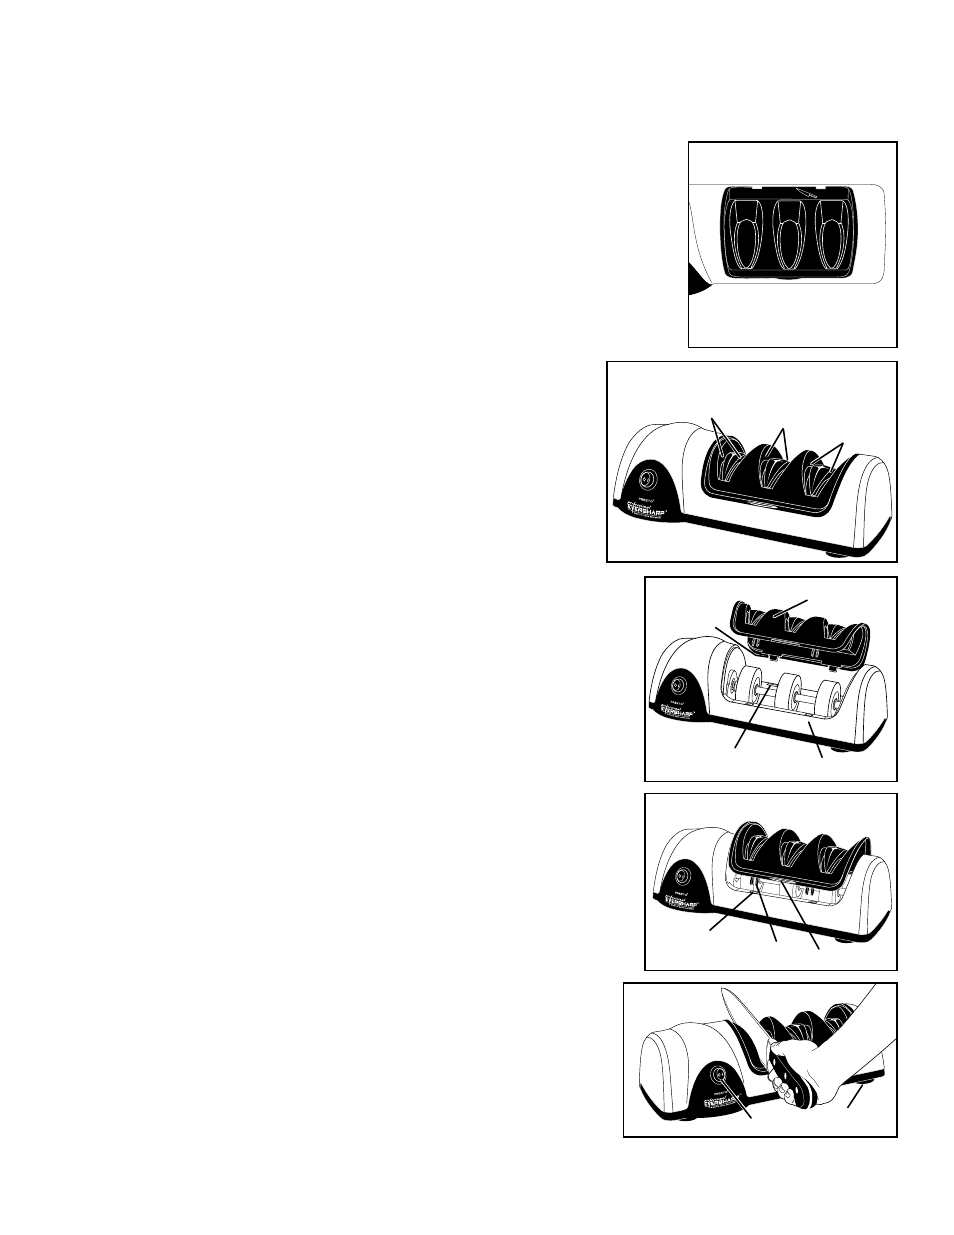
How To Use
1. For best results, moisten the bottom of the suction feet on the knife sharpener base and
place the unit on a stable surface.
2. Select the appropriate blade guide for the type of knife being sharpened (see “Getting
Acquainted” above) and attach the blade guide as described above. Plug cord into
outlet.
3. Turn the unit On by pressing the symbol “ l ” on the on/off switch (Fig. E).
4. Evaluate the condition of your blade to determine which sharpening stage to start
with:
If the blade is very dull or if you are sharpening the knife for the first time, begin
with STAGE l – COARSE GRINDING. This is the stage located on the left,
nearest the on/off switch. This stage begins sharpening and creates a precision
angled edge. Follow the sharpening procedure as described on page 3, beginning
with Stage 1 and followed by Stages 2 and 3.
(Note: Do not use Stage 1 when sharpening serrated blades.)
If your knife is a bit dull, begin with STAGE 2 – MEDIUM GRINDING.
This is the stage located in the middle; it continues the grinding by giving the
blade a precision edge. Follow the sharpening procedure as described on page 3,
beginning with Stage 2 and followed by Stage 3.
Stage 2
Left and
right slots
Stage 1
Left and
right slots
Stage 3
Left and
right slots
Fig. B
Top View of
Interchangeable Blade Guide
Stage 1
Coarse
Grinding
Stage 2
Medium
Grinding
Stage 3
Honing
Fig. A
Fig. C
Fig. D
Interchangeable
blade guide
Hook
Back pockets
Knife sharpener base
Tabs
Front pockets
Lip
On/Off switch
Suction feet
Fig. E
2