Kustom KGA30 User Manual
Page 3
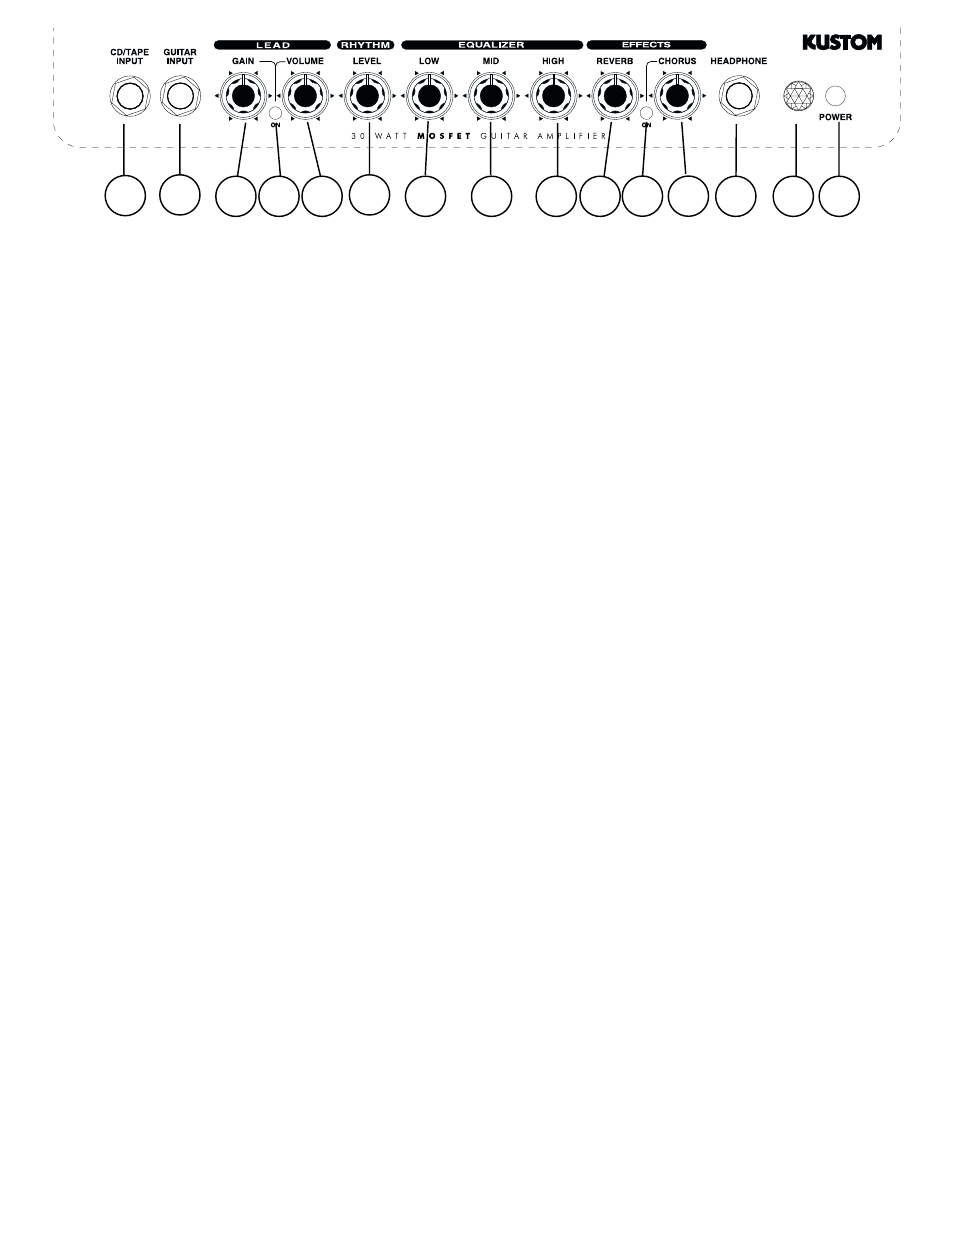
1.) CD/Tape Input - this 1/4 3 conductor jack will allow you to plug in a CD player, tape or any other source to
practice along with. It sums the left and right signals into a mono signal. To control the volume of the source,
adjust the output volume of the device. We suggest you turn the volume all the way down then plug in and adjust
the volume according to your taste.
2.) Guitar Input Jack - this is a 1/4 2 conductor input jack for plugging in your instrument. It is intended for
guitars but will accept other instruments as well.
3.) Lead Gain - adjust this clockwise to increase the amount of distortion you add to the overdrive signal. Used
in the lower ranges of the control, you get a less distorted sound, a bluesy tone. As you increase the gain, you
add tremendous amounts of distortion to the signal for a harder edged crunch tone.
4.) Channel Switch - this switch selects which preamp you are using. It will switch between the Rhythm and
Lead channels.
5.) Lead Volume - this control is the output volume control for the Lead Channel. It follows the same tone circuit
as the other channel. Its gain structure is determined by the lead gain control but this serves as the overall
master volume for this channel.
6.) Rhythm Level - this is the volume control for the clean channel. Its gain structure is preset for maximum
signal before distortion and determines the output level of the amp.
7.) Bass - this control is the bass control. It is passive and set to shelve frequencies at 65 Hz. This will effect
the low frequency signals. Turning it fully clockwise, the signal is left alone. Turning it counterclockwise, the lows
will be rolled off.
8.) Mid - this control is the midrange control. It is passive and set to shelve frequencies at 1KHz. This will effect
the middle frequency signals. Turning it counterclockwise, your signal will hollow out the mids which is popular
in todays music.
9.) High - this control is the high control. It is passive and set to shelve frequencies at 5KHz. This will effect the
high frequency signals. Turning it fully clockwise, the signal is left alone. Turning it counterclockwise, the highs
will be rolled off.
10.) Reverb Level - this control adds the spring reverb and mixes it into the main signal buss. Reverberation
creates a trail like effect with the sound. It lets the notes hang in the air longer, extending the sound.
11.) Chorus On/Off Switch - this is the switch to turn on and off the chorus circuit.
12.) Chorus Level - this is the Speed Control for the chorus circuit.
13) Headphone Jack - this is a 1/4 3 conductor jack for plugging headphones. It will sum the signal and put
the sound in both ears, thereby creating a pseudo-stereo sound. Volume will be determined by the volume control
on the channel you are on. It will disconnect the internal speaker when plugged in. This will allow quiet practicing.
14.) Jewel Light - this jewel light lets you know that the amplifier is on.
15.) Power - this switch turns on and off the AC power to the amp.
Back Panel - (not pictured)
Speaker Out - this is a 2 conductor 1/4 speaker output jack. This will disconnect the internal speaker and allow
an external speaker cabinet to be employed. Rating is 8 ohms.
Line Output - this is a 2 conductor 1/4 line output jack. This will allow an external amplifier or mixing board to
be supplied with the signal from this amp. This signal is attenuated and comes from the power amp.
Effects Loop I/O - these are 2-2 conductor 1/4 jacks. This will allow an external effects device or equalizer to be
patched back in before the power amp section in this amp. One is send and the other is return.
Footswitch Jack - this is a 3 conductor 1/4 jack. This is for hooking up a footswitch to switch channels and to
turn on/off the chorus.
KGA30
1
2
3
4
5
6
7
8
9
10
13
14 15
12
11