MB QUART PSC 210 User Manual
Page 3
Q U A R T M O B I L P S C 2 1 0
Q U A R T M O B I L P S C 2 1 0
Montagehinweis
Instrucciones para el montaje
Mounting instructions
Montagehinweis
Instrucciones para el montaje
Mounting instructions
Montagehinweis
Instrucciones para el montaje
Mounting instructions
E I N B A U A N L E I T U N G / I N S T U C C I O N E S D E M O N TA J E / I N S TA L L AT I O N I N S T R U C T I O N S
EINBAU VON LAUTSPRECHERKOMPONENTEN MIT DEN
BEIGEFÜGTEN MONTAGETEILEN
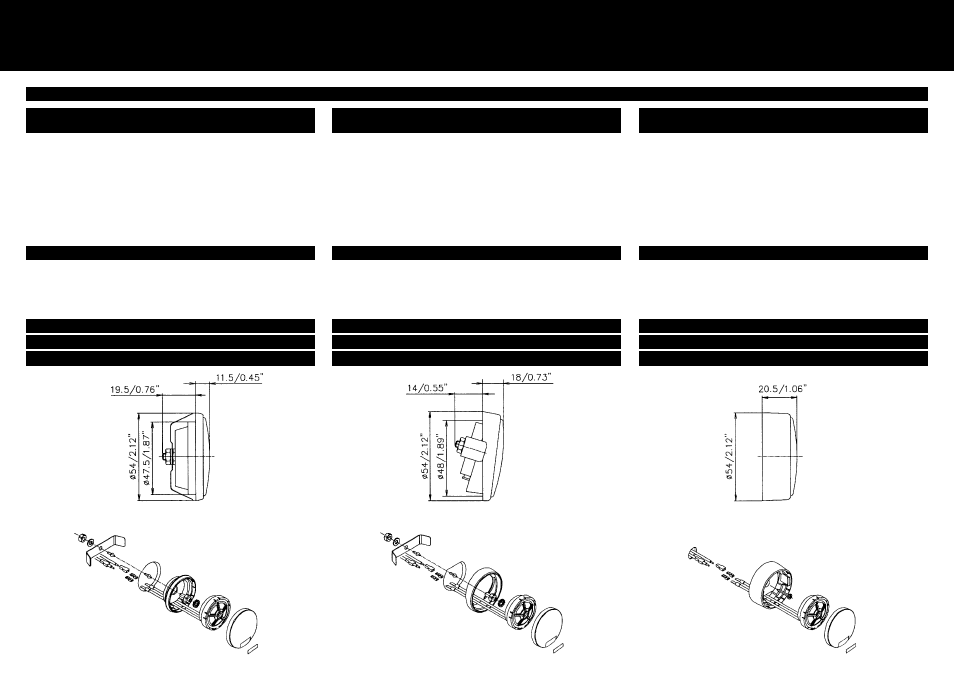
Wählen Sie anhand der Maßskizzen, den beigefügten Montageteilen und Einbauschab-
lonen und den in der Montageanleitung aufgezeigten Einbaumöglichkeiten einen geeig-
neten Montageplatz in Ihrem Fahrzeug aus.
Achten Sie dabei darauf, daß keine beweglichen Teile (Fensterkurbel, Seitenfenster,
Türöffner etc.) den montierten Lautsprecher berühren.
Schneiden Sie die Einbauöffnung am gewählten Montageplatz mit Hilfe der Einbauringe
oder -schablonen aus und bringen Sie evtl. benötigte Bohrungen an.
Verbinden Sie die Anschlüsse der Lautsprecher mit den Elektronikkomponenten wie in
den Schaubildern beschrieben. (Polung beachten!)
Sind die Lautsprecher montiert und verdrahtet, fahren Sie bitte wie im Abschnitt „Funk-
tionstest“ beschrieben fort.
FUNKTIONSTEST
Nach Feststellung der korrekten Funktion können Sie bei abgeschalteter Anlage die
Polung beider Hochtöner einmal ändern (PLUS und MINUS vertauschen). Dies kann je
nach Einbausituation zu einer besseren räumlichen Abbildung führen.
MONTAJE DE LOS COMPONENTES DE LOS ALTAVOCES
CON LAS PIEZAS DE MONTAJE ADJUNTAS
Atendiendo a los esquemas de medidas, a las piezas de montaje adjuntas, a
las plantillas para el montaje y a los posibles montajes mostrados en las instrucciones
de montaje, elija el lugar más apropiado para el montaje en su vehículo.
Al hacer esta elección aseg˙rese de que ninguna pieza móvil (manivela alzacristales,
ventanilla lateral, manilla de la puerta, etc.) pueda rozar con el altavoz cuando esté
montado. Recorte el hueco para el montaje en el lugar elegido sirviéndose del anillo
o de las plantillas de montaje, y haga los taladros que pueda necesitar. Conecte los
altavoces con los componentes electrónicos tal y como se describe en los diagramas
(¡atienda a la polaridad!).
Una vez que haya montado y cableado los altavoces, siga las instrucciones del aparta-
do „Test de funcionamiento“.
TEST DE FUNCIONAMIENTO
Después de haber comprobado que los altavoces funcionan correctamente, puede
desconectar el equipo y cambiar los polos de ambos altavoces de agudos (permutar
las posiciones POSITIVO y NEGATIVO). Seg˙n el lugar donde se hayan montado los
altavoces, con este cambio de polaridad es posible que el sonido se reproduzca mejor
en el espacio.
INSTALLATION OF LOUDSPEAKER COMPONENTS WITH
THE ENCLOSED ASSEMBLY PARTS
Choose a suitable installation position in your vehicle using the dimensioned sketches,
the enclosed assembly parts, the installation templates and the installation possibilities
described in the assembly instructions. Take care that no moving parts (window hand-
le, side windows, door handles etc) touch the assembled loudspeaker.
Cut out the installation opening of the chosen installation position with the help of the
installation rings or templates and drill holes if necessary. Connect the wires of the
loudspeakers to the electronic components, as described in the diagrams (observe
polarity!). When the loudspeakers are assembled and wired, please continue as descri-
bed in the „Function test“ section.
FUNCTION TEST
After ensuring the loudspeakers are functioning correctly, you can change the polarity
of both tweeters (exchange positive and negative) while the system is disconnected.
Depending on the installation situation, this can lead to improved acoustics.