Centre led pendants, Led pendant fixtures – AFX CNP240041LSNPWH User Manual
Page 2
CENTRE LED PENDANTS
Models: CNP2400 Series
2 of 2
Limited Factory Warranty
AFX Lighting warrants this fixture is free from defects in materials and workmanship when installed and used under normal ope
date of purchase. This warranty covers all component parts and extends only to replacement of defective fixture or components; it does not cover failure due to impr
installation, misuse, mishandling or damage incurred in transit
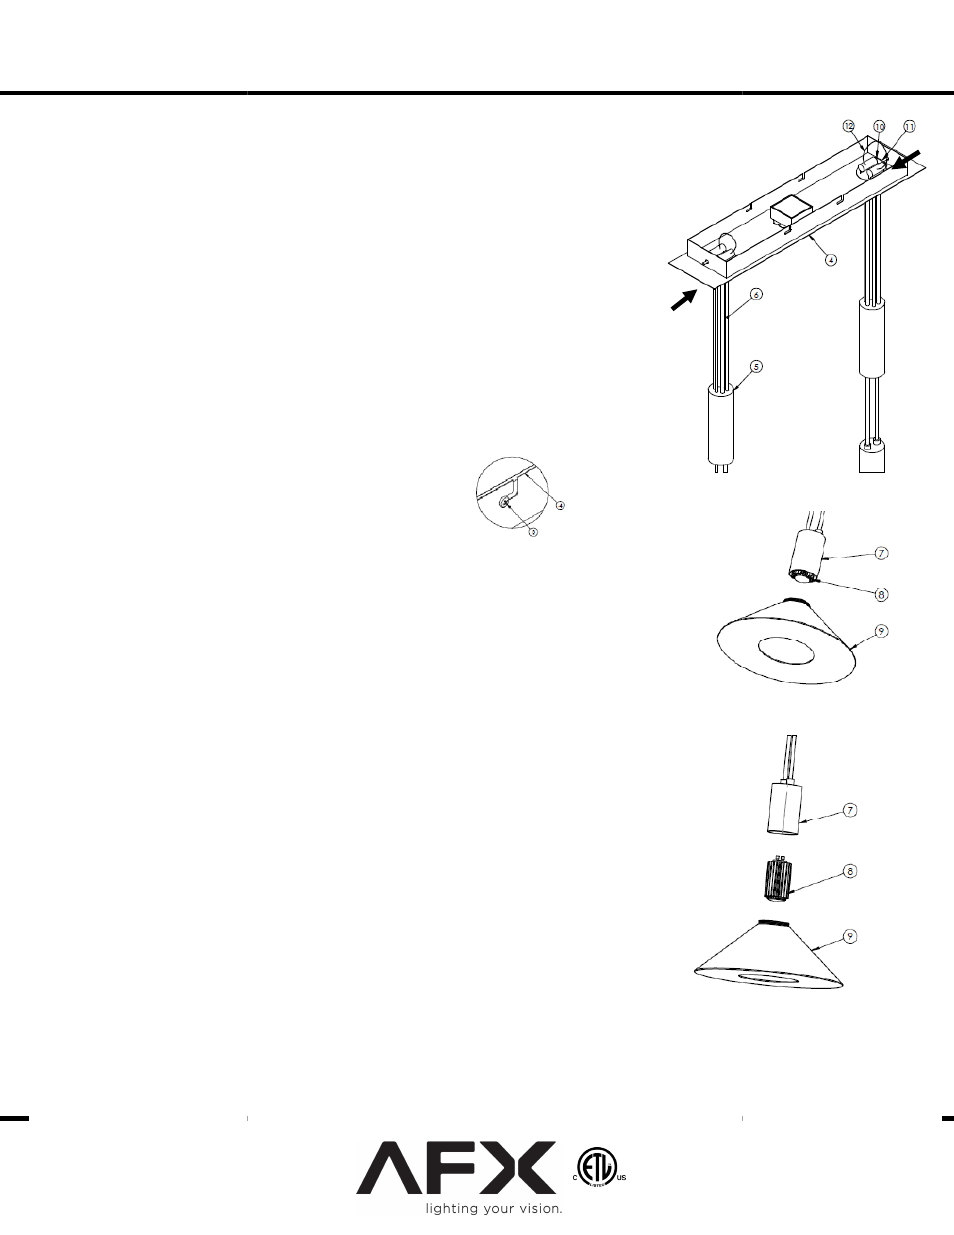
3. Mounting
A. (drivers are not shown)
Make sure all six cables (6)
balance (5) are all the same length. If any length adjustment is needed,
fixture so the balance will be free hanging on the cables.
knob (11) in the direction of the arrow
pulled by the weight of the balance (5) until they
.
B. Align the canopy (4) open slots with four gem bar screws (3
Install the fixture by inserting
screws thru the
canopy (4) open slots and
Tighten the screws.
4. Shade Installation.
A. Thread in the glass shade (9) metal insert into the lamp holder (7) and tighten it.
5. Restore power at fuse or circuit breaker box.
6. Replacement of LED Module.
A. Remove Diffuser (9) by turning it counter clockwise
B. Hold the housing (7) and turn LED module (6) counter clockwise to remove it.
C. Insert new LED lamp into the lamp socket
housing (5) and turn it clockwise until
place.
D. Re-attached glass diffuser.
CENTRE LED PENDANTS
CNP2400 Series
AFX Lighting warrants this fixture is free from defects in materials and workmanship when installed and used under normal ope
all component parts and extends only to replacement of defective fixture or components; it does not cover failure due to impr
installation, misuse, mishandling or damage incurred in transit
not shown):
cables (6) for each light between the canopy (4) and the
the same length. If any length adjustment is needed,
fixture so the balance will be free hanging on the cables. Push the
in the direction of the arrow to even the cable length. The cables are
pulled by the weight of the balance (5) until they are all the same length.
Align the canopy (4) open slots with four gem bar screws (3
Install the fixture by inserting the heads of the
and shifting it until it stops.
Thread in the glass shade (9) metal insert into the lamp holder (7) and tighten it.
Restore power at fuse or circuit breaker box.
D Module.
Remove Diffuser (9) by turning it counter clockwise.
and turn LED module (6) counter clockwise to remove it.
Insert new LED lamp into the lamp socket located in the
(5) and turn it clockwise until the lamp snaps in
attached glass diffuser.
LED Pendant Fixtures
120VAC / 60Hz
AFX Lighting warrants this fixture is free from defects in materials and workmanship when installed and used under normal operating conditions for a period of 3 years from
all component parts and extends only to replacement of defective fixture or components; it does not cover failure due to impr
between the canopy (4) and the
the same length. If any length adjustment is needed, hold the
Push the adjustment
ble length. The cables are
all the same length.
Align the canopy (4) open slots with four gem bar screws (3).
Thread in the glass shade (9) metal insert into the lamp holder (7) and tighten it.
and turn LED module (6) counter clockwise to remove it.
located in the
LED Pendant Fixtures
8060744 R0
rating conditions for a period of 3 years from
all component parts and extends only to replacement of defective fixture or components; it does not cover failure due to improper