Installation ii (joist mounting), Installation (joist mounting- ), Important – Panasonic FV-08VKML2 User Manual
Page 11: Ii iii
(FV-08VKML2)
(FV-08VKSL2)
Fig.8
Fig.9
Fig.10
Circular duct
Conduit
Inches (mm)
Joist
Junction box cover
INSTALLATION
(JOIST MOUNTING- )
(When spacing the fan body flange below the drywall or resilient channel)
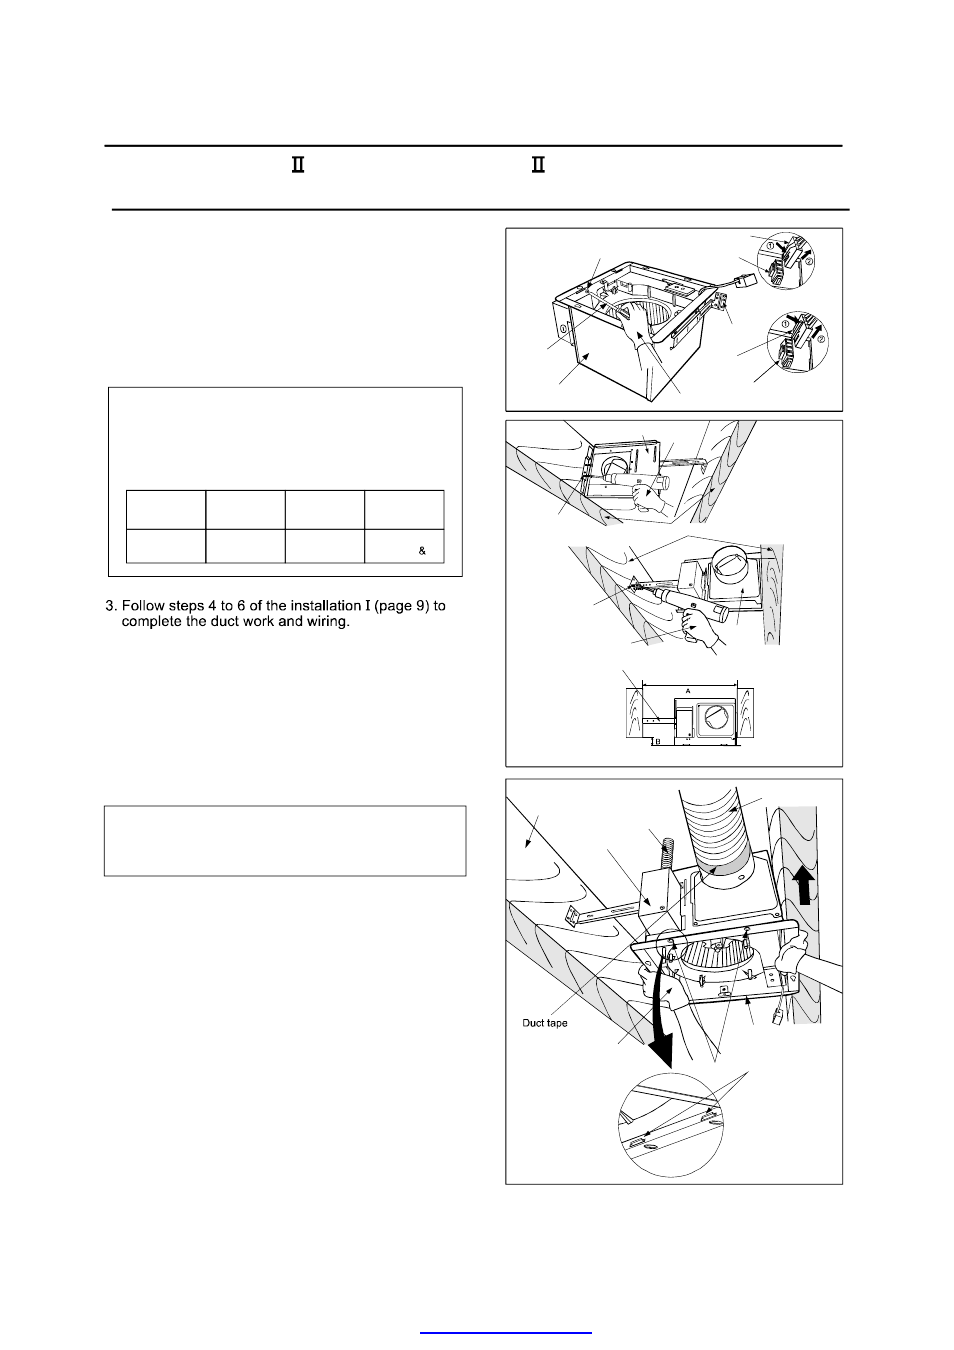
1. Remove the machine screw by using screw driver,
disconnect plug connector from receptacle and
remove adaptor from fan body before installation,
(Fig.8)
4. Insert the suspension bracket into fan body (refering
to step 1 of installation , page 8)
I
5. Insert the fan body into joists. (Fig.10)
IMPORTANT:
Make sure that adaptor claws are properly inserted
into fan body slots.
2. Insert the suspension bracket into the adaptor and
secure it to joists by using long screws (ST4.2X20) (Fig.9)
Keep the distance B (1/ inch, 12.7mm or 5/8 inch,
15.9mm) for the thickness of ceiling board.
2
Spacing A
between Joists
inches (mm)
Suspension
bracket
Suspension
bracket
I
Suspension
bracket
III
Suspension
bracket
II III
If spacing A between joists is 21 1/4 to 23 1/
inches (540 to 597mm), connect suspension
bracket
and
(C4 mark to C4 mark) according
to page. 8 Select the suspension bracket
according to spacing A as shown below:
II
III
2
13 1/4 15 1/
(336 394)
~
~
2
16 1/
18 3/4
(419
)
~
~480
2
21 1/4 23 1/
(540 597)
~
~
2
Machine screw
Screw driver
Fan body
Fan body
Slots
Adaptor
claws
Gloves
Gloves
Gloves
Gloves
Adaptor
Adaptor
2 Long screws
(ST4.2X20)
2 Long screws
(ST4.2X20)
Joists
Suspension
bracket
I
Suspension bracket
16 1/2 18 3/4 (419 480)
~
~
13 1/4 15 1/2 (336 394)
~
~
21 1/4 23 1/2 (540 597)
~
~
1/ (12.7)
2
5/8 (15.9)
11
Receptacle
Receptacle
plug
connector
plug connector
PDF created with pdfFactory Pro trial versi