English, Front panel features, Rear panel features – ALESIS DM6 User Manual
Page 3
1
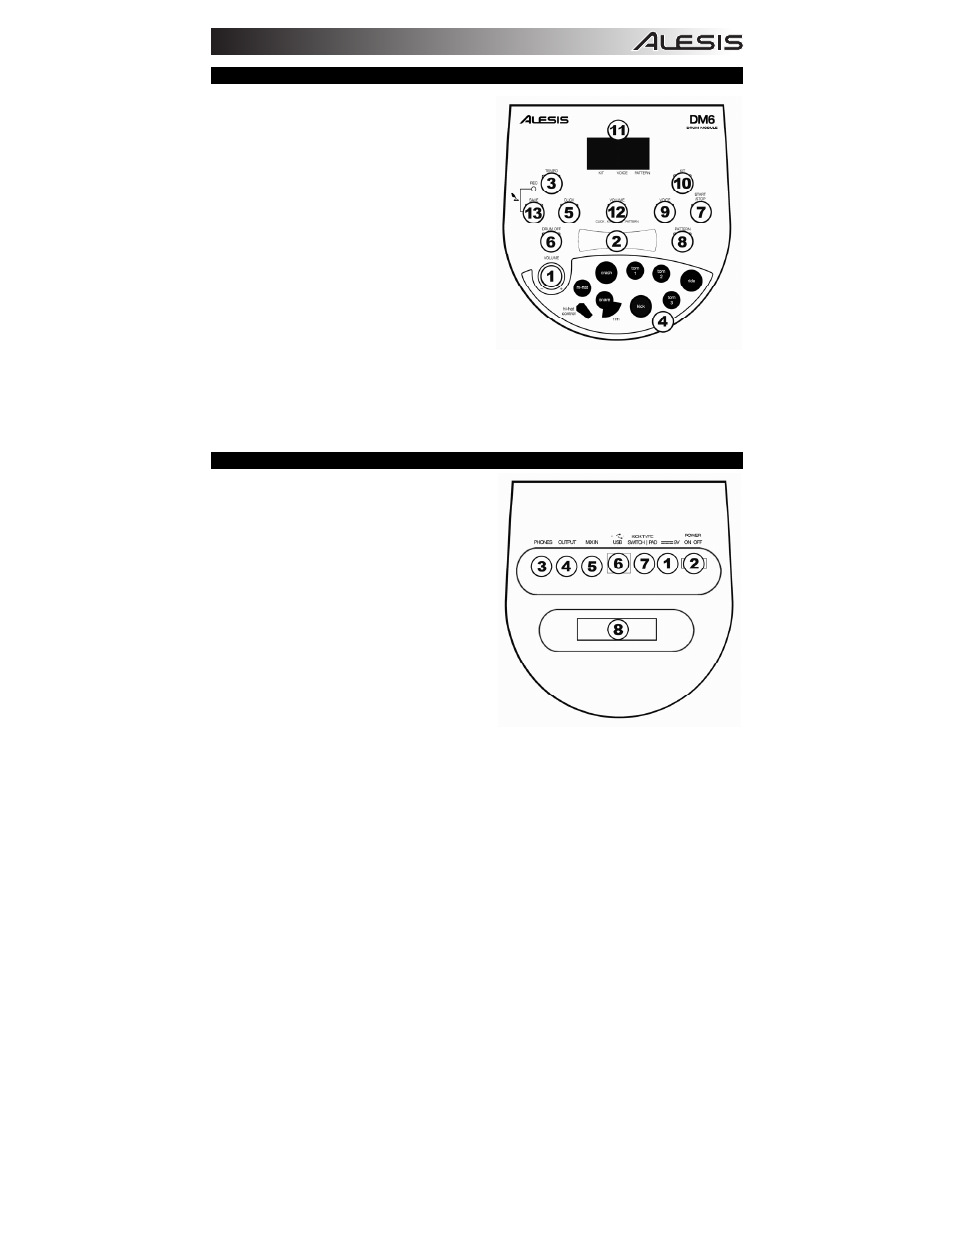
FRONT PANEL FEATURES
1.
VOLUME – Adjusts the module's master volume
level.
2.
VALUE +/- – Decreases or increases the value of
each parameter.
3.
TEMPO / TAP – Enters Tempo Adjustment
Mode.
4.
PAD INDICATORS – Displays the pads currently
being played.
5.
CLICK – Turns the metronome on or off.
6.
DRUM OFF – Mutes or unmutes the drum part of
the song (Pattern) being played.
7.
START / STOP – Starts or stops the current
Pattern.
8.
PATTERN – Enters Pattern Select Mode where
you can select the Pattern and the MIDI output
format.
9.
VOICE – Enters Voice Select Mode.
10.
KIT – Enters Kit Select Mode.
11.
LCD – Displays the current parameter values and indicator lights for Kit, Voice, and Pattern.
12.
VOLUME – Enters Volume Adjustment Mode to adjust the volumes of Kits, Voices, Patterns, and the
metronome separately.
13.
SAVE / REC – Press once to save the current Kit to a User Kit. Press and hold to enter Record Mode.
REAR PANEL FEATURES
1.
POWER IN – Connect the power adapter here,
then connect the adapter to wall power.
2.
POWER SWITCH – Turns the module on or off.
3.
HEADPHONES – You can connect a set of 1/8"
headphones to this output.
4.
STEREO OUTPUT – You can connect an optional
speaker system, recording input, etc. to this 1/8"
output.
5.
MIX INPUT – Connect the output of an external
audio source, such as a CD player, to this stereo
1/8" input.
6.
USB PORT – Connect this port to a computer or
other USB device with the included standard USB
cable.
7.
KICK TYPE SWITCH – Set this switch to select
the type of kick drum you are using with the
module. Select "SWITCH" if the kick pedal is a
simple footswitch. Select "PAD" if the kick pedal
is a velocity-sensitive pad (with a standard kick drum pedal).
8.
TRIGGER INPUT CONNECTION – Connect the included cable snake to this connector, then connect
the cables to their respective triggers. See the included separate Assembly Guide for setup
instructions.